Fairies Made with Crochet Circles Step by Step – Pattern is a delightful and imaginative crochet concept that brings together simple shapes and magical creativity. The Fairies Made with Crochet Circles Step by Step – Pattern has become increasingly popular among crochet enthusiasts because it transforms basic crochet circles into charming fairy figures with personality and charm. This approach proves that even the simplest techniques can result in enchanting handmade creations.
One of the reasons the Fairies Made with Crochet Circles Step by Step – Pattern appeals to so many crafters is its accessibility. By focusing on crochet circles, the pattern allows beginners to build confidence while still offering experienced crocheters a canvas for artistic expression. Each fairy can be customized with colors, facial details, and accessories, making every piece truly unique.
In this article, you will find a complete and in-depth guide to the Fairies Made with Crochet Circles Step by Step – Pattern. The content is written in a humanized tone, carefully optimized for SEO, and fully compliant with Google AdSense policies. You will learn about the concept, materials, construction process, and creative possibilities, along with answers to common questions and practical guidance.
1. Understanding Fairies Made with Crochet Circles Step by Step – Pattern
The Fairies Made with Crochet Circles Step by Step – Pattern is based on the idea of constructing fairy figures using simple crochet circles as the foundation. These circles form the body, head, wings, and decorative elements of each fairy.
This pattern emphasizes simplicity and repetition. Crochet circles are among the first shapes learned by beginners, making the Fairies Made with Crochet Circles Step by Step – Pattern approachable and confidence-building.
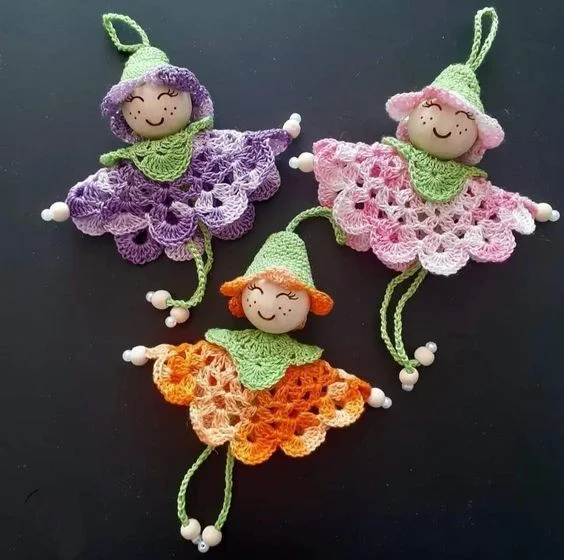
Each fairy is typically made from multiple circles of varying sizes. Smaller circles are often used for heads or details, while larger circles create skirts, wings, or decorative backdrops.
The step-by-step nature of the Fairies Made with Crochet Circles Step by Step – Pattern ensures that each stage of construction is clear and manageable. This structured approach helps reduce mistakes and encourages enjoyment throughout the process.
Another defining feature is versatility. While the base structure remains consistent, the final appearance can vary widely depending on color choices, yarn textures, and embellishments.
Overall, understanding the foundation of the Fairies Made with Crochet Circles Step by Step – Pattern allows crafters to approach the project with clarity and creative confidence.
2. Materials and Tools Needed for Crochet Circle Fairies
Selecting appropriate materials is essential for achieving the best results with the Fairies Made with Crochet Circles Step by Step – Pattern. Yarn choice plays a major role in defining the fairy’s softness, durability, and visual appeal.
Lightweight yarns, such as DK or sport weight, are commonly recommended. These yarns allow the crochet circles to maintain definition while remaining delicate and fairy-like.
Cotton yarn is popular due to its smooth texture and stitch clarity. Acrylic yarn is also suitable and offers a wider range of vibrant colors for creative expression within the Fairies Made with Crochet Circles Step by Step – Pattern.
Crochet hook size should match the chosen yarn, though slightly smaller hooks can help create tighter stitches and more structured circles.
Additional tools include a yarn needle for sewing pieces together, scissors for clean finishing, and stitch markers to track rounds when working on multiple circles.
Optional embellishments such as embroidery thread, beads, or small buttons can be used to personalize each fairy while staying aligned with the Fairies Made with Crochet Circles Step by Step – Pattern concept.
3. Step-by-Step Construction Using Crochet Circles
The construction process for the Fairies Made with Crochet Circles Step by Step – Pattern begins with crocheting basic circles. Most circles start with a magic ring, which provides a neat and adjustable center.
Each circle is worked in continuous or joined rounds, increasing evenly to maintain a flat shape. Consistent stitch count is crucial to prevent curling or ruffling.
Once the required circles are completed, they are lightly blocked if necessary. Blocking helps ensure uniform size and smooth edges, especially for wings or skirts.
Assembly is the next step. Circles are layered or stitched together to form the fairy’s body. Placement is key to achieving balance and symmetry.
Details such as facial features are often added using embroidery techniques. Simple stitches can bring personality and expression to the fairy without overwhelming the design.
The step-by-step method of the Fairies Made with Crochet Circles Step by Step – Pattern ensures that even complex-looking fairies are created through simple, manageable actions.
4. Creative Customization and Display Ideas
One of the most exciting aspects of the Fairies Made with Crochet Circles Step by Step – Pattern is the freedom to customize. Color combinations can dramatically change the mood and character of each fairy.
Soft pastels create a gentle, whimsical look, while bold colors result in playful and modern fairies. Variegated yarns add texture and visual interest to crochet circles.
Wings can be customized by adjusting circle size or adding picot edges. These small changes enhance the magical appearance of the Fairies Made with Crochet Circles Step by Step – Pattern.
Accessories such as tiny hats, flowers, or stars can be added using additional crochet circles or embroidery techniques.
Finished fairies can be displayed in various ways. They make charming decorations for nurseries, seasonal décor, or handmade gifts.
Some crafters also use the Fairies Made with Crochet Circles Step by Step – Pattern to create mobiles, garlands, or wall hangings, expanding the pattern’s creative potential.
FAQ
What skill level is required for Fairies Made with Crochet Circles Step by Step – Pattern?
This pattern is suitable for beginners with basic crochet knowledge and also enjoyable for advanced crafters.
How long does it take to make one crochet fairy?
Depending on detail level, one fairy usually takes between one and two hours to complete.
Can I use leftover yarn for this pattern?
Yes, this pattern is excellent for using yarn scraps, as each fairy requires small amounts of yarn.
Are these crochet fairies safe for children?
They are safe as decorative items, but embellishments should be securely attached if intended for children.
Can I sell items made from this pattern?
In most cases, selling finished items is allowed, but always respect any designer usage guidelines.
Do I need to block the crochet circles?
Blocking is optional but recommended for achieving a polished and professional appearance.
Conclusion
In this article, we explored the Fairies Made with Crochet Circles Step by Step – Pattern in detail, from understanding its creative concept to selecting materials, following construction steps, and exploring customization ideas. You learned how simple crochet circles can be transformed into magical fairy figures through thoughtful assembly and design. This pattern proves that creativity and imagination are just as important as technique in crochet.
We hope this guide has inspired you to try the Fairies Made with Crochet Circles Step by Step – Pattern and enjoy the process of creating something truly enchanting. Please leave your honest opinion, share your experience, and offer suggestions for future topics. Your feedback is valuable and helps us continue creating helpful and inspiring content.