Creating fairy doll keychains em crochet – pattern is a charming and enjoyable project that combines creativity with functionality. These miniature fairy dolls, crocheted with care and detail, make adorable keychains that can brighten your everyday items or become thoughtful handmade gifts. Whether you’re a seasoned crocheter or just starting, crafting these fairy doll keychains adds a magical touch to your accessory collection.
The beauty of the fairy doll keychains em crochet – pattern lies in their versatility. You can customize colors, embellishments, and even the style of each fairy to reflect your personality or those of your friends and family. This project is not only a creative outlet but also a perfect way to hone your crochet skills by working on small, intricate details like wings, hair, and facial features.
Moreover, these keychains serve a practical purpose. They help organize keys, adorn bags, or become collectibles. Their lightweight and durable nature make them ideal for everyday use, and the handmade aspect adds sentimental value that mass-produced items simply can’t match. In this article, you’ll learn everything about the fairy doll keychains em crochet – pattern, from materials to creative customization tips.
1. Understanding the Basics of Fairy Doll Keychains Em Crochet – Pattern
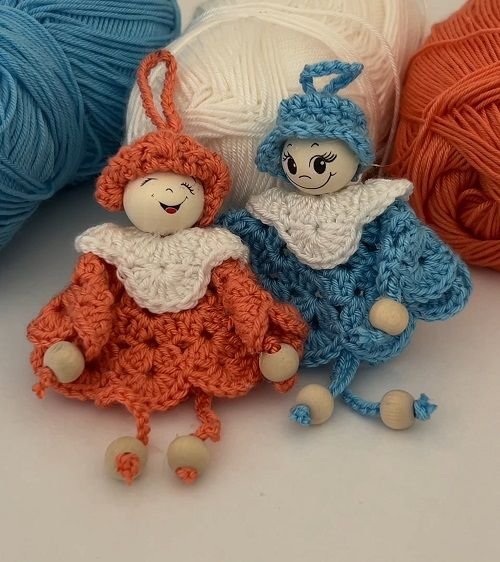
The fairy doll keychains em crochet – pattern typically involve crafting a small doll using basic crochet stitches such as single crochet, double crochet, and slip stitches. The pattern usually starts with the head and body, then moves on to intricate parts like wings, hair, and clothes.
Creating a keychain version means keeping the size compact while ensuring the details remain visible and charming. This balance is what makes the project enjoyable and a little challenging. Because of their size, these keychains require patience but reward you with delightful, wearable art.
This pattern often uses soft, lightweight yarns like cotton or acrylic blends to maintain durability without weighing down the keychain. Adding a metal or plastic keyring at the end allows the doll to be attached to keys, backpacks, or purses easily.
Another essential element is safety; secure stitching ensures the keychain withstands daily wear and tear. For those making keychains for children, non-toxic, hypoallergenic yarns and safety eyes or embroidered faces are preferable.
The fairy doll keychains em crochet – pattern offers room for endless personalization. You can create fairies of various skin tones, hair colors, and wing styles, making each doll truly one of a kind.
2. Materials and Tools Needed for the Project
Starting the fairy doll keychains em crochet – pattern requires gathering specific materials and tools to make the crafting process smooth and enjoyable. First, select your yarn carefully. Cotton yarn is popular because it holds shape well and feels soft against the skin, but acrylic yarn is also a budget-friendly alternative.
You’ll need a small crochet hook, usually between 2.5mm and 3.5mm, depending on your yarn choice. This smaller hook size helps create tight stitches necessary for maintaining the doll’s shape and detail.
Other essential tools include a tapestry needle for weaving in ends, scissors, and stitch markers to keep track of rounds or stitches. For the keychain attachment, you’ll require metal keyrings or lobster clasps, which can be easily found in craft stores or online.
Safety eyes or embroidery thread will add personality to your fairy doll’s face. Embroidering the face is often safer and more child-friendly, while safety eyes provide a polished look.
You may also want to have some small embellishments on hand, such as beads, ribbons, or tiny buttons, to decorate your fairy’s dress or wings. These final touches add charm and uniqueness to each keychain.
3. Step-by-Step Guide to Crocheting Your Fairy Doll Keychain
To start your fairy doll keychains em crochet – pattern, begin by crocheting the head. Usually, you work in a round, starting with a magic ring and increasing stitches to form a sphere. Stuff the head lightly with fiberfill to give it a soft shape.
Next, crochet the body, which is typically a simple tube shape, narrowing as you approach the waist. Consistent stitch tension is crucial to ensure the body is smooth and firm.
The arms and legs are often worked separately as small tubes or oval shapes and sewn onto the body. Keep these limbs proportional to the size of the head and body for balance.
Wings are a defining feature of fairy dolls. They can be made using openwork stitches like chains and single crochets to create a delicate look. Once completed, attach them securely to the back of the doll.
The hair can be created using strands of yarn tied or crocheted onto the head. You can style it in braids, curls, or loose strands to match the personality you want your fairy to have.
Finally, attach the metal keyring or lobster clasp to the top of the doll, ensuring it’s firmly secured. Weave in all loose ends, and your fairy doll keychain is ready to charm!
4. Creative Ideas and Customizations for Your Fairy Doll Keychain
One of the joys of making fairy doll keychains em crochet – pattern is the ability to customize each piece uniquely. You can experiment with different yarn colors for skin, hair, and clothing to reflect diverse fairy characters.
Consider adding tiny accessories like miniature hats, scarves, or even glasses made from wire or yarn. These additions give your fairies personality and make them perfect gifts.
For wing designs, try using sparkly or metallic yarn to add a magical shimmer effect. You can also crochet wings with layered stitches for a 3D look that truly stands out.
Another idea is to create themed fairy keychains, such as seasonal fairies representing spring, summer, autumn, and winter with corresponding colors and accessories.
You can also personalize fairies by embroidering initials or small symbols onto their dresses, making them memorable keepsakes for special occasions.
Lastly, packaging your fairy doll keychains in cute gift bags or boxes enhances their appeal if you plan to sell or gift them.
FAQ – Frequently Asked Questions About Fairy Doll Keychains Em Crochet – Pattern
Q1: Is this pattern suitable for beginners?
Yes, with basic knowledge of crochet stitches and techniques, beginners can follow this pattern. The small size helps build skills in working with tight stitches.
Q2: What yarn is best for these keychains?
Cotton yarn is ideal for its durability and softness, but acrylic yarn is also suitable and more budget-friendly.
Q3: How do I safely add eyes to the fairy doll?
Embroidery is safest, especially for children’s toys. Safety eyes are an option for adult-made pieces but require secure attachment.
Q4: Can I wash these crochet keychains?
Yes, gentle hand washing is recommended to maintain shape and color. Avoid machine washing unless you use very sturdy yarn.
Q5: How long does it take to make one fairy doll keychain?
Depending on your skill level, it can take anywhere from 2 to 5 hours to complete one.
Q6: Can I sell the finished keychains?
Yes, as long as you respect any pattern copyrights. Handmade crochet keychains are popular items at craft fairs and online shops.
Conclusion
The fairy doll keychains em crochet – pattern offers a wonderful opportunity to create enchanting, handmade accessories that combine art and function. Through this article, you’ve learned the essentials—from materials and step-by-step instructions to imaginative customization ideas. These delightful crochet fairies not only make perfect gifts but also bring joy to your daily life as charming companions on your keys or bags.
We’d love to hear your sincere opinions and see your creative twists on this pattern. Please leave your comments and suggestions below to inspire others in the crochet community!Thank you for joining this magical crafting journey. Happy crocheting!