Grandma’s Reindeer Square – Pattern has become a beloved project among crochet enthusiasts who enjoy creating festive and charming motifs for holiday decorations. Right from the first line, it’s important to highlight that a Grandma’s Reindeer Square – Pattern is a fully family-friendly crochet activity that aligns with Google AdSense policies. This pattern combines the nostalgic feel of traditional granny squares with the playful spirit of Christmas, resulting in beautiful squares that can be used for blankets, pillows, table runners, wall hangings, and even handmade gifts. The blend of classic techniques and creative design makes this project both accessible and delightful.
Working on a Grandma’s Reindeer Square – Pattern allows crocheters to use simple stitches in combination with minimal shaping to create a recognizable reindeer motif centered inside a square. It’s a perfect pattern for beginners who want to practice granny square construction while adding festive details. Experienced crocheters also enjoy it because the design offers room for creativity—especially when it comes to color choices and facial expressions for the reindeer. The finished square is decorative, warm, and ideal for the holiday season.
Another great benefit of creating a Grandma’s Reindeer Square – Pattern is how versatile the motif is. Whether you want to make a holiday throw blanket, incorporate it into gift bags, or add it as an accent to your Christmas décor, the reindeer square fits effortlessly into a wide range of handmade projects. Because each square is made individually, it’s also an excellent portable crochet project. Now that we understand its charm, let’s explore how to create this festive square in detail.
1. Understanding the Structure of Grandma’s Reindeer Square (H2)
A Grandma’s Reindeer Square – Pattern typically begins with a traditional granny square base. The center is constructed using simple stitches such as chains, double crochet, and slip stitches. This foundation provides a sturdy and visually balanced frame for the reindeer motif that will be built into the center of the square.
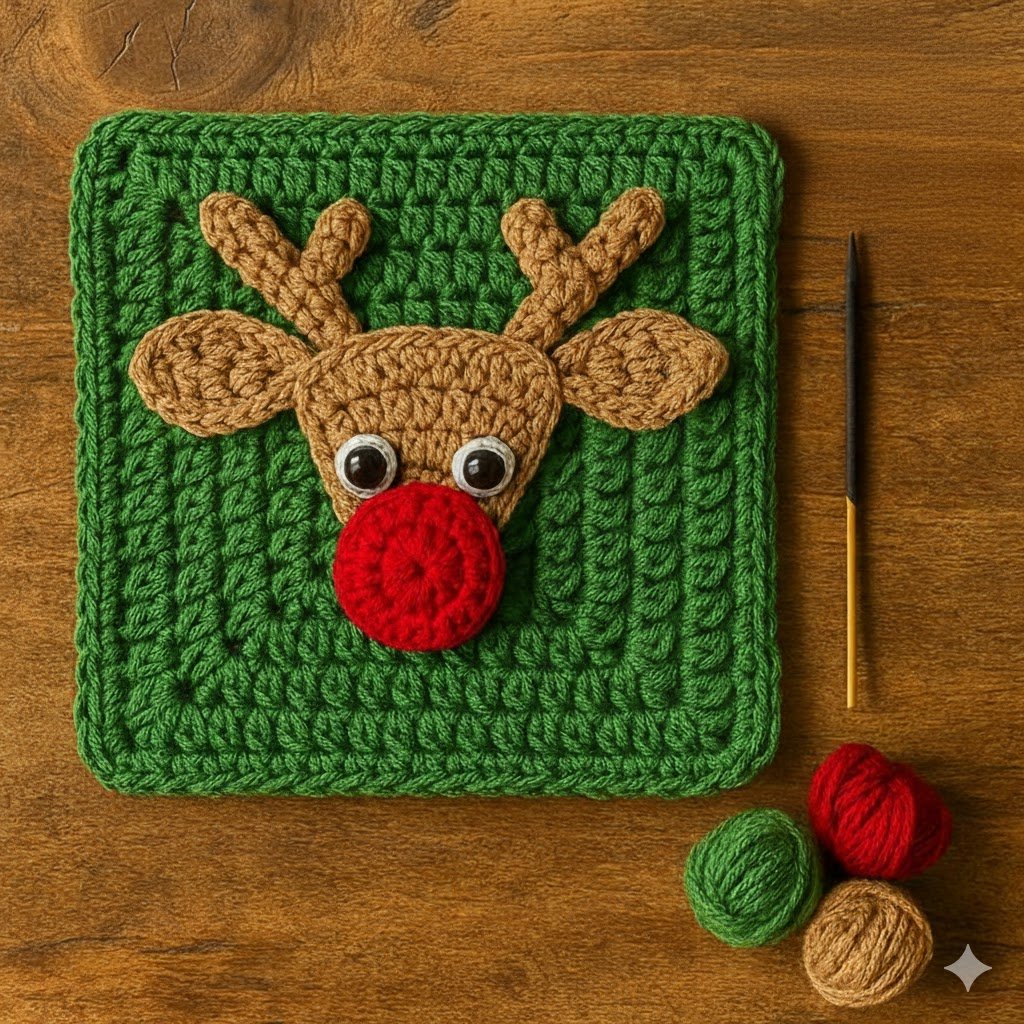
Once the basic square is formed, the reindeer design is added using color changes or appliqué techniques. Some versions of the pattern crochet the reindeer directly into the square using colorwork, while others use separate motifs like a small head, ears, nose, and antlers sewn onto the square afterward. Both methods work beautifully and allow for personal artistic expression.
The reindeer’s head is often round or oval, placed in the center of the square. The eyes, nose, and ears add personality and charm. Many crafters enjoy using a bright red yarn for the nose to create a Rudolph-inspired version. The antlers, which are typically crocheted separately, complete the design and bring the square to life.
The outer border of the square is usually made with traditional granny square rounds. These rounds support the design structurally and visually, ensuring the motif stays centered and symmetrical. They also allow the square to be easily joined with others if you’re making a larger project.
One of the reasons this square is so popular is because it can be customized in many ways. Colors can be changed to match specific themes, home décor, or personal preferences. Classic Christmas colors like red, green, brown, and cream are the most common, but modern pastels or neutral palettes also work beautifully.
By understanding how the square is structured, you can adapt the design to suit your needs, whether you’re making just one decorative square or planning an entire holiday blanket.
2. Materials and Tools Needed for the Reindeer Square (H2)
To complete a Grandma’s Reindeer Square – Pattern, you will need a few basic materials. The most important is yarn, and worsted-weight or DK-weight yarns are typically best for granny squares. These yarns offer structure and clarity, helping the reindeer design stand out. Cotton or acrylic yarns are equally suitable depending on your preference.
A crochet hook that matches your yarn weight is essential. Most patterns call for sizes between 3.5 mm and 5.0 mm. The hook size will affect the overall size of your square, so choose one that produces a fabric you like—tight enough to hold shape but flexible enough for comfortable stitching.
A yarn needle is necessary for weaving in the ends and sewing on the reindeer features. Because this pattern includes color changes or small appliqué pieces, a needle is one of the most important tools for achieving a neat and polished finish. Sharp scissors will also be needed for trimming yarn ends.
Safety eyes or embroidered eyes are optional additions, depending on the look you want. Safety eyes add a polished, store-bought appearance, while embroidered eyes keep the piece soft and child-friendly. Similarly, you can choose between a crocheted nose or a simple embroidered one.
Stitch markers may be helpful if you want to keep track of rounds or ensure your increases are evenly spaced. This is especially useful when creating the granny square border or shaping the reindeer’s head.
Optional materials include pom-poms, small bells, or glitter yarn for decorative accents. These can enhance the festive feel of your Grandma’s Reindeer Square – Pattern, but they are entirely optional and based on personal preference.
3. Step-by-Step Overview of How to Make the Reindeer Square (H2)
To begin your Grandma’s Reindeer Square – Pattern, start with the center of the granny square. Most patterns begin with a chain-4 loop, a magic ring, or a small foundation of double crochet stitches. This initial round forms the core of your square and determines how your reindeer motif sits within it.
Next, crochet additional rounds to expand the square outward. As with most granny squares, you will place clusters of double crochet stitches in each corner to keep the shape balanced. Continue building the square until you reach the round where the reindeer face will be introduced or attached.
If you’re working the reindeer design directly into the square, you’ll follow colorwork instructions that indicate when to switch yarns. This method requires some attention to detail but results in a beautifully integrated motif. Keeping your tension even helps prevent gaps between color changes.
If you’re using appliqué pieces, you will crochet the reindeer’s head, ears, nose, and antlers separately. The head is usually a small circle or oval, while the antlers may require shaping through increases and decreases. Once all the pieces are completed, sew them carefully onto the center of the square.
After the reindeer motif is in place, continue crocheting additional granny square rounds to frame the design. The number of rounds depends on how large you want your square to be. Make sure the edges are even and the corners remain sharp for a clean finish.
Finally, weave in all ends and block the square if needed. Blocking helps flatten the design and ensures your squares match in size—especially important if you plan to join them into a larger project like a blanket or pillow cover.
4. Creative Uses and Customization Ideas (H2)
One of the most delightful aspects of a Grandma’s Reindeer Square – Pattern is its versatility. These festive squares can be used in countless holiday projects. A popular choice is to create a set of squares and join them into a Christmas blanket. The repeating reindeer motifs create a cozy and charming holiday atmosphere.
You can also make Christmas pillows using just one or two squares. Adding a fabric backing or crocheting a simple envelope-style pillowcase makes this a quick and enjoyable project. The reindeer motif serves as the perfect seasonal decoration for living rooms or bedrooms.
Another creative idea is to use the square as part of a table runner or centerpiece mat. When made with elegant Christmas colors, the squares add warmth and character to any holiday meal setting. They also make great gifts for friends and family who appreciate handmade décor.
Smaller versions of the square can be turned into ornaments. Simply reduce the yarn weight and hook size, or stop the granny square after fewer rounds. Attach a small string or ribbon loop at the top, and you’ll have a unique handmade ornament for your Christmas tree.
You can customize the reindeer’s look by changing the nose color, using embroidered eyes, or adding small accessories like bows, scarves, or festive buttons. This allows you to create multiple reindeer squares, each with a unique personality.
Finally, if you enjoy themed crochet projects, consider creating an entire set of holiday squares—snowflakes, Christmas trees, Santa faces, and gingerbread men—to join with your reindeer squares. This creates a truly magical and personalized festive blanket.
FAQ – Grandma’s Reindeer Square
1. Is the Grandma’s Reindeer Square suitable for beginners?
Yes, the Grandma’s Reindeer Square – Pattern is beginner-friendly, especially if using the appliqué method.
2. What yarn works best for the reindeer square?
Worsted-weight or DK-weight yarn offers structure and clarity for the motif.
3. Can I make the reindeer without safety eyes?
Absolutely. Embroidered eyes work beautifully and are child-safe.
4. How large is the finished square?
The size varies depending on hook size and the number of rounds, typically between 12 and 20 cm.
5. Can I join multiple squares to make a blanket?
Yes! These squares join seamlessly into blankets, pillows, and table runners.
6. Do I need to block the square?
Blocking is recommended for evenly shaped squares, especially when joining multiple motifs.
Conclusion
In this article, we explored how to create a charming and festive Grandma’s Reindeer Square – Pattern, from understanding the structure of the design to selecting materials, following the step-by-step process, and customizing the motif to suit your style.
This delightful square is perfect for holiday décor and makes a heartfelt handmade gift.