The Granny Ripple Stitch Crochet – Pattern is a timeless masterpiece in the world of fiber arts, combining the classic aesthetic of the granny square with the dynamic flow of a chevron design. Many crocheters find themselves drawn to this specific style because it offers a rhythmic, meditative experience that results in a visually stunning texture. By mastering the Granny Ripple Stitch Crochet – Pattern, you can create everything from cozy baby blankets to vibrant throw rugs that serve as the centerpiece of any room.
Learning how to execute the Granny Ripple Stitch Crochet – Pattern requires a basic understanding of double crochet clusters and how to manipulate them into “peaks” and “valleys.” Unlike a standard straight row, this pattern uses strategic increases and decreases to create the iconic zigzag wave. The beauty of the Granny Ripple Stitch Crochet – Pattern lies in its versatility; you can use scrap yarn for a multicolored “stash-buster” look or choose a sophisticated ombre palette to highlight the elegant movement of the stitches.
In this comprehensive guide, we will dive deep into the mechanics of the Granny Ripple Stitch Crochet – Pattern to ensure your next project is a success. We will explore the essential materials, the foundational logic of the Granny Ripple Stitch Crochet, and how to read a pattern to avoid common mistakes like curling edges or uneven waves. Whether you are a beginner looking for a new challenge or an experienced maker seeking a nostalgic project, this detailed exploration will provide all the tools you need to master this beloved technique.
1. Understanding the Foundation of Granny Ripple Stitch Crochet
The core concept of the Granny Ripple Stitch Crochet – Pattern is the use of three-double-crochet clusters, often referred to as “granny shells.” These shells are the building blocks of the entire fabric, giving it that airy yet substantial feel associated with vintage crochet. When you start your Granny Ripple Stitch Crochet, you aren’t just making a flat grid; you are leaning the clusters in specific directions to force the yarn into a rhythmic, undulating wave.
To begin any Granny Ripple Stitch Crochet – Pattern, you must calculate your starting chain based on a specific multiple. Most variations of this pattern require a multiple of 18 or 24 stitches, plus a few extra for the turning chain. This mathematical foundation is what ensures your peaks and valleys align perfectly row after row. If the initial count is off by even one stitch, the entire Granny Ripple Stitch Crochet will lose its symmetry, leading to a lopsided finished product.
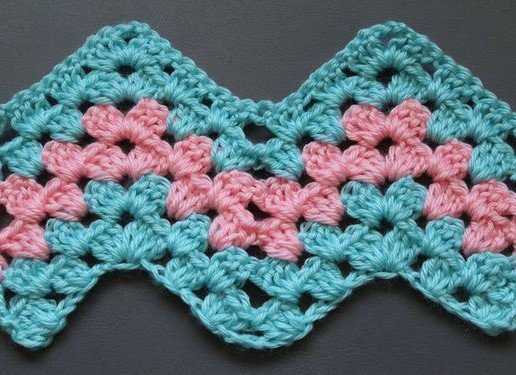
The “peaks” in a Granny Ripple Stitch Crochet – Pattern are created by working two clusters into the same space or chain, separated by a small gap. This forces the fabric to expand outward and upward, forming the top of the wave. Mastering this increase is vital for the Granny Ripple Stitch Crochet because it provides the necessary “give” for the blanket to grow without pulling too tightly. It is the secret behind that beautiful, pointed chevron look we all love.
Conversely, the “valleys” of the Granny Ripple Stitch Crochet – Pattern are formed by skipping stitches or clusters. By bringing the clusters closer together without adding extra width, the fabric naturally dips downward. When you look at a completed Granny Ripple Stitch Crochet, these dips create a gorgeous scalloped edge at the bottom of the work. This contrast between the rising peaks and the falling valleys is what defines the iconic ripple effect in this specific pattern.
Texture plays a huge role in why the Granny Ripple Stitch Crochet – Pattern remains a favorite among hobbyists. Because the clusters create small gaps between them, the resulting fabric is incredibly drapeable and soft. Unlike solid chevron patterns that can feel stiff or heavy, a Granny Ripple Stitch Crochet project breathes well, making it ideal for spring blankets or lightweight wraps. It is the perfect balance of traditional technique and modern geometric design.
Choosing the right hook size for your Granny Ripple Stitch Crochet – Pattern can make or break the final result. If your hook is too small, the clusters will be cramped, and the “ripple” won’t flow naturally. Most experts recommend using a slightly larger hook than what is suggested on the yarn label for the Granny Ripple Stitch Crochet. This encourages a relaxed tension, allowing the pattern to bloom and showing off the intricate details of the granny shells and the chevron waves.
2. Essential Materials and Tools for Your Crochet Pattern
When embarking on a Granny Ripple Stitch Crochet – Pattern project, your choice of yarn is the most significant decision you will make. While you can use almost any weight, a medium #4 worsted weight yarn is usually the standard for beginners. This weight allows the Granny Ripple Stitch Crochet to grow quickly while clearly defining each shell. High-quality acrylics or cotton blends are excellent choices because they maintain the structural integrity of the pattern over time.
Color transitions are where the Granny Ripple Stitch Crochet – Pattern truly shines. To emphasize the “ripple” effect, many crafters choose at least three different colors to rotate. Changing colors every two rows is a popular technique in Granny Ripple Stitch Crochet because it highlights the “V” shape of the stitches. Using a pattern that incorporates high-contrast colors can make the zigzag effect pop, while analogous colors create a more subtle, soothing wave.
Aside from yarn, you will need a comfortable ergonomic crochet hook to handle the repetitive motions of the Granny Ripple Stitch Crochet – Pattern. Since you will be working many double crochet clusters, a hook that reduces hand fatigue is a wise investment. Make sure to keep a few stitch markers nearby; they are incredibly helpful for marking the peaks of your Granny Ripple Stitch Crochet rows, ensuring you never miss an increase as you work across long foundation chains.
A reliable pair of embroidery scissors and a darning needle are also essential for finishing your Granny Ripple Stitch Crochet – Pattern. Because this style often involves frequent color changes, you will have many yarn tails to weave in. A sharp needle ensures that these ends are tucked securely into the dense parts of the Granny Ripple Stitch Crochet clusters, preventing the work from unraveling after a trip through the washing machine. Proper finishing is what elevates a DIY project to a professional standard.
Measuring tape is another tool you shouldn’t overlook when following a Granny Ripple Stitch Crochet – Pattern. It is important to check your “gauge” or the width of your ripples every few rows. Since the Granny Ripple Stitch Crochet can sometimes pull inward if your tension changes, measuring helps you catch issues early. A well-executed pattern should maintain a consistent width from the first row to the last, ensuring the sides of your blanket remain perfectly straight.
Finally, consider using a project bag to keep your Granny Ripple Stitch Crochet – Pattern supplies organized. Since ripple blankets can become quite large and heavy as you progress, having a dedicated space for your yarn and tools prevents tangles. Many people enjoy working on their Granny Ripple Stitch Crochet during long car rides or while watching TV, so a portable setup allows you to take your pattern with you wherever you go, making progress in small, manageable chunks.
3. Step by Step Execution of the Granny Ripple Stitch
The first row of your Granny Ripple Stitch Crochet – Pattern is always the most challenging because you are working into a foundation chain. You will begin by placing your first granny shell (3 double crochets) into the designated chain. As you follow the pattern, you will alternate between skipping chains to create valleys and adding extra clusters to create peaks. This initial setup is the “blueprint” for every subsequent row of your Granny Ripple Stitch Crochet project.
Once the foundation is set, Row 2 and beyond become much easier as you are now working into the “spaces” created by the previous row. In a Granny Ripple Stitch Crochet – Pattern, you generally don’t stitch into the top of the stitches themselves, but into the gaps between the clusters. This is the hallmark of the Granny Ripple Stitch Crochet style, making it a “fast” stitch that grows rapidly once you find your rhythm and understand the flow of the pattern.
To create a clean peak in your Granny Ripple Stitch Crochet – Pattern, you will typically work two sets of 3-double crochet clusters into the peak space of the row below, often separated by one or two chains. This “shell-chain-shell” combination is the engine that drives the Granny Ripple Stitch Crochet upward. It creates a sturdy point that won’t lose its shape even after heavy use, which is a key reason this specific pattern is so durable for family blankets.
Handling the valleys in the Granny Ripple Stitch Crochet – Pattern requires a bit of focus to ensure the blanket doesn’t become too wide. You will skip the clusters at the bottom of the “V” to pull the fabric back down. In some versions of the Granny Ripple Stitch Crochet, you might even work a “cluster decrease” to keep the transitions smooth. Following the technical instructions of the pattern precisely during these dips is what keeps the waves looking sharp and professional.
One of the most satisfying parts of the Granny Ripple Stitch Crochet – Pattern is the color change. To do this seamlessly, finish the last pull-through of the final stitch in your row with the new color. This technique ensures that the “turning chain” of the next row of your Granny Ripple Stitch Crochet starts with the correct color, creating crisp lines between your waves. It is these small details in the pattern that result in a high-end, polished look.
As you reach the end of a row in your Granny Ripple Stitch Crochet – Pattern, it is crucial to count your clusters. Each side of the ripple—the slope between the peak and the valley—should have the exact same number of granny shells. If one side has four and the other has five, your Granny Ripple Stitch Crochet will begin to slant. Regular counting is the best habit you can develop when working through any complex pattern, saving you from having to “frog” or rip out hours of hard work.
4. Troubleshooting and Customizing Your Granny Ripple Project
A common issue when working on a Granny Ripple Stitch Crochet – Pattern is the “curling” of the bottom edge. This usually happens if the foundation chain is worked too tightly. To fix this in your next Granny Ripple Stitch Crochet, try using a hook one size larger just for the starting chain. This gives the first row of your pattern enough room to stretch into the wave shape without pulling the fabric into a tight, uncomfortable curl.
If you notice your Granny Ripple Stitch Crochet – Pattern is growing wider as you go, you are likely adding accidental clusters at the ends of the rows. The edges of a Granny Ripple Stitch Crochet project should be straight vertical lines. Pay close attention to the beginning and end instructions of your pattern, as they often involve a specific sequence of double crochets to “anchor” the row and maintain a consistent width throughout the life of the project.
Customizing the size of your Granny Ripple Stitch Crochet – Pattern is easy once you understand the “repeat.” To make a wider blanket, simply add more multiples of the base number to your starting chain. For a smaller baby blanket using the Granny Ripple Stitch Crochet, reduce the number of repeats. The flexibility of this pattern means you can adapt it for any yarn weight or project size, from a tiny doll blanket to a king-sized bedspread.
For a modern twist on the Granny Ripple Stitch Crochet – Pattern, consider using a “solid” color but varying the textures of the yarn. Using a matte cotton mixed with a slightly shiny bamboo yarn in the same shade can create a sophisticated, tactile Granny Ripple Stitch Crochet that looks very expensive. This approach allows the geometric beauty of the pattern to take center stage without the distraction of multiple colors, appealing to those who prefer minimalist home decor.
Adding a border to your Granny Ripple Stitch Crochet – Pattern can provide a beautiful “frame” for your work. While the wavy edges are stunning on their own, a simple row of single crochet or a “crab stitch” around the perimeter can help stabilize the Granny Ripple Stitch Crochet and give it a finished look. Some makers prefer to fill in the “valleys” at the top and bottom with taller stitches to create a straight edge, a technique often detailed in advanced pattern guides.
Finally, blocking your finished Granny Ripple Stitch Crochet – Pattern is the secret to a perfect drape. By gently steaming or wetting the finished item and pinning it into shape, you “set” the ripples. This process helps the clusters in your Granny Ripple Stitch Crochet relax and ensures that the peaks and valleys are as prominent as possible. Following through with these final steps of the pattern ensures that your handmade creation remains a cherished heirloom for years to come.
Frequently Asked Questions (FAQ)
Can a beginner attempt the Granny Ripple Stitch Crochet – Pattern?
Yes! While it looks complex, it is essentially just repeating double crochet clusters. If you know how to make a basic granny square and how to count stitches, you can successfully navigate a Granny Ripple Stitch Crochet project. Just take it slow during the first three rows until the pattern repeat becomes visible.
How much yarn do I need for a full-sized blanket using this pattern?
For a standard throw blanket using the Granny Ripple Stitch Crochet – Pattern, you will typically need between 1,500 and 2,000 yards of worsted weight yarn. The ripple design uses slightly more yarn than a flat stitch because the “peaks and valleys” add more surface area to each row of the Granny Ripple Stitch Crochet.
Why is my crochet ripple look like it’s leaning to one side?
Leaning usually occurs in a Granny Ripple Stitch Crochet – Pattern if the increases at the peaks don’t perfectly balance the decreases in the valleys. Double-check your pattern to ensure you are skipping the correct number of stitches. If the balance is off by even one, the Granny Ripple Stitch Crochet will gradually shift to the left or right.
What is the best way to change colors in this pattern?
The best method for the Granny Ripple Stitch Crochet – Pattern is to change colors during the final pull-through of the last stitch of the row. This creates a clean transition. Many people choose to carry the yarn up the side if they are only using two colors, but for the Granny Ripple Stitch Crochet, cutting the yarn and weaving in ends usually provides a neater finish.
Does the Granny Ripple Stitch Crochet – Pattern use a lot of yarn?
Yes, it is often considered a “yarn eater.” Because the Granny Ripple Stitch Crochet involves dense clusters of double crochets and a wavy path that is longer than a straight line, you will go through skeins faster than you would with a simple mesh or single crochet pattern. However, the weight and warmth of the finished piece are well worth the extra yarn.
Can I use variegated yarn for this pattern?
Variegated yarn can work, but it sometimes “hides” the ripple effect of the Granny Ripple Stitch Crochet – Pattern. The best results are usually achieved with solid colors or long-gradient yarns (like cake yarns). These allow the “zigzag” of the Granny Ripple Stitch Crochet to remain the focal point rather than getting lost in a busy multicolored yarn.
Conclusion
In this article, we have explored the beautiful world of the Granny Ripple Stitch Crochet – Pattern, a design that perfectly bridges the gap between vintage charm and modern geometry.
We discussed how the foundation of this pattern relies on the balance between peaks and valleys, the essential tools like ergonomic hooks and quality yarn, and the step-by-step logic of working with granny clusters. Mastering the Granny Ripple Stitch Crochet is a rewarding journey that allows you to play with color and texture while creating durable, heirloom-quality pieces. Whether you are making a gift or something for your own home, following this pattern ensures a project that is as fun to make as it is to use.