The Granny Square Cardigan – Pattern is perhaps the most iconic project in the world of crochet, representing a timeless fusion of retro charm and modern bohemian fashion. For decades, the humble granny square has been the building block for blankets, but transforming these geometric motifs into a wearable garment takes the craft to a whole new level of artistry. Whether you are aiming for a vibrant “scrap-buster” look or a sophisticated monochromatic piece, this specific type of cardigan offers a level of comfort and personal expression that mass-produced clothing simply cannot replicate.
Choosing to follow a Granny Square Cardigan – Pattern allows for incredible modularity, meaning you can work on small, portable squares during your commute or while relaxing, and later assemble them into a stunning coat or sweater. This “join-as-you-go” or “seam-later” approach makes it an ideal project for those who get intimidated by large, continuous rows of fabric. Furthermore, the breathable nature of the classic crochet stitch makes these cardigans perfect for layering across all seasons, providing warmth without the excessive weight of solid knitted fabrics.
In this comprehensive guide, we are going to explore the essential steps of mastering the Granny Square Cardigan – Pattern, from selecting the right yarn weight for the perfect drape to the technical methods of joining squares for a professional finish. We will also dive into how to calculate the number of motifs needed for different sizes and how to add stylish elements like ribbed cuffs and button borders. By the end of this article, you will be equipped with the knowledge to create a handmade wardrobe staple that reflects your unique style and craftsmanship.
1. Material Selection and Gauge for the Granny Square Cardigan – Pattern
The soul of your Granny Square Cardigan – Pattern lies in the yarn you select, as this will determine the weight and “drape” of the finished garment. For a cozy, traditional feel, a worsted weight (Category 4) acrylic or wool blend is the standard choice, offering durability and warmth. However, if you prefer a lighter, more ethereal summer cardigan, opting for a DK weight cotton or bamboo yarn will result in a soft, flowing fabric that feels cool against the skin.
Your choice of crochet hook size is equally vital when working on a Granny Square Cardigan – Pattern. While a 5.0mm (H) hook is common for worsted yarn, you must always perform a gauge swatch. If your squares turn out too stiff, your cardigan will look boxy and uncomfortable; if they are too loose, the garment may stretch out of shape over time. Adjusting your hook size to achieve a flexible but stable fabric is the first secret to a high-quality crochet garment.
Color theory plays a massive role in the success of a Granny Square Cardigan – Pattern. You can go for a “Stash Buster” style, using up leftover bits of yarn for a multicolored, eclectic vibe, or a “Planned Colorway” for a more high-end, designer look. Many modern crafters are choosing neutral tones like cream, tan, and charcoal to make their cardigans versatile enough to wear with everyday outfits, turning a vintage concept into a contemporary fashion statement.
In addition to yarn and hooks, you will need a generous supply of stitch markers and a sturdy yarn needle. Because the Granny Square Cardigan – Pattern involves joining dozens of individual pieces, keeping track of your progress is essential. Stitch markers help you align the corners of your squares during the assembly phase, ensuring that your sleeves are symmetrical and your side seams are perfectly straight, preventing any awkward warping of the final sweater.
Blocking your squares before assembly is a professional tip that elevates your Granny Square Cardigan – Pattern results. By pinning your squares to a blocking board and lightly steaming them, you ensure every motif is exactly the same size. This makes the joining process significantly easier and ensures that the finished cardigan hangs beautifully. Skipping this step can lead to a “puckered” look where the seams pull against the fabric, detracting from the overall handmade elegance.
Lastly, consider the closure components of your Granny Square Cardigan – Pattern. Will your cardigan be an open-front duster, or will it feature large wooden buttons? If you plan on adding buttons, you will need to account for buttonholes in your final border rows. Choosing hardware that complements your yarn—like vintage brass or natural coconut shells—adds that final touch of artisanal quality that makes your project stand out from the crowd.
2. Construction Methods and Sizing Logic for Cardigans
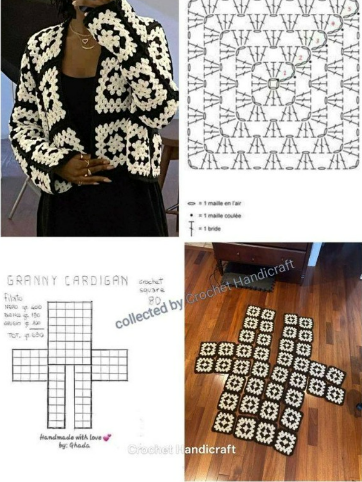
Understanding the layout of a Granny Square Cardigan – Pattern is like solving a beautiful puzzle. Most designs are based on a series of squares that form the back panel, two front panels, and the sleeves. For a standard medium-sized cardigan, you might need a 5×5 grid for the back and 2×5 grids for each front. Learning how to scale these grids up or down is the key to creating a custom-fit crochet sweater that flatters your specific body type.
The “Flat Lay” method is the most common way to visualize your Granny Square Cardigan – Pattern. Before sewing anything together, lay all your finished squares on the floor in the shape of a large “T”. This allows you to arrange the colors and patterns to your liking, ensuring a balanced distribution of hues. It is much easier to swap a square now than it is to undo several feet of crochet seaming later on once the garment is half-assembled.
There are two main ways to connect the motifs in a Granny Square Cardigan – Pattern: sewing or crocheting them together. The “Mattress Stitch” involves using a yarn needle to create an invisible, flat seam that looks professional and sleek. On the other hand, the “Slip Stitch Join” or “Single Crochet Join” creates a raised ridge that can add a beautiful decorative element to the geometric design, highlighting the individual nature of each square.
Sizing for a Granny Square Cardigan – Pattern can be adjusted by either changing the number of squares or the number of rounds within each square. If you find that adding an entire extra square makes the cardigan too big, simply add one or two extra rounds of solid stitches to the existing squares. This “bordering” technique allows for precision sizing, ensuring that the crochet coat fits perfectly across the shoulders and bust without being overly restrictive.
The sleeves of a Granny Square Cardigan – Pattern can be constructed as flat panels that are later seamed into tubes, or as squares joined in a ring. For a more modern “balloon sleeve” look, you can join several large squares and then use a series of decreases at the wrist to create a gathered effect. This structural versatility is why the granny square motif remains a favorite for fashion-forward designers who want to experiment with silhouette and volume.
Finally, don’t forget the importance of the “underarm gusset” in your Granny Square Cardigan – Pattern. Sometimes, joining squares directly at the armpit can lead to a tight, uncomfortable fit. Adding a small triangular or square filler piece in the underarm area provides better range of motion. This small technical adjustment transforms a simple modular cardigan into a high-performance piece of clothing that you can comfortably wear all day long.
3. Advanced Borders and Finishing Techniques
Once the main body of your Granny Square Cardigan – Pattern is assembled, the borders are what pull the whole look together. Adding a wide “Ribbed Border” using front-post and back-post double crochet stitches mimics the look of knitted ribbing and provides a professional finish. This border can be applied to the bottom hem, the sleeve cuffs, and all the way around the neckline, giving the crochet cardigan a structured and “finished” appearance.
The neckline of a Granny Square Cardigan – Pattern can be customized to your preference. You can leave it as a simple V-neck by omitting a square at the top of the front panels, or you can build up a “Shawl Collar” by adding extra rows of stitches around the neck. A shawl collar adds a layer of warmth and luxury, making the cardigan feel more like a cozy housecoat or a high-end winter outer layer.
Weaving in ends is perhaps the most tedious part of a Granny Square Cardigan – Pattern, especially if you used many colors. To make this easier, try to weave in the tails as you finish each individual square. If you wait until the very end to weave in hundreds of ends, it can become overwhelming. Using a “doubled-back” weaving technique ensures that your ends stay put even after the crochet garment has been washed and worn multiple times.
Adding pockets to your Granny Square Cardigan – Pattern is a functional upgrade that everyone loves. You can simply sew two additional granny squares onto the front panels of the cardigan. For a more “invisible” look, you can create inset pockets, but the patch-pocket style is much more traditional for granny square fashion and adds to the charming, “homemade” aesthetic of the piece.
Steam blocking the final assembled Granny Square Cardigan – Pattern is the penultimate step. Even if you blocked the individual squares, the seams can sometimes cause the fabric to pull. A final steam block helps the seams relax and the entire garment to “settle” into its final shape. This is particularly important for the sleeves and the button band, as it ensures they lay flat and don’t curl inward during wear, maintaining the clean lines of your work.
Finally, consider adding a personalized label to your Granny Square Cardigan – Pattern. Whether it’s a simple “Made with Love” tag or a custom brand label, this small detail reinforces the fact that the garment is a unique piece of art. It also serves as a reminder of the hours of creativity and effort you poured into the project, making the handmade cardigan a cherished heirloom for years to come.
4. Maintenance and Style Tips for Your Crochet Cardigan
Because a Granny Square Cardigan – Pattern results in a garment with many seams and holes (the “lace” effect of the granny stitch), you must be careful with how you wear it. Avoid wearing jewelry with sharp edges that might snag the yarn. If a snag does occur, never cut the yarn! Instead, use a crochet hook to gently pull the loop back through to the inside of the garment. Proper care ensures your crochet masterpiece stays in pristine condition.
Washing your Granny Square Cardigan – Pattern should always be done with caution. Hand-washing in cold water with a gentle wool soak is the safest method. If you must use a machine, place the cardigan inside a mesh laundry bag and use the “delicate” cycle. Never hang a wet crochet cardigan to dry, as the weight of the water will stretch the stitches and permanently ruin the garment’s shape; always lay it flat on a towel.
Pilling is a natural occurrence with many yarns used in a Granny Square Cardigan – Pattern. Over time, small balls of fiber may form in high-friction areas like the underarms. Using a battery-operated fabric shaver or a “pill comb” can easily remove these, keeping your handmade sweater looking fresh and new. Regular maintenance like this prevents the cardigan from looking “shabby” and preserves its boutique-quality appearance.
Styling your Granny Square Cardigan – Pattern is where the fun really begins. For a classic boho look, pair a colorful cardigan with flared jeans and a simple white tee. If you made a more neutral-toned version, it can be styled over a slip dress for a romantic, feminine vibe. The versatility of crochet means this single item can transition from a casual beach cover-up to a cozy layer for a crisp autumn evening.
Seasonal storage is vital for the longevity of your Granny Square Cardigan – Pattern. During the months you aren’t wearing it, store the cardigan folded in a breathable cotton bag. Avoid wire hangers at all costs, as they will cause “shoulder bumps” and stretch the neck out of shape. Including a small cedar block or lavender sachet will keep moths away and ensure your crochet clothing smells wonderful when you take it out next season.
Finally, don’t be afraid to “upcycle” your Granny Square Cardigan – Pattern later on. If you find the sleeves are too long or you want to change the border, crochet is easily unravelable and modifiable. You can always add a hood, change the buttons, or even lengthen the hem into a duster coat. The evolving nature of handmade fashion means your cardigan can grow and change along with your personal style.
FAQ – Frequently Asked Questions
Is a Granny Square Cardigan – Pattern suitable for beginners?
Yes, it is one of the best “first garments” for a beginner. If you can make a single granny square, you can make a cardigan! The difficulty lies mainly in the assembly and the patience required to make many motifs, but the stitches themselves are very basic and easy to master.
How many squares do I need for a Granny Square Cardigan – Pattern?
This varies based on size and square dimensions. For a standard adult medium with 5-inch squares, you typically need between 50 and 60 squares. Always check your specific crochet pattern for the exact count, as sleeve length and cardigan height will change the requirements.
Can I use different sized squares in one cardigan?
While it is possible, it is much more difficult for a Granny Square Cardigan – Pattern. Using squares of the same size ensures that the edges line up perfectly for seaming. If you want variety, try using different designs or colors within the same-sized square framework.
What is the best yarn for a Granny Square Cardigan – Pattern?
For beginners, a premium acrylic or a cotton-acrylic blend is best because it is easy to work with and machine-washable. For those looking for luxury, a merino wool or alpaca blend offers incredible warmth and a beautiful, soft drape that makes the cardigan feel very high-end.
How do I stop my granny squares from curling?
Curling usually happens due to tight tension or not enough “chain spaces” in the corners. Following a high-quality Granny Square Cardigan – Pattern carefully and blocking your squares once they are finished will solve almost all curling issues and ensure a flat, professional look.
How long does it take to finish a Granny Square Cardigan – Pattern?
Since it is a large project, it can take anywhere from 40 to 80 hours of active crochet time. The beauty of the granny square is that you can do it in small increments, making it a “slow fashion” project that is very rewarding to finish.
Conclusion
In this guide, we have explored the timeless appeal and technical journey of the Granny Square Cardigan – Pattern. We’ve covered everything from the essential choice of yarn and hook sizes to the intricate logic of garment construction and the finishing touches that turn a simple craft into a professional piece of fashion.
Whether you’re mastering the mattress stitch for invisible seams or adding a lush ribbed border, every step you take brings you closer to a unique, handmade treasure. The Granny Square Cardigan – Pattern is more than just a set of instructions; it is a gateway to sustainable, slow fashion that allows you to wear your creativity on your sleeve—literally.