The Granny’s square bucket hat – pattern has become one of the most talked-about crochet trends in recent years.
This vibrant, nostalgic accessory blends traditional crochet techniques with modern flair, making it a must-have item for all seasons.
Whether you’re a beginner or a seasoned crafter, learning how to create your own Granny’s square bucket hat is a fun and rewarding experience.
As fashion leans more into handmade, sustainable items, crocheted hats are quickly taking center stage. The Granny’s square bucket hat – pattern offers not just style but also a meaningful way to express creativity and eco-consciousness. It’s more than just a hat—it’s a wearable piece of art, and each square tells a unique story.
In this article, you’ll discover everything you need to get started, from materials and techniques to styling tips and customization ideas. Follow along as we break down the Granny’s square bucket hat – pattern into simple steps. Let’s dive in!
1. What is a Granny’s Square Bucket Hat?
A Granny’s square bucket hat is a stylish crocheted hat made by stitching together several “granny squares.” These squares are classic crochet motifs that typically feature a multi-colored, geometric design and are loved for their versatility and charm.
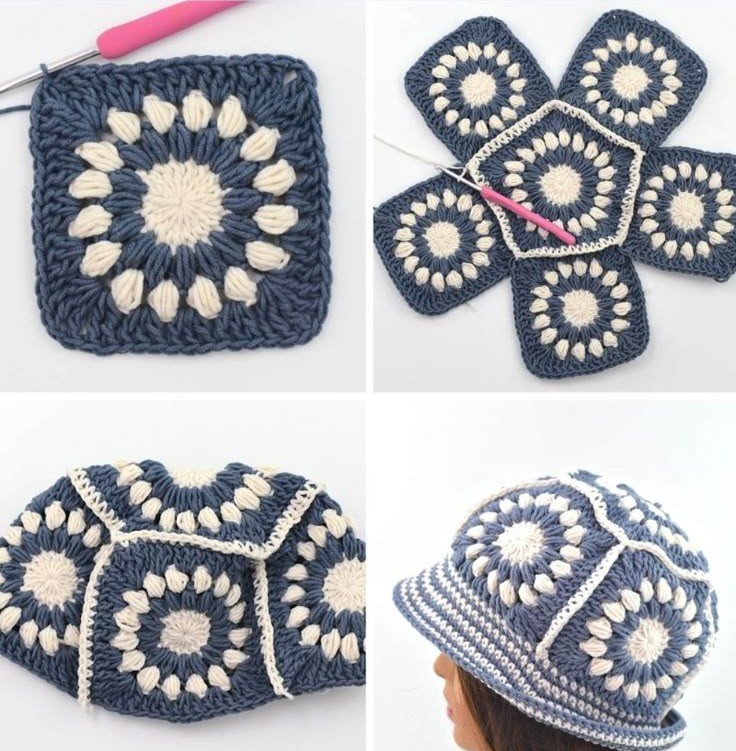
The hat usually begins by creating individual granny squares, which are then joined together in a circular formation to form the bucket shape. The top is usually a large square or circle, while the brim adds functionality and flair.
This crochet project stands out for its ability to mix and match colors, textures, and patterns. Crafters can personalize their Granny’s square bucket hat – pattern using a rainbow of yarns, giving each hat its own character and story.
Another reason for its popularity is the comfort and breathability that crochet fabric provides. It’s ideal for summer wear, festival fashion, and everyday casual outfits.
Many people use leftover yarn from other projects to make granny squares, making this hat both sustainable and budget-friendly. It’s a fantastic way to reduce waste and create something beautiful at the same time.
Finally, granny squares are beginner-friendly and easy to learn. Even if you’re new to crochet, you can start your journey with this project and gain confidence quickly while making something truly stylish.
2. Materials Needed for the Granny’s Square Bucket Hat
Before starting your Granny’s square bucket hat – pattern, it’s important to gather all the necessary materials. Having the right tools will make your project smoother and more enjoyable.
You will need a crochet hook that matches your chosen yarn. Most patterns recommend a 4mm to 5mm hook, which is ideal for worsted or medium-weight yarn. Be sure to check your gauge if you want a specific fit.
Yarn selection plays a big role in the final look and feel of your hat. Cotton yarn is highly recommended for its breathability, especially if you plan to wear the hat in warm weather.
You’ll also need scissors, a yarn needle for weaving in ends, and stitch markers to keep your work aligned. Optional tools include blocking mats and pins to shape your hat more precisely.
Choose your color palette wisely. A cohesive theme, such as pastel tones or vibrant primaries, can help your Granny’s square bucket hat look intentional and stylish.
Lastly, have your Granny’s square bucket hat – pattern printed or saved digitally. This allows you to reference it easily as you work and helps you keep track of your progress.
3. Step-by-Step Instructions for Creating the Hat
To begin your Granny’s square bucket hat – pattern, start by making your granny squares. Most hats use between 5 and 8 squares, depending on the size and desired fit.
To create a basic granny square, start with a magic ring and chain three (counts as your first double crochet). Work two more double crochets into the ring, then chain one. Repeat this step three more times and join with a slip stitch.
Continue adding rounds until your square reaches the desired size—usually around 4 to 5 inches across. Use different colors for each round to give the classic granny square aesthetic.
After completing your squares, arrange them into a circular shape. Stitch them together using slip stitches or whipstitch, forming the sides of the bucket hat.
For the crown (top of the hat), you can either make a large square or a flat circle using increasing rounds of double crochet. Attach this piece to the top of your square assembly.
Finally, create the brim by crocheting around the bottom edge. Increase stitches slightly to allow the brim to flare out, giving it that characteristic bucket hat shape. Finish by weaving in all ends and optionally blocking the hat to shape it perfectly.
4. Styling and Customization Tips
Your finished Granny’s square bucket hat – pattern is not just functional—it’s also a bold fashion statement. Here’s how to make it uniquely yours.
Mix unexpected color combinations. Pastels can give a soft, vintage feel, while bold primary colors offer a retro, pop-art vibe. The color palette is where your creativity shines.
Add decorative elements like small crochet flowers, tassels, or beads. These small touches can make your hat stand out and reflect your personal style.
Try using textured or variegated yarns for a more dynamic look. These yarns add depth and interest to each granny square without requiring complex stitches.
If you prefer a firmer hat, consider lining it with a lightweight fabric or using a stiffer yarn. This will help the hat hold its shape, especially around the brim.
You can also adjust the brim size based on your preferences. A wider brim offers more sun protection and adds drama, while a narrower brim keeps it minimalist and sleek.
Wear your Granny’s square bucket hat with casual outfits, boho dresses, or even as a contrast piece with urban streetwear. It’s a highly versatile accessory that suits a wide range of fashion styles.
FAQ – Granny’s Square Bucket Hat – Pattern
Q1: Is the Granny’s square bucket hat suitable for beginners?
Yes, the Granny’s square bucket hat – pattern is beginner-friendly, especially if you already know how to make basic granny squares. Many tutorials are available to help you learn.
Q2: How many granny squares do I need to make a hat?
Typically, 5 to 8 squares are used for the body of the hat. You will also need a top piece and a brim to complete the look.
Q3: What type of yarn is best for this pattern?
Cotton yarn is ideal for warm weather and offers a nice structure. However, you can also use acrylic or blends depending on the season and desired texture.
Q4: Can I wash the hat in a machine?
If made with cotton yarn, the hat is usually machine washable on a gentle cycle. Always check the yarn label and consider hand-washing for best longevity.
Q5: How long does it take to make a Granny’s square bucket hat?
Depending on your skill level, it can take anywhere from a few hours to a full weekend. The process is quite relaxing and rewarding.
Q6: Can I sell hats made from this pattern?
Yes, as long as the pattern is not copyrighted or if you have permission from the original designer. Always credit the designer if required and check local craft fair rules.
Conclusion
Creating your own Granny’s square bucket hat – pattern is a delightful journey into the world of crochet. From selecting yarn and mastering granny squares to assembling and styling the final product, this project offers endless opportunities for personalization and creativity.
Whether you’re crafting it for yourself, a friend, or as a gift, this handmade hat will surely bring smiles and compliments. It’s more than just a trendy accessory—it’s a statement of sustainability, craftsmanship, and individual style.
If this article helped you understand the Granny’s square bucket hat – pattern, feel free to leave a sincere opinion or suggestions below. We’d love to hear about your experience or see your finished hats!