Creating a Hair clip with crocheted bow – Pattern is one of the most delightful and quick projects for anyone looking to add a touch of handmade charm to their accessory collection. Whether you are an experienced crafter or just picking up a hook for the first time, this project offers the perfect blend of simplicity and elegance, allowing you to create beautiful gifts or personalized items for yourself. By following a structured Hair clip with crocheted bow – Pattern, you can transform simple scraps of yarn into a sophisticated fashion statement that complements any outfit, from casual daywear to more formal ensembles.
The beauty of the Hair clip with crocheted bow – Pattern lies in its incredible versatility and the minimal amount of supplies required to get started. Most people already have small amounts of leftover yarn in their stash, making this an eco-friendly way to reduce waste while producing something functional and cute. A well-designed Hair clip with crocheted bow – Pattern provides you with the exact stitch counts and assembly instructions needed to ensure the bow sits perfectly on the clip, maintaining its shape throughout the day without sagging or losing its aesthetic appeal.
In this comprehensive guide, we will explore everything you need to know about mastering the Hair clip with crocheted bow – Pattern. We will delve into the best materials for the job, the technical steps of the crocheted bow construction, and the secrets to securely attaching your work to a hair clip. By focusing on the details of the Hair clip with crocheted bow – Pattern, you will learn how to scale the design for different ages and hair types, ensuring that your finished product is not only beautiful but also durable and comfortable to wear.
1. Essential Materials and Tools for Your Hair clip with crocheted bow – Pattern
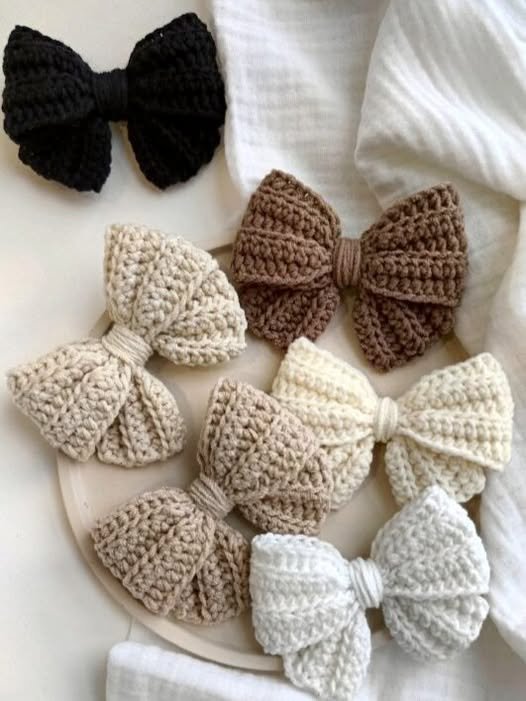
Before you dive into your Hair clip with crocheted bow – Pattern, gathering the right materials is the first step toward a professional finish. For the bow itself, you will want to choose a high-quality yarn that offers good stitch definition; mercerized cotton is often the preferred choice because it has a slight sheen and holds its shape exceptionally well. Since the Hair clip with crocheted bow – Pattern usually requires very little yardage, this is an excellent opportunity to use those luxury silk or bamboo blends you have been saving for something special.
The “hardware” of your project is just as important as the yarn. You will need a sturdy metal hair clip, such as an alligator clip, a snap clip, or a barrette, depending on who will be wearing the accessory. When following the Hair clip with crocheted bow – Pattern, it is helpful to have clips that are lead-free and nickel-free, especially if you are making these for children or people with sensitive skin. The size of the clip should be proportional to the finished size of the bow described in your pattern.
A crochet hook that matches your yarn weight is vital for achieving the correct gauge. For a Hair clip with crocheted bow – Pattern using sport or DK weight yarn, a 2.5mm to 3.5mm hook is typically ideal. Using a slightly smaller hook than recommended on the yarn label can help create a tighter fabric, which is beneficial for the Hair clip with crocheted bow – Pattern because it prevents the clip from showing through the stitches and helps the bow remain stiff and upright.
Beyond the hook and yarn, you will need a few basic sewing notions to complete the Hair clip with crocheted bow – Pattern. A sharp pair of scissors and a tapestry needle are essential for weaving in your ends securely. Additionally, many crafters like to use a small amount of hot glue or specialized fabric glue to reinforce the bond between the fabric and the metal. The Hair clip with crocheted bow – Pattern often includes a central “wrap” piece that hides these attachment points for a clean, professional look.
For those who want to add a bit of extra flair to their Hair clip with crocheted bow – Pattern, consider gathering small embellishments like pearls, rhinestones, or tiny buttons. These can be sewn into the center of the crocheted bow once the main structure is finished. While the core Hair clip with crocheted bow – Pattern provides the shape, these small details are what allow you to express your individual style and make each piece truly unique.
Finally, do not forget the importance of a good measuring tape. Even though the Hair clip with crocheted bow – Pattern is a small-scale project, ensuring that your bow is the correct width for the clip you have chosen is a key factor in the final balance of the accessory. Most patterns will give you a target measurement in inches or centimeters, allowing you to adjust your tension or stitch count to match the hardware perfectly before you begin the final assembly.
2. Understanding the Construction and Stitching of the Pattern
The technical heart of the Hair clip with crocheted bow – Pattern usually involves creating a simple rectangle that is later transformed into a bow shape. Most patterns will instruct you to start with a foundation chain that determines the width of the bow. Using basic stitches like the single crochet or half-double crochet ensures that the texture is dense and consistent, which is a hallmark of a well-executed Hair clip with crocheted bow – Pattern that looks store-bought rather than messy.
One of the most popular techniques used in a Hair clip with crocheted bow – Pattern is working in the back loops only (BLO). This creates a ribbed effect that adds depth and visual interest to the crocheted bow, making it look more like a traditional ribbon. When you follow the Hair clip with crocheted bow – Pattern instructions for ribbing, the fabric becomes more elastic, which helps it “scrunch” beautifully in the middle when you are ready to form the bow shape.
Once the main rectangle is finished, the Hair clip with crocheted bow – Pattern will guide you through the “cinching” process. This involves taking a long tail of yarn and wrapping it tightly around the center of the rectangle to create the classic bow silhouette. It is fascinating to see how a flat piece of crochet can be so easily manipulated into a 3D accessory just by following the simple steps outlined in the Hair clip with crocheted bow – Pattern.
Accuracy in your stitch count is vital when working on the Hair clip with crocheted bow – Pattern. Because the project is so small, even being off by one or two stitches can make the bow look lopsided or tilted once it is attached to the clip. A professional Hair clip with crocheted bow – Pattern will often include a “stitch key” to help you understand the abbreviations used, ensuring that you can follow along without confusion and produce a symmetrical result every time.
Another variation you might find in a Hair clip with crocheted bow – Pattern is the “double bow” or “layered bow” look. This involves making two rectangles of slightly different sizes and stacking them before cinching. This adds a luxurious volume to the Hair clip with crocheted bow – Pattern and allows for creative color blocking, where the bottom layer is a different shade than the top, creating a vibrant and eye-catching hair accessory.
The final part of the stitching phase in the Hair clip with crocheted bow – Pattern is the center band. This is a tiny strip of crochet that wraps around the cinched middle of the bow. The pattern will usually tell you to sew this band closed at the back. This is not only decorative but also structural, as it provides a flat surface on the back of the bow that makes it much easier to glue or sew onto the metal clip itself.
3. Assembling the Bow and Attaching the Hair Clip Safely
Assembling your project is where the Hair clip with crocheted bow – Pattern really comes to life. Once you have your bow and your center band, you must decide on the best attachment method. For a long-lasting Hair clip with crocheted bow – Pattern, sewing the bow onto the clip using a needle and matching thread is the most secure option. This ensures that the accessory can withstand the tugging and pulling that often occurs when putting clips into thick or unruly hair.
If you prefer a faster method, high-quality hot glue is a staple for many who use a Hair clip with crocheted bow – Pattern. To do this correctly, apply a small bead of glue to the flat part of the clip and press the back of the bow’s center band firmly onto it. The Hair clip with crocheted bow – Pattern results are best when you allow the glue to cure completely before trying the clip out, as moving it too early can cause the bond to fail and the bow to fall off.
Safety is a paramount concern, especially if your Hair clip with crocheted bow – Pattern is intended for a baby or toddler. Ensure that there are no small parts, like beads, that could become detached and pose a choking hazard. When following a Hair clip with crocheted bow – Pattern for children, it is often recommended to use “no-slip” grips—small silicone strips that you can stick to the inside of the clip—to help the bow stay put in fine hair without needing to be too tight.
For a truly professional look, some patterns suggest lining the metal clip with ribbon before attaching the crochet. This is a common tip found in a high-end Hair clip with crocheted bow – Pattern because it hides the silver or gold metal and provides a better surface for the glue to adhere to. Matching the ribbon to the yarn color used in your crocheted bow creates a seamless, boutique-style finish that looks incredibly polished and well-thought-out.
Positioning the bow on the clip is another detail the Hair clip with crocheted bow – Pattern will cover. Most bows look best when centered, but some modern styles place the bow slightly to one side of the clip for a more whimsical look. Regardless of your choice, ensure the clip can still open and close freely. A common mistake when finishing a Hair clip with crocheted bow – Pattern is accidentally gluing the “hinge” of the clip shut, making the accessory unusable.
Finally, once the assembly is complete, give your Hair clip with crocheted bow – Pattern project a final inspection. Trim any stray yarn ends and ensure the bow is sitting straight. If the fabric feels too soft, you can lightly spray the back of the bow with a fabric stiffener or hairspray. Following these finishing touches from the Hair clip with crocheted bow – Pattern ensures that your handmade accessory stays looking fresh and beautiful through many wears.
4. Customizing Your Crochet Bow for Different Occasions
The versatility of the Hair clip with crocheted bow – Pattern means you can adapt it for every holiday and season throughout the year. For a festive Christmas look, you might follow the pattern using deep red yarn with a strand of metallic gold thread held together. By changing just the color and texture of your yarn while keeping the same Hair clip with crocheted bow – Pattern, you can create a whole wardrobe of accessories that match different outfits and moods.
In the springtime, you can modify the Hair clip with crocheted bow – Pattern by using pastel shades and perhaps adding a small crocheted flower to the center of the bow. This “pattern hacking” is a fun way for intermediate crafters to take a basic Hair clip with crocheted bow – Pattern and elevate it into something more complex and decorative. The fundamental structure of the bow remains the same, providing a reliable base for all your creative experiments.
For back-to-school season, a Hair clip with crocheted bow – Pattern worked in school colors is a wonderful way to show spirit. You can even make a set of smaller bows to be worn on pigtails, adjusting the pattern by starting with a shorter foundation chain. The ability to resize the Hair clip with crocheted bow – Pattern easily is one of its greatest strengths, making it a “go-to” resource for mothers and grandmothers everywhere who want to make matching sets.
Texture also plays a big role in customizing your Hair clip with crocheted bow – Pattern. Using a fuzzy mohair yarn will result in a soft, ethereal bow that is perfect for winter, while a raffia-style yarn can create a sturdy, “beachy” bow for summer vacations. Each time you change the yarn, the Hair clip with crocheted bow – Pattern produces a completely different aesthetic, proving that you only need one good template to create an infinite variety of styles.
Don’t forget that the Hair clip with crocheted bow – Pattern isn’t just for hair! These bows can be attached to safety pins to become brooches, or even glued onto plain headbands. Once you have mastered the crocheted bow portion of the pattern, you can apply that knowledge to home decor, such as tiny bows for curtain tie-backs or gift wrapping. The skills you learn from this one pattern are highly transferable to many other areas of crafting.
Lastly, consider the potential for selling your creations. A well-made Hair clip with crocheted bow – Pattern is a popular item at craft fairs and on platforms like Etsy. Because they are fast to make and use very little material, they offer a great profit margin. By offering a variety of colors and customizations based on your Hair clip with crocheted bow – Pattern, you can build a small business around these charming, handmade accessories that people of all ages will love to wear.
FAQ – Frequently Asked Questions
How long does it take to complete one Hair clip with crocheted bow – Pattern?
For most people, a single bow takes between 15 to 30 minutes to crochet and assemble. It is the perfect “quick-win” project that provides instant gratification, making it ideal for busy crafters or those looking for a relaxing evening activity.
What is the best type of clip to use for this pattern?
Alligator clips (the ones with teeth) are generally the best for a Hair clip with crocheted bow – Pattern because they grip the hair securely and provide a flat top surface that is easy to attach the bow to. However, snap clips work well for smaller, lightweight bows intended for babies.
Can I wash the crocheted bow once it is attached to the clip?
If you used cotton yarn and securely sewed the bow to the clip, you can hand wash it gently. However, if you used glue or metal clips that are prone to rusting, it is best to avoid soaking the accessory. Spot cleaning the yarn with a damp cloth is usually the safest way to maintain your Hair clip with crocheted bow – Pattern work.
What if my bow is too floppy and doesn’t hold its shape?
This usually happens if the crochet tension is too loose or the yarn is too soft. You can fix this by using a smaller hook next time you follow the Hair clip with crocheted bow – Pattern. For an existing bow, a light application of fabric stiffener or even a bit of spray starch can help it stay crisp.
Is this pattern suitable for someone who has never crocheted before?
Yes! The Hair clip with crocheted bow – Pattern is one of the best entry-level projects. It uses basic stitches and requires very little shaping. It is an excellent way to practice maintaining even tension and learning how to read a crochet template without the commitment of a large project like a blanket.
How much yarn do I need for one bow?
Typically, you need less than 10-15 yards of yarn. This makes the Hair clip with crocheted bow – Pattern the ultimate “stash-buster.” You can often make several bows from a single small ball of leftover yarn.
Conclusion
In conclusion, the Hair clip with crocheted bow – Pattern is a versatile, beginner-friendly, and highly rewarding project that allows you to create beautiful accessories in a short amount of time. Throughout this article, we have discussed the importance of choosing the right cotton yarn and metal clips, the technical steps of stitching a rectangular base and cinching it into a bow, and the various ways to securely assemble and customize your work.
By following a reliable Hair clip with crocheted bow – Pattern, you can produce high-quality, boutique-style clips for gifts, personal use, or even to start a small craft business. The combination of your handmade touch and a classic design ensures that these bows will never go out of style.