Hats with daisy flowers Crochet – Pattern designs are taking the fashion world by storm, blending a nostalgic 1970s aesthetic with the modern “cottagecore” movement that celebrates handmade charm. There is something inherently joyful about seeing a crochet daisy perched on a well-crafted beanie or sun hat, as it instantly elevates a simple accessory into a piece of wearable art. For many enthusiasts, starting a Hats with daisy flowers Crochet – Pattern is more than just a hobby; it is a way to disconnect from the digital noise and create something tangible, colorful, and unique that can be gifted or worn with pride.
Understanding the mechanics of a Hats with daisy flowers Crochet – Pattern is essential for achieving that professional, boutique-style finish that looks great in photos and feels comfortable on the head. Whether you are using cotton yarn for a breathable summer vibe or a soft acrylic blend for winter warmth, the versatility of the daisy motif remains unmatched in the world of needlecraft. The texture of the raised petals against a double crochet base creates a visual depth that flat fabrics simply cannot replicate, making these crochet hats a favorite for artisans of all skill levels.
As we dive into the specifics of this Hats with daisy flowers Crochet – Pattern, it is important to focus on the stitch consistency and the color coordination that make the floral design pop. Choosing a high-quality crochet hook size that matches your yarn weight will ensure that your daisy chains and puff stitches are tight enough to hold their shape but flexible enough to fit various head sizes. By following a structured crochet tutorial, you can master the art of joining granny squares or appliqueing individual flowers to a finished hat base, resulting in a stunning Hats with daisy flowers Crochet – Pattern masterpiece.
1. Choosing the Right Materials for Your Hats with daisy flowers Crochet – Pattern
Selecting the perfect yarn is the foundational step for any successful Hats with daisy flowers Crochet – Pattern. For a spring-inspired hat, a lightweight cotton yarn or a bamboo blend is highly recommended because it offers excellent stitch definition for the white petals and yellow centers. If you are aiming for a cozy winter beanie, look for worsted weight wool that provides insulation while remaining soft against the skin.
The crochet hook you choose should align with the yarn label recommendations, typically ranging from a 4.0mm to 5.5mm hook. Using an ergonomic hook can prevent hand fatigue, especially when working on the repetitive petal stitches required for a Hats with daisy flowers Crochet – Pattern. Having a set of stitch markers and a sharp tapestry needle nearby will also make the assembly process much smoother and more professional.
Color theory plays a massive role in the visual impact of your Hats with daisy flowers Crochet – Pattern. While the traditional white and yellow daisy is a classic, don’t be afraid to experiment with pastel pinks, lavender, or even neon tones for a modern twist. The background color of the hat should contrast enough with the flowers to make the crochet pattern stand out from a distance.
Texture is another element to consider when gathering your supplies for a Hats with daisy flowers Crochet – Pattern. Some crafters prefer a matte finish yarn for a vintage look, while others opt for a subtle shimmer to give the daisies a dew-kissed appearance. Whatever your choice, ensure you have enough yardage of the primary color to complete the crown and brim without running out mid-project.
Before you begin the first slip knot of your Hats with daisy flowers Crochet – Pattern, it is wise to perform a gauge swatch. This ensures that your tension isn’t too tight or too loose, which could result in a hat that is either too small for a child or too large for an adult. A few minutes spent checking your stitch count now will save you hours of “frogging” or ripping out your work later.
Finally, keep a measuring tape handy to track the diameter of the hat’s crown as you work through the increases. A well-fitted Hats with daisy flowers Crochet – Pattern relies on precise mathematical growth, usually following the formula of circumference divided by Pi. With the right tools and a bit of patience, your crochet project will look like it came straight off a high-end fashion runway.
2. Mastering the Daisy Motif and Stitch Techniques
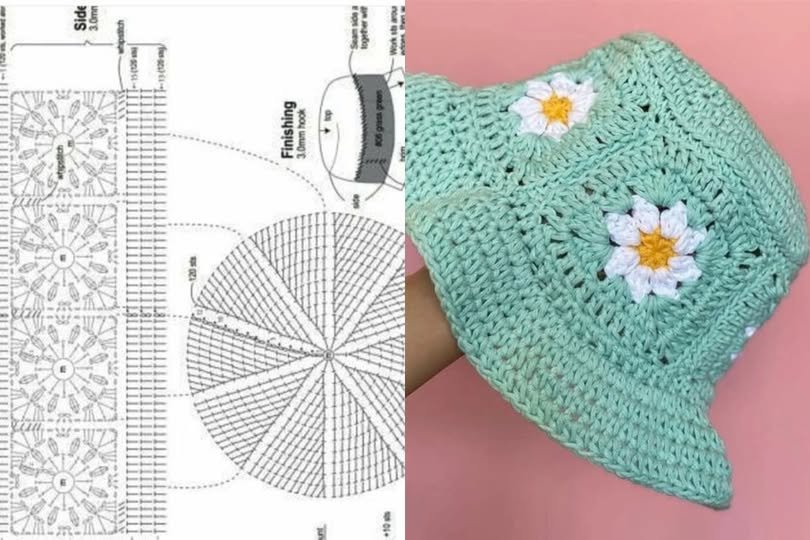
The heart of the Hats with daisy flowers Crochet – Pattern is the flower motif itself, which usually starts with a magic ring or a small chain loop. Using yellow yarn, you create the pollen center using single crochet or half-double crochet stitches. This circular base provides the anchor for the white petals that will eventually define the daisy’s iconic look.
To create the petals in a Hats with daisy flowers Crochet – Pattern, the puff stitch or the popcorn stitch is frequently employed. These stitches add 3D volume, making the flowers appear as though they are blooming right off the crochet fabric. Consistency is key here; each petal must have the same number of yarn overs to ensure the daisy looks symmetrical and professionally finished.
Integration is the next step in the Hats with daisy flowers Crochet – Pattern journey, where you decide if the flowers are worked into the hat or sewn on after. The granny square method involves making several floral squares and joining them with a slip stitch join or a whip stitch. This creates a beautiful, paneled effect that is very popular in boho-chic fashion and handmade accessories.
Alternatively, you can crochet a plain bucket hat or beanie and then use a surface crochet technique to attach the daisies. This approach allows for more creative freedom in placement, enabling you to scatter flowers randomly or arrange them in a neat row around the brim. Each method offers a different aesthetic for your Hats with daisy flowers Crochet – Pattern.
Don’t overlook the importance of the green leaves or stems if you want a more garden-realistic Hats with daisy flowers Crochet – Pattern. Adding a few chain stitches in a soft green can provide a lovely frame for the white petals. This small detail can significantly increase the visual value of the finished hand-crocheted item, making it look more intricate than it actually is.
Advanced crocheters might want to try the tapestry crochet or intarsia method for their Hats with daisy flowers Crochet – Pattern. This involves carrying multiple yarn colors across the row and switching them to “paint” the daisy directly into the stitch work. While more challenging, this results in a seamless hat that is smooth on both the inside and the outside, perfect for sensitive skin.
3. Shaping the Crown and Brim for a Perfect Fit
A Hats with daisy flowers Crochet – Pattern is only as good as its fit, which is why understanding head measurements is vital. Most adult hats require a circumference of 21 to 23 inches, while children’s hats are smaller. You start at the top of the head and work in rounds, adding increases evenly until the circle reaches the desired diameter for the crown.
Once the crown increases are complete, the Hats with daisy flowers Crochet – Pattern moves into the body of the hat. This is where you work in even rounds without any more increases, allowing the crochet work to naturally curve down toward the ears. This section is the perfect place to showcase a large daisy motif or a repeating pattern of smaller flowers.
The brim of the Hats with daisy flowers Crochet – Pattern determines the overall style, whether it is a slouchy beanie, a tight-fitting skull cap, or a wide-brimmed sun hat. To create a structured brim, you might switch to a smaller hook size or use a stiffer stitch like the waistcoat stitch. For a floppy sun hat, you would dramatically increase the stitch count in the final rounds.
Adding ribbing to the brim can provide a more secure fit for your Hats with daisy flowers Crochet – Pattern. This is often achieved using front post and back post double crochet stitches, which create a stretchy, elasticized edge. A ribbed brim is especially useful for winter hats, as it helps keep the crochet accessory snugly in place during windy weather.
Finishing touches, such as a reverse single crochet (crab stitch) edge, can give your Hats with daisy flowers Crochet – Pattern a polished, “store-bought” look. This stitch creates a corded, rounded edge that prevents the brim from curling and adds extra durability to the finished garment. It is the “secret sauce” for many professional crochet designers.
Throughout the shaping process of the Hats with daisy flowers Crochet – Pattern, it is important to weave in your ends securely. Because crochet daisy hats involve many color changes, you will have several yarn tails to hide. Using a weaving technique that goes in multiple directions will ensure that your beautiful flowers don’t come undone after the first wash.
4. Styling and Caring for Your Crochet Daisy Creations
Once you have completed your Hats with daisy flowers Crochet – Pattern, knowing how to style it can maximize its impact. These hats pair wonderfully with denim jackets, sundresses, or even simple white t-shirts. Because the daisy is a bold statement, let the hat be the “hero” of your outfit and keep other accessories minimal for a balanced, fashion-forward look.
If you are making these Hats with daisy flowers Crochet – Pattern for sale, consider adding a custom leather tag or a woven label with your brand name. This adds a level of professionalism that customers appreciate and helps your handmade business stand out. High-quality product photography featuring the hat in natural light will also help highlight the intricate crochet stitches.
Care and maintenance are crucial for preserving the life of your Hats with daisy flowers Crochet – Pattern. It is always best to hand wash crochet items in cool water with a mild detergent. Avoid wringing the hat, as this can distort the delicate daisy petals and stretch the yarn fibers out of their original shape.
To dry your Hats with daisy flowers Crochet – Pattern, lay it flat on a clean towel and reshape it while damp. This process, known as blocking, ensures that the daisies stay flat and the hat maintains its correct dimensions. Never put a handmade crochet hat in a mechanical dryer, as the heat can cause shrinkage or “killing” of acrylic fibers.
Storing your Hats with daisy flowers Crochet – Pattern properly will prevent it from becoming dusty or misshapen. A hat form or a stuffed mannequin head is ideal, but simply placing it flat in a breathable cotton bag works well too. Keep it away from direct sunlight when not in use to prevent the vibrant yarn colors from fading over time.
Finally, remember that a Hats with daisy flowers Crochet – Pattern is a versatile base that you can adapt for every season. By changing the yarn type and color palette, you can create a collection of hats that transition from the blooms of spring to the frost of winter. The daisy is a timeless symbol of purity and new beginnings, making it a perfect theme for your crochet journey.
FAQ – Frequently Asked Questions
What is the best yarn for a Hats with daisy flowers Crochet – Pattern?
For most people, a Level 4 Worsted Weight Cotton is the best choice because it provides great stitch definition for the flowers and is durable enough for regular wear. Acrylic yarn is a good budget-friendly alternative that is also very soft.
Can a beginner complete a Hats with daisy flowers Crochet – Pattern?
Yes! While the flower motif looks complex, it mostly uses basic stitches like the double crochet and chain stitch. If you can make a granny square, you can certainly master this crochet pattern.
How long does it take to crochet a daisy hat?
Depending on your speed, a full Hats with daisy flowers Crochet – Pattern usually takes between 4 to 8 hours. The flowers take about 10–15 minutes each, and the hat base takes up the remainder of the time.
Are these hats suitable for kids?
Absolutely. You can easily adjust the Hats with daisy flowers Crochet – Pattern by using a smaller hook or fewer increase rounds in the crown to fit infants, toddlers, or teens.
How do I make the daisies look more “3D”?
To get that “pop,” use the puff stitch for the petals. By pulling up multiple loops of yarn in a single stitch, you create a thick, rounded petal that stands out from the hat’s surface.
Can I sell items made from this Hats with daisy flowers Crochet – Pattern?
Generally, most crochet designers allow you to sell the finished product as long as you give credit for the pattern design. Always check the specific licensing of the pattern you are following.
Conclusion
In this article, we explored the wonderful world of the Hats with daisy flowers Crochet – Pattern, covering everything from selecting the best yarn and hooks to mastering the intricate daisy motif.
We discussed how to shape the crown and brim for a perfect fit and provided essential tips for caring and styling your handmade treasures. This crochet project is a fantastic way to express your creativity while producing a functional and trendy accessory that celebrates the beauty of nature.