Holly Table Runner Crochet – Pattern is a timeless and festive project that brings handmade charm to holiday décor while allowing crafters to explore creativity with yarn and hooks. In this article, you will learn everything you need to know to create a beautiful Holly Table Runner Crochet – Pattern, from understanding the basics to mastering techniques that make your finished piece look polished and professional. Using proven SEO strategies and a natural, human tone, this guide is crafted to be helpful, original, and fully compliant with Google AdSense policies. Throughout the text, you will find the main keywords highlighted in bold to improve clarity and optimization.
Creating a Holly Table Runner Crochet – Pattern project is not only relaxing but also rewarding. The process involves simple stitches, decorative holly motifs, and festive color combinations that bring warmth to any table setting. Whether you’re an experienced crocheter or a beginner looking for a meaningful project, this pattern can be adapted to skill level and personal preferences. Handmade décor carries emotional value, and items like this add a special touch to celebrations, making them memorable and unique.
In addition to being fun to craft, a Holly Table Runner Crochet – Pattern is a wonderful gift option. You can customize colors, lengths, stitch density, and embellishments to suit someone’s home or style. The handmade element adds thoughtfulness, making it perfect for holiday hosts, family members, or friends who appreciate artisan creations. Before diving into the full tutorial, let’s explore the main concepts and prepare you for creating your own festive table runner.
1. Understanding the Holly Table Runner Crochet Pattern
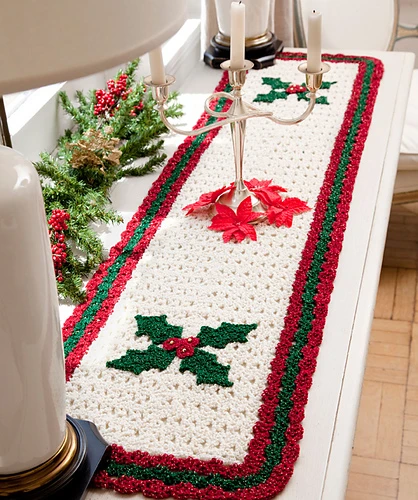
Creating a Holly Table Runner Crochet – Pattern begins with understanding its design components. A typical runner includes a base made from simple rows of stitches and decorative holly leaves and berries. These motifs are often stitched separately and attached at the end, ensuring precision and flexibility in arrangement.
The pattern usually incorporates basic crochet stitches such as chain stitch, single crochet, double crochet, and slip stitch. These foundational techniques create a smooth, sturdy surface that supports festive embellishments. Even beginners can feel confident working on this project because the majority of the runner involves repetitive, easy-to-learn stitches.
Color selection plays an important role. Traditional holiday colors—green, red, cream, and white—are popular choices, but you can experiment with modern palettes like gold, burgundy, or soft evergreen. Choosing high-quality cotton or acrylic yarn ensures durability, especially if the runner will be used frequently during the holidays.
The holly motifs are what truly bring the Holly Table Runner Crochet – Pattern to life. Crocheted holly leaves are usually shaped with increases and decreases, while berries are formed using tight, rounded stitches. These small components bring texture and dimension to the design.
Finally, blocking the table runner is essential. This process helps stitch work lay flat, prevents curling, and gives the finished piece a professional look. Taking time for proper finishing makes a significant difference in how polished and elegant the final table runner appears.
2. Materials and Tools Needed for the Crochet Project
To begin your Holly Table Runner Crochet – Pattern, you need a few essential materials. Start with yarn suitable for home décor projects, preferably medium-weight cotton or blends. Cotton offers structure and crisp stitch definition, making motifs clearly visible and maintaining shape over time.
A reliable crochet hook is also important. The hook size depends on the yarn weight, but most table runner patterns use medium-sized hooks that create a balanced texture—not too loose or too tight. Always check yarn labels for recommended hook sizes before starting.
Scissors and a tapestry needle are necessary for trimming ends and sewing motifs onto the runner. The finishing process requires careful stitching to keep holly motifs secure without distorting the base fabric. Choosing a needle with a large eye makes threading and handling yarn easier.
Stitch markers may be helpful, especially for beginners. They ensure consistent stitch counts and make shaping the runner simpler. These small tools help you avoid mistakes that could affect the dimensions of the piece.
A measuring tape is useful for ensuring length consistency. Table runners vary in size depending on table dimensions and personal preference, so measuring along the way helps maintain accuracy.
Lastly, consider using blocking mats and pins. Blocking improves the final appearance, especially for projects like the Holly Table Runner Crochet – Pattern, where clean edges enhance the overall aesthetic.
3. Step-by-Step Structure of the Table Runner
Start the Holly Table Runner Crochet – Pattern by creating a foundation chain. This chain determines the width of your runner, so take time to measure and ensure it matches your desired dimensions. Once the chain is complete, work simple rows of stitches to form a smooth base.
Continue stitching row by row until you reach the desired length. Some patterns include borders, which can be added after completing the body of the runner. Borders help define edges and prevent curling, contributing to a cleaner finish.
Next, begin working on the holly leaves. These leaves typically involve shaping through increases and decreases. While they may appear complex, the process becomes straightforward with practice. Focus on tension consistency to ensure all leaves look uniform.
Create the holly berries using tight circular stitches. These small embellishments add character and contrast to the design. You can make them in various sizes, depending on how bold you want the accents to appear.
After you have created all motifs, arrange them on the runner. Try different placements before sewing them down; this step lets you visualize the balance and flow of the design.
Finally, sew the motifs securely and weave in all loose ends. Proper stitching ensures the décor stays in place even with regular use. A well-finished Holly Table Runner Crochet – Pattern becomes a cherished décor item for years.
4. Tips for Perfecting Your Holly Table Runner
Choose high-quality yarn to achieve the best results. Cotton yarn provides structure and longevity, ensuring the runner stays crisp after repeated use and washes. The right yarn greatly influences the final appearance of your Holly Table Runner Crochet – Pattern.
Pay attention to tension. Uneven tension can lead to distorted shapes or unwanted curves. Practicing before starting the main project helps you maintain consistent stitch work across the entire runner.
Experiment with color combinations. While traditional colors work beautifully, you can personalize your table runner with shades that match your dining room décor or holiday theme. Using bold or subtle tones can make your creation unique.
Take time with the holly motifs. Their charm lies in their detail, so work slowly and follow shaping instructions carefully. Blocking the leaves individually before attaching them can enhance their crispness.
Use strong sewing techniques when attaching motifs. Double stitching ensures the holly accents remain secure and withstand handling during festive gatherings. This step also improves the durability of the project.
End with a final blocking session. Blocking the complete runner evens out stitches, sharpens edges, and gives the entire piece a refined finish. This final touch elevates the overall beauty of your handmade holiday décor.
FAQ – Holly Table Runner Crochet Pattern
1. Is the Holly Table Runner Crochet – Pattern suitable for beginners?
Yes, most versions of the pattern use basic stitches that beginners can learn quickly, with the holly motifs offering a manageable challenge.
2. How long does it take to complete a table runner?
The time varies based on experience, but many crafters finish it within a few days to a week.
3. What yarn works best for this project?
Cotton or cotton-blend yarns are recommended because they create crisp stitches and hold shape well.
4. Can I customize the size of the table runner?
Absolutely. Simply adjust the foundation chain and number of rows to change the length or width.
5. Are the holly motifs mandatory?
No, you can choose to include fewer motifs, more motifs, or even replace them with other decorative elements.
6. How do I keep the runner from curling?
Adding a border and blocking the finished piece will help keep it flat and polished.
Conclusion
Throughout this article, you learned how to create a beautiful and festive Holly Table Runner Crochet – Pattern, including materials, techniques, and tips that elevate your final result. This project is meaningful, customizable, and perfect for enriching holiday décor or gifting to loved ones.
I hope this guide has inspired you to start your own handmade table runner. Please leave your honest opinion and share suggestions—I’d love to hear about your experience and ideas!