If you’re looking to add a whimsical and cozy touch to your wardrobe or gift someone with something handmade and heartwarming, learning how to crochet a cute cape – pattern is a delightful place to start.
A cape is a stylish and versatile accessory that combines the comfort of a shawl with the elegance of a poncho. With the right stitches and creativity, you can craft a charming piece that suits any occasion or season.
This project is suitable for both beginners and experienced crocheters alike. You don’t need to be a crochet expert to complete a cape, especially when working with a clear and well-structured pattern.
Once you’ve mastered the basic stitches and shaping techniques, you’ll find the process not only enjoyable but also relaxing and deeply rewarding.
In this guide, we’ll walk you through the entire process of how to crochet a cute cape – pattern, including material selection, foundational stitches, shaping methods, and finishing techniques. We’ll also share customization tips so you can add your personal flair. Whether you’re creating this cape for yourself or as a thoughtful gift, you’re sure to fall in love with the result.
1. Choosing Materials and Planning Your Cape
Before you even make your first stitch, it’s essential to prepare by gathering all necessary materials and planning your project carefully. The type of yarn and hook you choose will affect the overall texture, weight, and drape of your cape.
Start with selecting your yarn. For a lightweight, flowy cape, opt for DK or worsted weight yarn. Wool blends are perfect for warmth, while cotton is ideal for breathable capes in warmer months. Choose soft yarns with good drape to ensure your cute cape moves beautifully when worn.
Pick a crochet hook size that complements your yarn. Most yarn labels offer recommendations, but be sure to create a swatch first. If your stitches seem too tight or loose, adjust your hook size accordingly to match the gauge stated in the pattern.
You’ll also need basic crochet tools: stitch markers, a yarn needle for weaving in ends, scissors, and a measuring tape. Blocking mats and pins are helpful for shaping your finished piece.
Choose a color palette that fits your personal style or the season. Pastels work well for spring, bold colors for winter, and neutrals for an everyday look. Multi-color yarns or ombre skeins can add extra charm without needing to switch yarns frequently.
Finally, take time to read through your pattern entirely before you begin. Familiarizing yourself with the steps will help you avoid surprises and better plan your work from start to finish.
2. Starting Your Crochet Cape Project
To begin crafting your cape, you’ll first establish the foundation, which could be a chain row, a magic circle, or a yoke depending on the pattern structure. Starting correctly ensures your cape has a solid base to build from.
Most how to crochet a cute cape – pattern guides begin with a top-down method, working in rows or rounds. This makes it easy to adjust the length as you go and ensures a better fit around the shoulders and neckline.
Once the foundation is complete, continue building the cape body with basic stitches like single crochet (sc), half-double crochet (hdc), and double crochet (dc). These stitches are often used in combination to create texture, flow, and shape.
As you crochet, increases at regular intervals will give the cape its flared shape. These increases typically occur at the center front, back, and sides to create a circular or semi-circular form. Use stitch markers to help track these increase points.
It’s important to count your stitches frequently. Staying on track with your stitch count will maintain symmetry and ensure that the shaping develops as intended by the pattern.
Work at your own pace and enjoy each stitch. Crocheting is not just a craft—it’s a mindful, creative activity that brings satisfaction with every row.
3. Adding Details and Personal Touches
Once the body of your cape is complete, you can enhance it with stylish and functional details. These finishing touches will elevate your project from simple to spectacular.
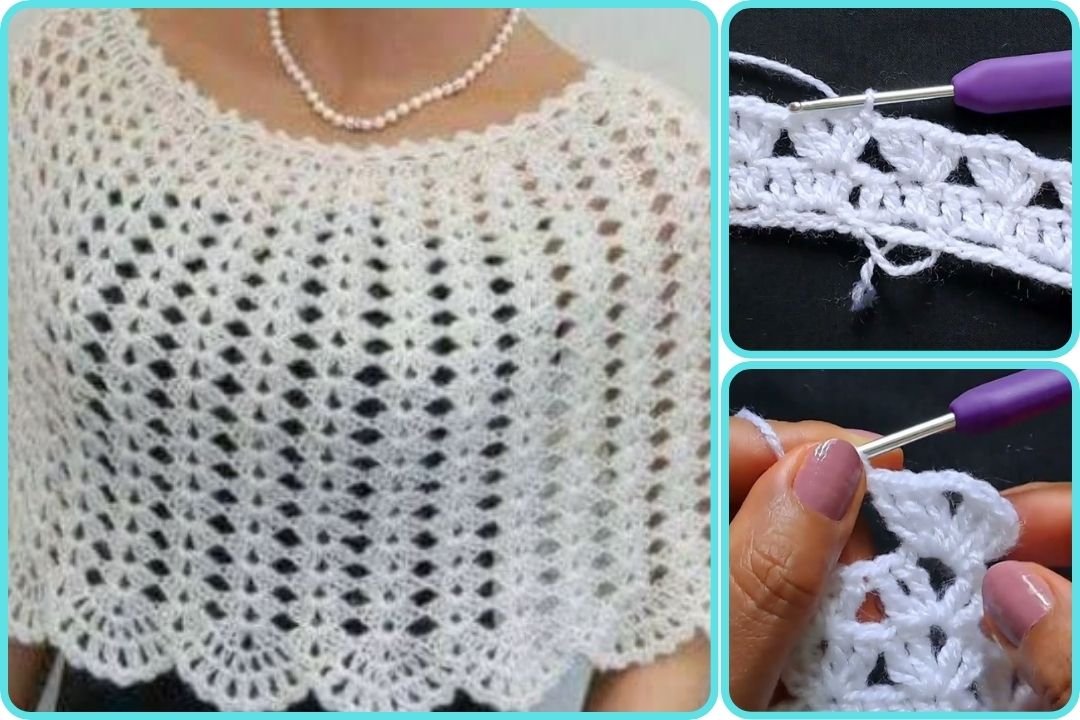
Consider adding a decorative border. Shell stitches, picot edges, or scalloped finishes can add elegance and personality to your cute cape. These can be easily incorporated into the final few rows of your pattern or added separately after the main body is done.
Buttons, ties, or clasps can be added at the neck for closure. Choose wooden buttons for a rustic look or metallic fasteners for a modern touch. Crochet ties with tassels or pom-poms are another fun option that adds charm.
You can also incorporate colorwork. Use stripes or color-blocking techniques to create visual interest. If you’re feeling adventurous, try tapestry crochet or surface slip stitches to add simple motifs or designs.
To make the cape even cozier, consider adding a hood. Some patterns offer a hood attachment or you can modify your existing pattern to include one. This turns your cute cape into a practical layering piece for colder months.
Personalize your cape with embroidery or patches. These hand-sewn details make your piece truly one-of-a-kind and give you another creative outlet within your crochet project.
Lastly, block your finished cape to open up the stitches, smooth edges, and perfect the shape. This final step makes a noticeable difference in the overall finish of your handmade creation.
4. Styling and Wearing Your Crochet Cape
After you’ve learned how to crochet a cute cape – pattern and completed your piece, it’s time to enjoy wearing it! Styling your cape is half the fun and can completely transform your outfit.
Pair your cape with fitted jeans and boots for a casual look or throw it over a dress for something more elegant. Because it’s both warm and breathable, it works well in various climates and seasons.
Try layering your cape with other garments. Wear it over long sleeves in the fall, under a jacket in winter, or as a statement piece in spring. Its versatility makes it a favorite wardrobe item.
You can also accessorize around your cape. Wear it with a brooch, a belt, or a coordinating hat. Adding a belt around the waist creates a more structured silhouette and turns the cape into a wrap-style garment.
If you’ve made capes in different colors or sizes, switch them out to match different occasions. A bright-colored cape might be perfect for festivals or vacations, while a neutral one works great for everyday wear.
Show off your work on social media or at local craft fairs. Your creation is a testament to your skills and creativity. Sharing it with others may inspire fellow crafters to start their own projects.
Most importantly, wear your cape with pride. You’ve put time, effort, and love into creating something beautiful and functional—and that deserves to be celebrated!
FAQ – Frequently Asked Questions
Q1: Is this pattern beginner-friendly?
Yes, many cape patterns are suitable for beginners, especially those that use basic stitches. Look for how to crochet a cute cape – pattern guides that include step-by-step instructions and diagrams.
Q2: How long does it take to crochet a cape?
Depending on the size, stitch complexity, and your experience, a cape can take anywhere from 10 to 30 hours. Spread it over a few days for a relaxing and manageable project.
Q3: What yarn is best for a cute cape?
Worsted or DK weight yarn is ideal. Choose soft fibers like acrylic, cotton, or wool blends for comfort and ease of care.
Q4: Can I adjust the size of the cape?
Yes! Most cape patterns are easily adjustable. You can make it shorter or longer by adding or removing rows and adjusting the neck size by changing your starting chain count.
Q5: How do I care for my crocheted cape?
Hand wash in cool water with mild soap and lay flat to dry. Some yarns may also be machine-washable—check your yarn label for care instructions.
Q6: Can I sell capes made from this pattern?
That depends on the pattern license. Many designers allow selling finished products if credit is given, but always read the pattern’s terms of use before selling.
Conclusion
Now that you’ve learned how to crochet a cute cape – pattern, you’re ready to start one of the most enjoyable and stylish crochet projects out there. From planning and preparation to the final stitch, this project offers creativity, comfort, and charm. Whether you keep your cape or gift it to someone special, your handmade piece is sure to impress.
We’d love to hear from you! Have you made a cape using this guide or another favorite pattern? Share your honest opinion, tips, and photos in the comments. Your feedback helps us improve and inspire other crafters. Happy crocheting!