Learning how to crochet Lego stitch- pattern is a delightful and satisfying experience for both beginners and advanced crafters. This unique crochet stitch mimics the playful, blocky look of Lego bricks, making it a favorite among enthusiasts who love to combine creativity with color. Whether you’re making a blanket, scarf, or decorative piece, the Lego stitch adds a vibrant and playful touch to any project.
This crochet technique is also a fantastic way to explore color changes and practice textured stitching, helping you expand your crochet skills in a fun and practical way. Unlike other more traditional patterns, the Lego stitch pattern truly stands out due to its blocky, structured appearance that resembles actual Lego pieces — which makes it particularly appealing for kids’ accessories and nerdy home decor.
In this guide, we will walk you step-by-step through how to crochet Lego stitch- pattern, including the tools you need, the best yarn choices, stitch breakdown, color techniques, and how to create your own custom designs. You’ll also find helpful answers to common questions and tips to enhance your crochet experience. Let’s get started!
1. Understanding the Lego Stitch: What Makes It Unique
The Lego stitch pattern is not a standard crochet stitch you’ll find in every beginner’s guide. It’s a creative variation that combines color blocks with textured crochet techniques to mimic the look of stacked Lego bricks. It’s often made with simple stitches like single crochet and double crochet, yet the color changes and block formation make it visually impressive.
Each “Lego brick” in the pattern is created using multiple rows of a solid color, bordered and separated by a background color, often black or grey. This helps define the bricks and give that signature Lego look. The result is a colorful, modular design perfect for playful items like blankets, cushion covers, or even wall hangings.
One of the best things about this stitch is that you can customize it endlessly. You’re not limited to specific sizes or colors. Want mini bricks? Use thinner yarn and smaller hooks. Want giant Lego blocks? Use chunky yarn. The creative freedom is part of what makes it so fun and engaging for crafters of all levels.
In terms of technique, how to crochet Lego stitch- pattern mainly involves mastering color changes and maintaining even tension throughout. It’s important to learn how to carry your yarn along the back of your work neatly or to fasten off and weave ends cleanly, especially if you’re using many colors.
If you’re a beginner, don’t be intimidated. Once you get the hang of the stitch repeat and color transitions, it becomes easy to build rows of blocks, almost like stacking Lego pieces. It’s a rewarding project that will grow fast once you’re in rhythm.
Finally, this stitch can be used as a base for endless creative ideas. From geeky gifts to playful baby items, the Lego stitch brings fun and color into every crochet project — and makes your handmade items look like no other.
2. Materials and Tools You’ll Need
To begin your journey into how to crochet Lego stitch- pattern, you’ll need the right materials and tools. Thankfully, this pattern doesn’t require anything too specialized, making it accessible for most crafters.
First, choose your yarn. A worsted weight (medium #4) yarn is ideal for beginners as it’s easy to work with and creates a solid structure for the blocks. Cotton or acrylic yarns are both great options depending on whether you want something soft or more durable. Pick at least 4–5 bold colors for the bricks and one neutral color for the background.
Your crochet hook should match the yarn. Typically, a 5mm (H-8) hook works well with worsted weight yarn, but always check your yarn label for guidance. Using the right hook ensures your stitches are neither too tight nor too loose, which is important for clean color changes.
You’ll also want to keep a pair of scissors and a tapestry needle on hand. The scissors will help you trim yarn ends as you switch colors, and the tapestry needle is essential for weaving in those ends once your project is complete.
Another useful tool is a stitch marker, especially when you’re first learning the pattern. It can help you track your rows and block changes without losing your place, making the process smoother.
If you’re using many colors in a project, consider organizing your yarn in small balls or bobbins. This prevents tangling and helps with easier, faster color switching — especially important in a pattern like this one that relies on clear visual blocks.
Lastly, make sure you have a clean, well-lit workspace. Being able to clearly see your stitches and colors will make the process of crocheting Lego bricks more enjoyable and efficient.
3. Step-by-Step: How To Crochet Lego Stitch- Pattern
Now that you have your materials ready, let’s dive into how to crochet Lego stitch- pattern step by step. We’ll begin with a small swatch to practice.
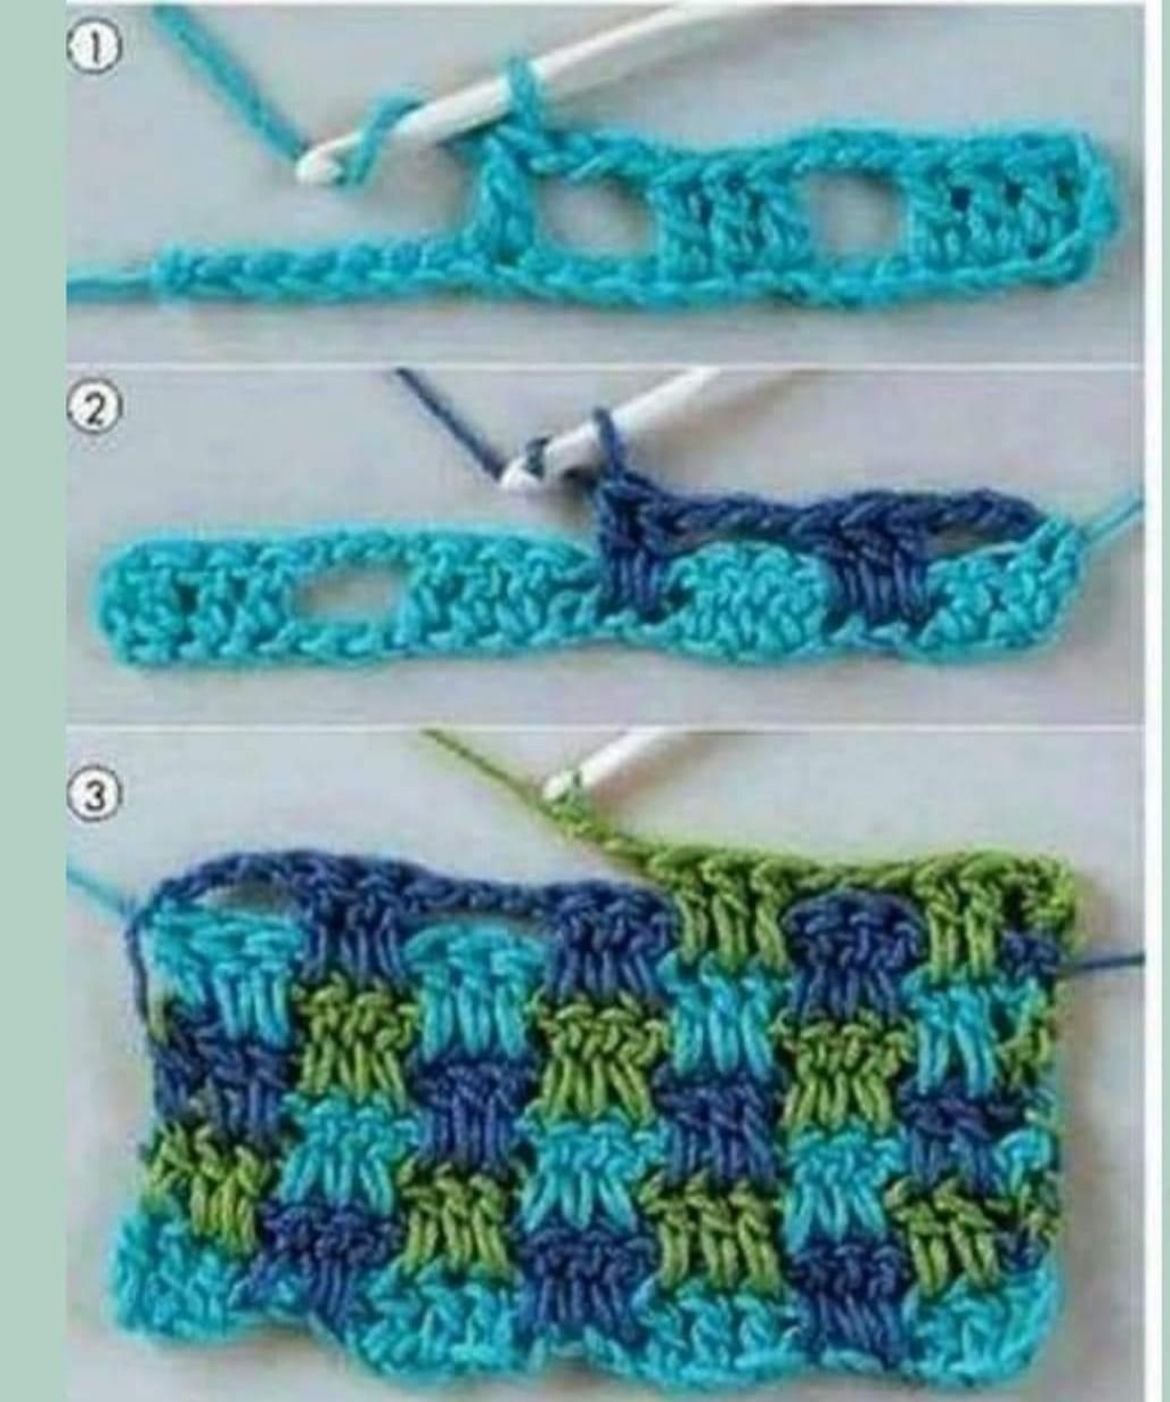
Start by chaining a multiple of stitches depending on the size of your Lego bricks. A good place to begin is 16 chains (for 4 bricks of 4 stitches wide). Add 1 extra chain to turn.
For the first row, use your background color (usually black or gray) and make a row of single crochets. This sets up the base for your first row of blocks. Turn your work.
In the second row, switch to your first brick color and crochet 4 stitches, then switch to a second color and crochet the next 4, and so on. You’ll now see the beginning of your Lego bricks forming. Make sure to carry or fasten your yarn neatly.
Continue the brick row for 2–3 rows using the same colors to create a rectangular brick effect. When you switch back to the background color, it creates a distinct line between each set of bricks.
As you build up your rows, alternate the position of the bricks. Offset them so that each brick in the next row sits between the bricks below. This mimics the way real Lego bricks stack and adds visual interest to the pattern.
Once you’ve completed several rows, you’ll begin to see the Lego structure emerge. Remember, the key to making it look authentic is keeping your edges clean, your color changes neat, and your bricks evenly sized.
Don’t forget to weave in your ends securely if you fasten off each color. For a cleaner back, consider the tapestry crochet method where you carry the unused yarn along the row, hiding it inside your stitches.
4. Creative Project Ideas Using the Lego Stitch Pattern
Mastering how to crochet Lego stitch- pattern opens up a world of project possibilities. Here are some fun ideas to inspire your creativity and make practical use of your new skill.
The most popular project is the Lego blanket. By repeating rows of Lego bricks, you can make a colorful throw or full-sized bedspread that kids and adults alike will love. You can even add initials or shapes to certain bricks for personalization.
Pillow covers are another great option. A front panel made from Lego stitch gives a bold and playful look, and you can sew it to a simple fabric or crocheted back for a complete cushion.
For those looking to make gifts, consider a Lego scarf or beanie. These are especially fun for younger children or fans of the iconic toy brand. Use primary colors and bold contrasts for the best effect.
Another creative idea is to make wall art or banners using the Lego stitch. Mount the finished piece in a shadow box or frame for a fun decoration in a playroom or craft space.
You can even adapt this pattern into bags or pouches. Just fold a Lego-stitched rectangle in half, seam the sides, and add a zipper or button closure. It’s a cute and functional project to store small toys or craft supplies.
Finally, combine the Lego stitch with other patterns or borders to create a unique hybrid design. A granny square border around a Lego-stitched center? Why not! Let your imagination guide you.
FAQ: How To Crochet Lego Stitch- Pattern
Q1: Is the Lego stitch pattern suitable for beginners?
Yes, this pattern uses basic crochet stitches and is suitable for confident beginners who are ready to learn color changes and pattern repeats.
Q2: What yarn should I use for the Lego stitch pattern?
Worsted weight yarn (medium #4) in bold colors works best. Choose a neutral for the background and 3–5 vibrant shades for the bricks.
Q3: How do I keep the back of the work neat with so many color changes?
You can carry the yarn behind your work using tapestry crochet techniques or fasten off each color and weave in the ends.
Q4: Can I use this stitch for a baby blanket?
Absolutely! It’s playful and colorful — perfect for a nursery. Just ensure you use soft, baby-safe yarn.
Q5: How long does it take to complete a Lego stitch blanket?
This depends on the size, but a baby-sized blanket may take a few days of consistent work, while a full throw could take a couple of weeks.
Q6: Do I need a pattern chart to follow the Lego stitch design?
While not necessary, a simple chart or sketch can help visualize color placement and ensure even spacing of bricks
.
Conclusion
Now that you know how to crochet Lego stitch- pattern, you’re ready to begin a colorful and creative crochet journey. From cozy blankets to playful accessories, the Lego stitch offers endless opportunities to craft something unique and fun. Remember, the key to success is practice, patience, and a bit of imagination.
If you enjoyed this tutorial or have any suggestions, we’d love to hear from you! Leave a sincere opinion in the comments below and let us know what you plan to make using this awesome Lego stitch pattern. Happy crocheting!