A Jellyfish Keychain in Amigurumi Crochet – Pattern is one of the most delightful and satisfying projects a crafter can take on, especially if you are looking for a quick yet impressive gift. These tiny, floating wonders of the sea translate perfectly into the world of crochet amigurumi, allowing you to play with vibrant colors, varied textures, and expressive faces. Whether you are a seasoned pro or a curious beginner, creating a handmade keychain offers a unique way to personalize your accessories while honing your stitching skills.
The beauty of a Jellyfish Keychain in Amigurumi Crochet – Pattern lies in its versatility and the minimal amount of yarn required to finish a piece. You can use leftover scraps from larger projects to create a whole colony of colorful jellyfish, making it an eco-friendly and cost-effective hobby. Beyond being just a cute trinket, these crochet jellyfish serve as excellent stress relievers—their soft texture and dangling tentacles provide a tactile experience that many find soothing to hold throughout the day.
In this comprehensive guide, we are going to explore everything you need to know about the Jellyfish Keychain in Amigurumi Crochet – Pattern. We will dive into the essential materials, the step-by-step logic of the construction, and the specialized techniques that make your amigurumi look professional and polished. By the end of this article, you will have a deep understanding of how to manipulate crochet stitches to create the perfect dome shape and those iconic, spiraling tentacles that give the jellyfish its charm.
1 Understanding the Jellyfish Keychain in Amigurumi Crochet – Pattern
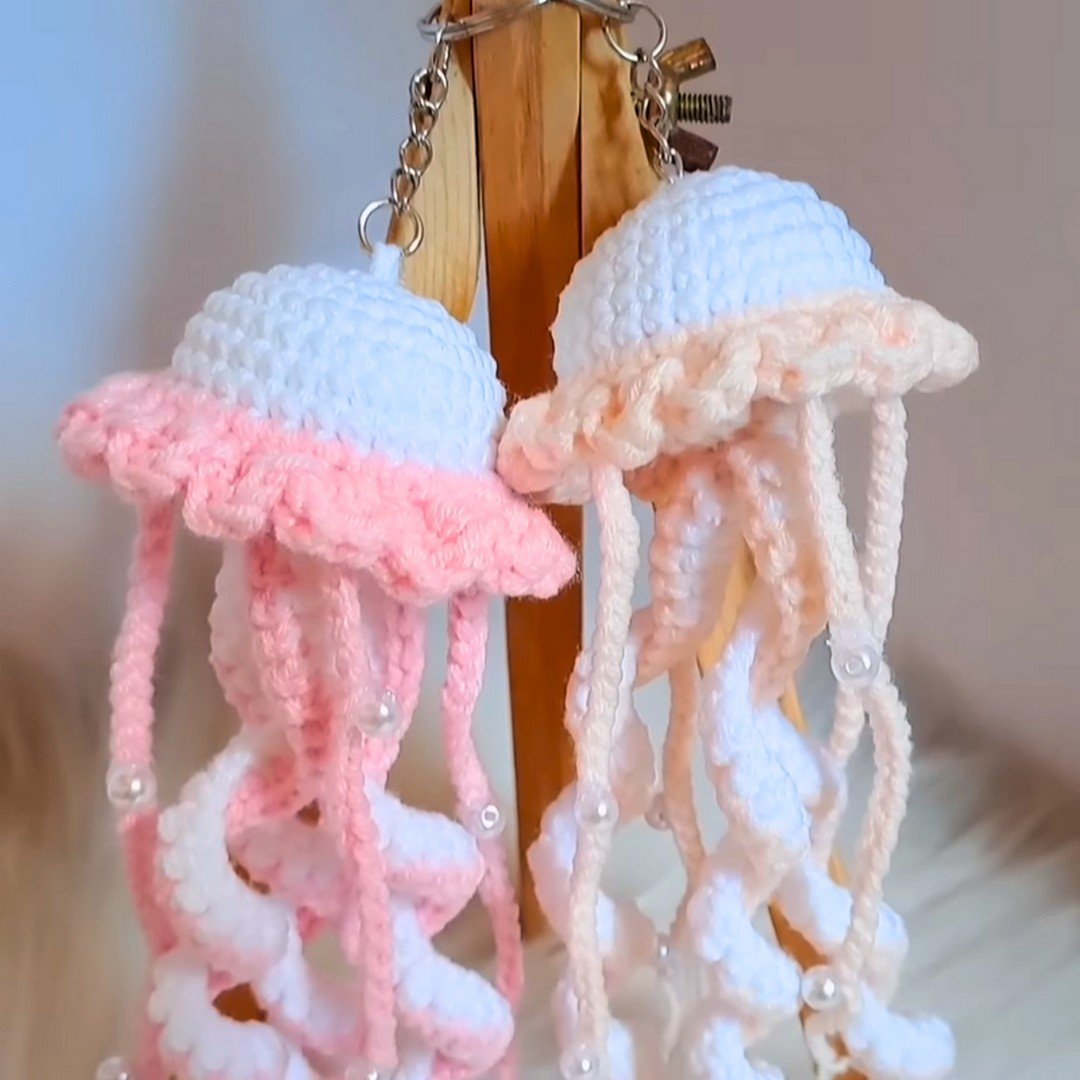
The Jellyfish Keychain in Amigurumi Crochet – Pattern is essentially a blueprint that guides you through creating a three-dimensional stuffed toy using the amigurumi technique. This Japanese art form focuses on knitting or crocheting small, stylized yarn creatures that often have an “adorable” or “kawaii” aesthetic. For this specific project, the crochet pattern focuses on two main components: the body (a hollow semi-sphere) and the tentacles (curly or straight chains attached to the base).
When following a Jellyfish Keychain in Amigurumi Crochet – Pattern, you will typically start with a magic ring, which is the foundational move for most circular amigurumi projects. This ensures that the top of your jellyfish head is tightly closed with no visible hole, providing a clean and professional finish. Most patterns utilize the single crochet stitch (shortened as SC in US terms), which creates a dense, sturdy fabric that prevents the polyester fiberfill stuffing from peeking through the gaps.
One of the most exciting aspects of this crochet pattern is the customization of the tentacles. Designers often include variations such as the “curly queue,” achieved by placing multiple stitches into a single chain, causing the yarn to naturally spiral. This adds a sense of movement and personality to your Jellyfish Keychain, making each one you create feel like a distinct character. You can choose to make them long and elegant or short and chunky depending on your personal style.
Accuracy is vital when reading a Jellyfish Keychain in Amigurumi Crochet – Pattern, so paying attention to stitch counts at the end of every round is a best practice. Using a stitch marker is highly recommended to keep track of your progress, as the continuous spiral method used in amigurumi can make it easy to lose your place. These patterns are designed to be “no-sew” or “low-sew,” meaning the tentacles are often joined directly to the bottom flap, reducing the amount of assembly required at the end.
For those looking to sell their crafts, the Jellyfish Keychain in Amigurumi Crochet – Pattern is a goldmine for Etsy sellers or craft fair vendors. Because they are fast to produce, you can build up a large inventory in a short amount of time. Adding high-quality metal keychain rings and perhaps some decorative beads can elevate the perceived value of the item, turning a simple ball of yarn into a premium, handcrafted accessory that people are eager to purchase.
Ultimately, mastering this amigurumi pattern is about understanding the balance between tension and shape. If your stitches are too loose, the jellyfish will look floppy; if they are too tight, your hands might tire quickly. Finding that “sweet spot” ensures your Jellyfish Keychain is durable enough to withstand being tossed into a purse or jingled on a set of keys for years to come. It is the perfect project to practice your increasing and decreasing techniques while producing something genuinely useful.
2 Materials and Tools for Your Amigurumi Project
To successfully execute a Jellyfish Keychain in Amigurumi Crochet – Pattern, you need to gather the right supplies, starting with the yarn. For keychains, a mercerized cotton yarn or a high-quality cotton blend is usually the best choice because it offers great stitch definition and doesn’t pill as easily as acrylic or wool. Since these items are handled frequently, the durability of cotton ensures the amigurumi remains vibrant and intact even with daily wear and tear.
The crochet hook size is another critical factor in the success of your Jellyfish Keychain. Generally, you should use a hook that is one or two sizes smaller than what the yarn label suggests. For example, if you are using a sport-weight yarn, a 2.0mm or 2.5mm hook is ideal. This creates the tight, “hole-free” fabric necessary for quality amigurumi, ensuring the stuffing stays inside and the shape remains firm over time.
You cannot complete a Jellyfish Keychain in Amigurumi Crochet – Pattern without high-quality stuffing. Most crafters prefer polyester fiberfill because it is lightweight, washable, and keeps its bounce. When stuffing your jellyfish, the goal is to make it firm but not so overstuffed that the stitches begin to stretch and show the white filler. It is a delicate balance that gives the “head” of the jellyfish its iconic, rounded appearance.
Safety is a priority, especially if the keychain might end up in the hands of children. Using plastic safety eyes gives the jellyfish a professional look, but they must be secured firmly before you close the bottom of the piece. If you prefer a completely soft toy, you can use embroidery thread to sew on eyes and a little smile. This “facial expression” stage is where the Jellyfish Keychain in Amigurumi Crochet – Pattern truly comes to life, giving the creature its unique charm.
The “keychain” part of the Jellyfish Keychain requires hardware, typically a split ring or a lobster claw clasp. You will also need a yarn needle (often called a tapestry needle) to weave in your ends and to sew the bottom disk to the top dome if the pattern isn’t worked in one piece. Having a sharp pair of scissors and some stitch markers nearby will make the process much smoother and prevent unnecessary frustration during the construction phase.
Lastly, consider adding some “flair” to your amigurumi crochet work by using variegated yarn or “ombre” yarns. These yarns change color automatically as you work, creating a beautiful transition effect on the jellyfish body without you having to manually switch colors. This technique works incredibly well with the Jellyfish Keychain in Amigurumi Crochet – Pattern, as it mimics the natural, shimmering gradients found in real-life sea creatures in the depths of the ocean.
3 Essential Crochet Techniques for Amigurumi Success
Mastering the Jellyfish Keychain in Amigurumi Crochet – Pattern requires a few specific skills that differ from traditional flat crochet. The first is the Magic Ring (or Magic Circle). This technique allows you to pull the center of your work completely tight, which is essential for the top of the jellyfish head. Without a magic ring, you might be left with a small hole where the stuffing can escape, which detracts from the professional look of your handmade keychain.
Another vital skill is the Invisible Decrease (inv dec). Traditional decreases can sometimes leave small bumps or gaps in the fabric, but the invisible version involves inserting the hook only into the front loops of the next two stitches. This creates a much smoother surface, which is particularly important for a Jellyfish Keychain in Amigurumi Crochet – Pattern because the rounded dome of the head is the most visible part of the toy.
Maintaining consistent tension is the secret sauce of beautiful crochet amigurumi. If your tension varies, the jellyfish might look lopsided or “bumpy.” Beginners often struggle with holding the yarn too tightly, which can make it difficult to insert the hook in subsequent rounds. Practice makes perfect here; as you work through the Jellyfish Keychain pattern, you will develop a rhythm that allows for tight yet workable stitches that hold their shape perfectly.
The Jellyfish Keychain in Amigurumi Crochet – Pattern also introduces the concept of working in continuous rounds. Unlike hats or blankets where you “slip stitch and chain 1” at the end of a row, amigurumi is worked in a spiral. This eliminates the unsightly seam that often runs down the side of crochet items. To stay organized, always move your stitch marker to the last stitch of each round so you never lose count of where you are in the project.
Color changing is a technique you might want to use to make the tentacles a different shade than the body. The “clean color change” method involves finishing the last pull-through of the previous stitch with the new color. This ensures the transition is sharp and professional. When applied to the Jellyfish Keychain in Amigurumi Crochet – Pattern, this technique allows for endless creative combinations, such as a pink body with purple and white swirling tentacles.
Finally, finishing your work with a fasten off and an “invisible finish” will elevate your craft. Instead of a bulky knot, you use a yarn needle to mimic the look of a stitch over the final gap. This attention to detail is what separates a hobbyist from a master of the Jellyfish Keychain in Amigurumi Crochet – Pattern. These small technical improvements ensure that your finished product is not only cute but also durable enough to be a functional keychain accessory.
4 Assembly and Customization Tips for Your Jellyfish
Once you have crocheted all the parts defined in your Jellyfish Keychain in Amigurumi Crochet – Pattern, the assembly phase begins. This is where you join the bottom circle (the “belly”) to the main dome. Many designers recommend using the back loops only of the final round of the dome to attach the bottom piece. This creates a neat ridge that mimics the natural anatomy of a jellyfish, adding a layer of realism to your crochet project.
Attaching the tentacles is perhaps the most fun part of the Jellyfish Keychain in Amigurumi Crochet – Pattern. You can vary the lengths and thicknesses to give your jellyfish a “wild” look. A great tip is to use different types of stitches for different tentacles—some could be simple chains, while others could be half-double crochet spirals. This variety creates visual interest and makes the keychain more engaging to look at and touch.
Don’t forget the keychain attachment! To ensure the Jellyfish Keychain doesn’t fall off its ring, it’s best to crochet a small loop of chains at the very top of the head or sew the metal ring directly into the sturdy stitches of the first few rounds. Using a bit of matching yarn to reinforce this connection will ensure that the amigurumi crochet piece can handle the weight of keys and the constant movement of being carried around.
Customization is where you can truly let your creativity shine with the Jellyfish Keychain in Amigurumi Crochet – Pattern. You can add a tiny crochet bow, a small flower, or even use blush (real makeup!) to give your jellyfish rosy cheeks. These small “humanizing” touches make the amigurumi more endearing and are highly popular in the crochet community for creating “character” toys rather than just simple shapes.
If you are making these as party favors or small gifts, consider using “glow in the dark” yarn. Since real jellyfish are often bioluminescent, using specialized yarn can make your Jellyfish Keychain in Amigurumi Crochet – Pattern a huge hit at night. Imagine a collection of these hanging in a bedroom, glowing softly—it adds a magical element to a simple DIY crochet project that children and adults alike will absolutely love.
In conclusion, the Jellyfish Keychain in Amigurumi Crochet – Pattern is more than just a set of instructions; it is a canvas for your imagination. By varying the yarn weight, you can turn this tiny keychain into a large plush pillow using the exact same pattern logic. The skills you learn here—shaping, stuffing, and detailing—are the foundations of all amigurumi art. So, grab your hook, pick your favorite ocean colors, and start stitching your way to a delightful undersea companion.
FAQ – Frequently Asked Questions
1. Is the Jellyfish Keychain in Amigurumi Crochet – Pattern suitable for beginners?
Yes, it is one of the best projects for beginners. It involves basic stitches like the single crochet, increases, and decreases. The small size means you can finish it quickly, providing instant gratification.
2. What is the best yarn for a Jellyfish Keychain?
Cotton yarn (100% cotton) is highly recommended. It doesn’t stretch as much as acrylic, which helps the keychain keep its shape, and it shows off the stitch detail beautifully.
3. How do I make the tentacles curly?
To make curly tentacles, crochet a chain of the desired length, then work 2 or 3 single crochet stitches into every single chain link. The extra stitches will force the chain to twist into a spiral.
4. Can I wash my amigurumi jellyfish?
Yes, if you use polyester stuffing and cotton or acrylic yarn, you can gently hand wash it. Make sure to air dry it completely to prevent the stuffing from clumping.
5. How long does it take to make one?
Depending on your speed, a Jellyfish Keychain in Amigurumi Crochet – Pattern usually takes between 45 minutes to 1.5 hours to complete, including assembly.
6. Do I need to use safety eyes?
Safety eyes are great for aesthetics, but if the keychain is for a baby or a very young child, it is safer to embroider the eyes with black yarn to prevent any choking hazards.
Conclusion
In this article, we have explored the wonderful world of the Jellyfish Keychain in Amigurumi Crochet – Pattern, covering everything from the essential tools and materials to the technical stitches required for success. We learned how a magic ring starts the journey, how invisible decreases create a smooth finish, and how various tentacle styles can add personality to your work. This project is a fantastic way to use up yarn scraps while creating something functional, cute, and highly giftable.
The Jellyfish Keychain serves as a perfect entry point into the broader hobby of amigurumi crochet, teaching you the fundamental shapes that form the basis of almost every crochet creature. We hope this guide has inspired you to pick up your hook and dive into this aquatic adventure.