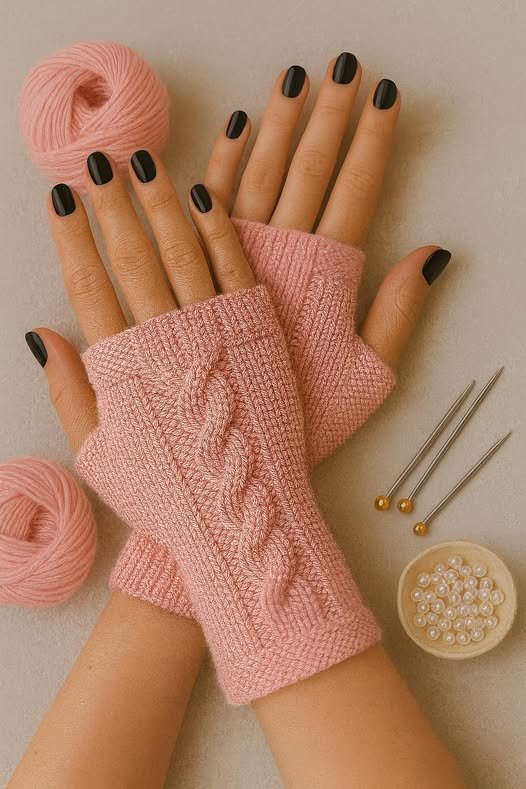
Knitted Glove with Braid – Pattern projects are among the most elegant and functional accessories you can create for the colder months. Right from the first line, this article will guide you through this beautiful design, showing how the Knitted Glove with Braid – Pattern combines practicality with timeless style. Whether you are an experienced knitter or someone seeking a challenge, this pattern offers the perfect opportunity to develop your skills while producing a high-quality, wearable piece. The textured braid running along the top of the glove adds a sophisticated touch that stands out in any winter wardrobe.
This type of glove is a wonderful project for gift-giving as well. Handmade gloves carry a unique charm because they reflect attention, warmth, and dedication. The Knitted Glove with Braid – Pattern is especially appreciated because it offers a snug fit and a professional look, even when created by knitters with only intermediate skills. With the right materials and consistent tension, your gloves will turn out soft, warm, and visually striking.
Another reason this pattern has become so popular is its versatility. You can adapt it for different sizes, adjust the length, change the type of braid, or even switch colors to create contrasting elements. In this article, you will find everything you need to begin: material recommendations, step-by-step guidance, customization ideas, and professional finishing tips—all written in a natural and easy-to-follow tone.
1. Materials and Preparation for the Knitted Glove with Braid – Pattern (H2)
To start your Knitted Glove with Braid – Pattern, choosing the right materials is essential for achieving comfort and durability. A soft yet sturdy yarn works best, because gloves must withstand movement, stretching, and frequent wear. Wool blends, merino wool, or high-quality acrylic are commonly recommended. These yarns hold the shape well and highlight the braided texture beautifully.
Selecting appropriate needles is equally important. Most knitters prefer double-pointed needles or circular needles using the magic-loop method. Both options work well for knitting in the round, which is necessary for glove construction. Needle sizes usually range from 2.5 mm to 3.5 mm, depending on yarn thickness and your personal tension.
Before starting your actual glove, it’s important to knit a small gauge swatch. Gloves need to fit snugly, and even minor differences in stitch size can affect the final measurement. Knitting a gauge swatch for your Knitted Glove with Braid – Pattern helps ensure the glove will fit comfortably around the hand and wrist.
Once you have selected your yarn and needles, take time to prepare your pattern notes. Keeping track of stitch counts, braid rows, and thumb placement helps prevent mistakes. Writing everything down also makes it easier to create a matching second glove later.
Consider choosing colors that complement the braided detail. Solid colors highlight texture best, while heathered tones add richness without overshadowing the braid. Avoid very busy multicolored yarns, as they can make the braid less visible.
Finally, organize all your tools—stitch markers, yarn needles, scissors, and cable needles—before you begin. Having everything ready will make your knitting experience smooth and enjoyable.
2. Creating the Cuff and Starting the Knitted Glove with Braid – Pattern (H2)
The cuff is the foundation of your Knitted Glove with Braid – Pattern, helping the glove stay secure around the wrist. Most patterns begin with a stretchy ribbing such as 1×1 or 2×2 rib stitch. These ribbing styles add elasticity and help the glove fit properly, even after extended use.
Cast on the required number of stitches using a stretchy cast-on method. This ensures the cuff does not feel tight or uncomfortable. Once cast on, join in the round, taking care not to twist the stitches. Work several rounds of ribbing until the cuff reaches your desired length—usually 5 to 7 centimeters.
After completing the cuff, you will transition into stockinette stitching for the glove body. At this point, the braid section begins. The Knitted Glove with Braid – Pattern uses a cable stitch to form the braid, which is typically placed on the back side of the hand. This braid is created by crossing stitches using a cable needle, forming a raised, elegant pattern.
Work the stockinette stitch around the glove while repeating the braid section on the designated panel. The braid row repeats every few rounds, depending on the pattern, creating a beautiful flow up the glove. Taking your time with the braid helps maintain clean, consistent stitches.
As you continue knitting upward, regularly check the fit. Gloves fit best when they hug the hand without restricting movement. Stretch the fabric gently to ensure the braid section remains even and centered.
Before reaching the thumb, knit several more rounds to accommodate the length of the palm. Preparing early will make the thumb gusset much easier to shape later.
3. Shaping the Thumb and Hand in the Knitted Glove with Braid – Pattern (H2)
The thumb gusset is one of the most important parts of the Knitted Glove with Braid – Pattern, as it determines comfort and flexibility. Begin shaping the thumb by gradually increasing stitches at the appropriate spot—usually on the inside of the hand. This method creates space for the thumb to move naturally.
Use stitch markers to keep track of where your increases will occur. Most patterns instruct knitters to increase every few rounds until enough stitches have been added to form the thumb. These stitches will eventually be placed on a holder so you can complete the rest of the hand comfortably.
Once the thumb stitches are set aside, continue working the body of the glove in the round. The cable braid remains centered on the back of the hand, creating a beautiful visual anchor for the design. Maintaining consistent tension is crucial for both comfort and appearance.
Knit the body until you reach the base of the fingers. Some knitters prefer shorter gloves that end below the fingers, while others enjoy full gloves for maximum warmth. You can easily adjust the Knitted Glove with Braid – Pattern according to your preference.
After completing the main body, return to the thumb stitches. Transfer them back onto your needles and work in the round until the thumb reaches a comfortable length. You can end the thumb with a small knitted decrease to help it taper and fit naturally.
Double-check all stitch counts before moving to the finishing phase. A well-shaped glove will fit like a second skin and maintain the clean lines of the braid.
4. Finishing and Perfecting the Knitted Glove with Braid – Pattern (H2)
Finishing is what transforms your project from “homemade” to “professionally handmade.” After completing the top of the glove, close the remaining stitches using a smooth, rounded method such as the Kitchener stitch. This prevents any sharp or bulky edges.
Next, weave in all loose yarn ends. Take your time to ensure the inside of the glove remains smooth and comfortable. No one likes scratchy loose ends while wearing gloves, so a neat finish is essential for the Knitted Glove with Braid – Pattern.
Light blocking can also help refine the shape. Gently steam the gloves or lay them flat to dry after shaping them by hand. Blocking allows the braid texture to open beautifully, making it stand out even more.
If you want to personalize your gloves, you can add decorative elements such as small buttons at the wrist or a contrasting trim at the cuff. These tiny touches add personality without interfering with the braided design.
Always try on the glove once more before considering the project complete. Move your hand, stretch your fingers, and check if the braid sits symmetrically on top. If everything feels and looks right, you have successfully finished your Knitted Glove with Braid – Pattern.
Creating the second glove becomes easier once you’ve perfected your technique. Follow your notes to ensure both gloves match perfectly.
FAQ About the Knitted Glove with Braid – Pattern
1. Is the Knitted Glove with Braid – Pattern suitable for beginners?
It is best suited for intermediate knitters because cable work and glove shaping require some experience.
2. What type of yarn works best?
Wool or wool-blend yarns are ideal due to their warmth, elasticity, and ability to highlight braided textures.
3. Can the pattern be adjusted for different sizes?
Yes. You can change the number of stitches, adjust needle size, or alter the braid panel width.
4. Do I need a cable needle for the braid?
Yes, a cable needle helps keep stitches secure while crossing them to form the braid.
5. How long does it take to make a pair of gloves?
Most knitters finish a pair within a few days, depending on the complexity and available time.
6. Can the thumb placement be changed?
Yes. Thumb gussets can be modified to suit left-handed or right-handed preferences.
Conclusion
The Knitted Glove with Braid – Pattern is a beautiful and rewarding project that blends style, comfort, and technique.
Throughout this article, you learned about materials, construction methods, shaping techniques, and finishing touches that help create a professional-quality pair of gloves. I hope this guide inspires you to try your own version and explore your creativity.