If you’re looking to create beautiful, handmade holiday décor, the Layered Christmas Tree Crochet – Pattern is a charming and rewarding project that adds warmth and personal flair to your celebrations. This festive crochet pattern creates a three-dimensional, tiered tree that’s perfect for decorating mantels, tables, or even giving as a thoughtful handmade gift.
Crocheting your own layered Christmas tree brings a sense of joy and creativity to the holiday season. Not only is it a fun and relaxing craft, but the end result is a reusable piece of décor that you can treasure for years to come. With the ability to customize colors, size, and embellishments, each tree you make can be as unique as a snowflake.
Whether you’re a beginner or a seasoned crocheter, this pattern is easy to follow and doesn’t require complex stitches. The beauty lies in its layered effect, created by stacking crocheted tiers to form a full, fluffy tree. Let’s explore how to make your own using the Layered Christmas Tree Crochet – Pattern, what materials you’ll need, and how to personalize it for your home or gift list.
1. Why the Layered Christmas Tree Crochet – Pattern is a Holiday Favorite
The popularity of the Layered Christmas Tree Crochet – Pattern has grown in recent years, and it’s easy to see why. These adorable handmade trees are a beautiful alternative to plastic décor, offering charm, texture, and tradition all in one.
First, this project is beginner-friendly, making it accessible to anyone with basic crochet skills. If you can make chains, double crochets, and slip stitches, you’ll be able to follow the pattern with ease. This makes it an excellent holiday project for new crafters or those looking for a relaxing, low-stress activity.
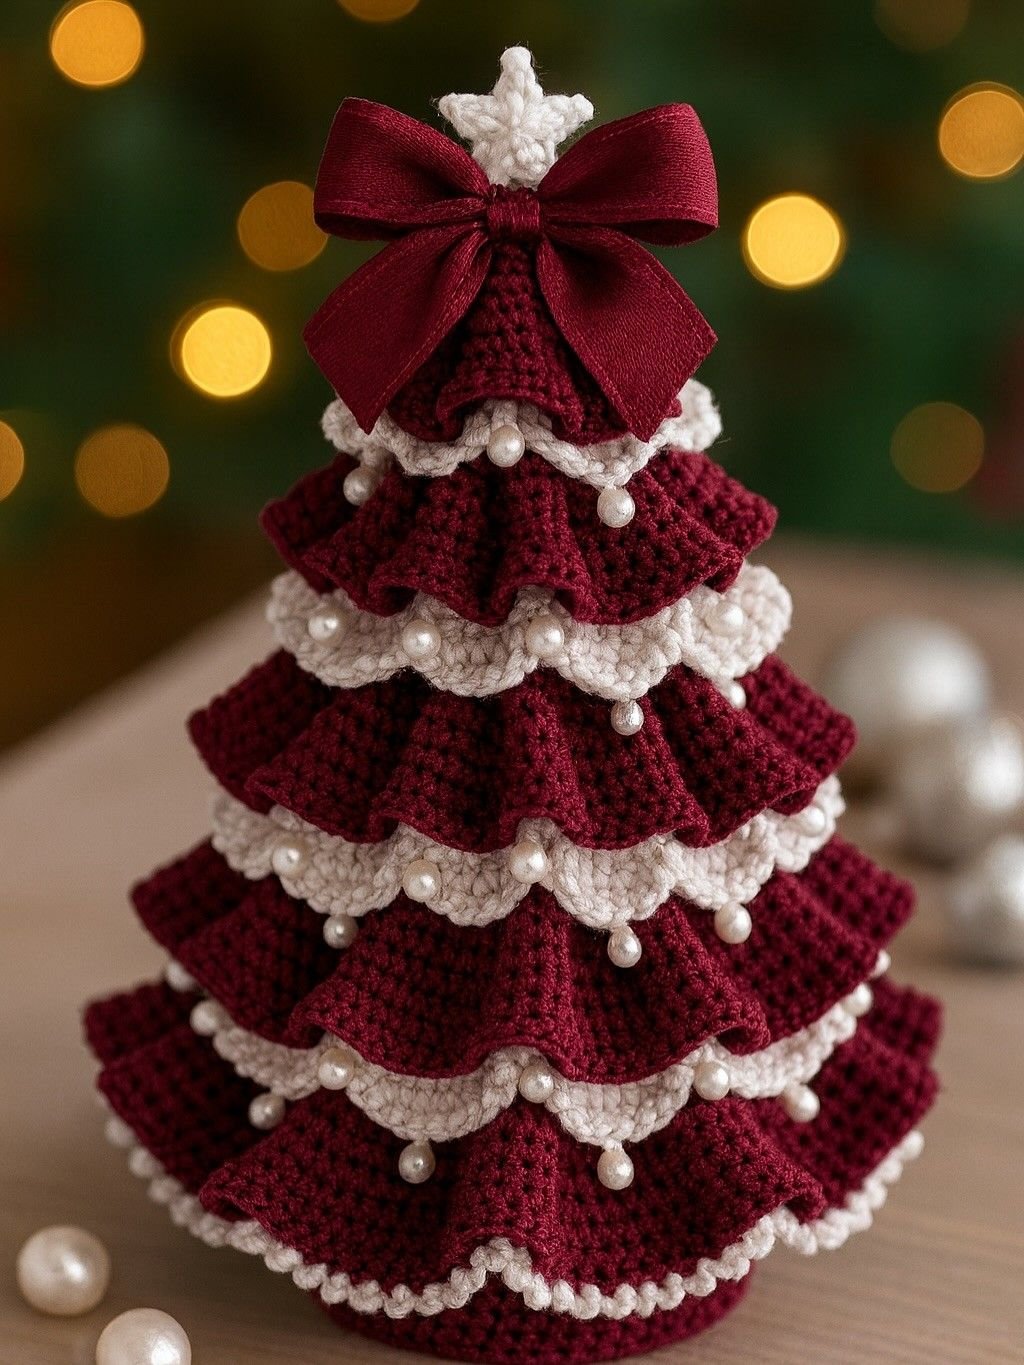
Secondly, the layered effect of this pattern gives the finished tree a dimensional, realistic look that’s both cozy and elegant. By crocheting several tiered circles and stacking them from largest to smallest, you create the signature Christmas tree shape naturally.
This pattern is also incredibly versatile. Use traditional green yarn for a classic look, or get creative with pastels, metallics, or variegated yarns for a whimsical or modern aesthetic. Add beads, mini pom-poms, or buttons to mimic ornaments, and finish the top with a crocheted star.
Handmade crochet trees make great gifts. Whether for teachers, friends, co-workers, or family members, they’re personal, thoughtful, and lightweight enough to ship. You can even make them into ornaments or use them as centerpieces for holiday tables.
Finally, crafting your own decorations promotes sustainability. Unlike mass-produced plastic décor, these trees can be reused year after year, and even passed down through generations, adding sentimental value to your holiday traditions.
2. Materials and Tools You Need to Crochet a Layered Christmas Tree
To get started with the Layered Christmas Tree Crochet – Pattern, you’ll only need a few materials, most of which may already be in your crafting corner. This is a great stash-busting project that doesn’t require a large amount of yarn or expensive tools.
The most important material is yarn. For a classic look, opt for medium-weight acrylic or cotton yarn in green tones. If you want a softer or fluffier texture, consider using yarns like velvet or chenille. Sparkle yarns can add a festive shimmer to your finished tree.
You’ll need a crochet hook that matches your yarn weight. For worsted weight yarn, a 4.0mm to 5.5mm hook is typically recommended. Using a slightly smaller hook than usual will make the layers firmer, which helps the tree stand tall and hold its shape.
Have a yarn needle on hand for weaving in ends and assembling the layers. A pair of scissors is also essential for trimming excess yarn. If you’re adding decorations, gather items like beads, buttons, ribbon, or embroidery floss.
Some crocheters like to stiffen the layers for more structure, especially for standing tabletop trees. You can do this with fabric stiffener, starch spray, or even diluted white glue applied to the finished pieces and shaped while drying.
If you want your tree to stand upright, consider using a cone insert made from cardboard or foam. Alternatively, crochet a cone shape separately and build the tree around it. This provides extra support and helps maintain the structure.
Lastly, if you plan to make multiple trees in different sizes, having a written or printed version of the Layered Christmas Tree Crochet – Pattern is helpful. Keep track of how many layers you’ve made and the size of each for consistency across projects.
3. Step-by-Step Instructions for the Layered Christmas Tree Crochet – Pattern
Creating a Layered Christmas Tree is simpler than it looks. The basic concept involves crocheting round layers that gradually decrease in size, then stacking them to form a tree shape. You can customize how many tiers you use depending on your desired tree height.
Start by crocheting the base tier, which will be the widest. Typically, this is a large circle worked in the round using double crochet stitches. Begin with a magic ring or chain 4 and join, then work increasing rounds to expand the circle.
Each new layer should be slightly smaller in diameter than the one below it. Repeat the same process to create 4 to 6 decreasing tiers. You can make each tier separately, or crochet them as a continuous piece with stitch markers separating each level.
To achieve a ruffled or textured edge, consider adding picots, shell stitches, or layered back-loop rounds to the outer edge of each tier. This creates the look of pine branches and adds volume to your tree.
Once all layers are crocheted, it’s time to assemble your tree. Stack the layers from largest to smallest. You can either stitch them together permanently or keep them removable for easier storage. If using a cone insert, glue or stitch the layers to the cone.
Add a crocheted star or snowflake to the top of the tree. This final touch completes the classic Christmas tree look. If you’re making an ornament, add a loop at the top using yarn or ribbon for hanging.
Take time to weave in all loose ends, press or stiffen your layers if needed, and enjoy your finished project. Whether you display it on a mantel or give it as a gift, your layered crochet tree is sure to bring smiles and holiday cheer.
4. Creative Ways to Customize and Use Your Crochet Christmas Tree
The beauty of the Layered Christmas Tree Crochet – Pattern lies in its flexibility. There are so many ways to personalize your project and make it special for yourself or others. Here are some creative ideas to inspire you.
Create a set of trees in different sizes. Use the same pattern with fewer or more layers, or increase the number of stitches in each tier. Displaying three trees together in small, medium, and large makes a beautiful table centerpiece.
Add personalized decorations to each tree. Sew on beads to look like ornaments, use mini jingle bells, or glue tiny bows or pom-poms. These additions transform a simple crochet piece into a festive work of art.
Consider using non-traditional colors for a modern twist. Pastel trees, ombré yarns, or even all-white versions make beautiful décor for various interior styles. Try silver and blue for a winter wonderland look, or metallic yarn for an upscale holiday vibe.
Turn your tree into a scented decoration by tucking a cinnamon stick, dried orange slice, or small sachet of cloves into the center. The tree will not only look beautiful but also smell like the holidays.
Make mini crochet tree ornaments using thread or lace-weight yarn. These are great for decorating your Christmas tree, tying onto gifts, or selling at holiday craft fairs. Add a loop of metallic thread for hanging.
Use your tree as part of a larger Christmas village scene. Pair it with crocheted houses, snowmen, and reindeer to create a magical display that the whole family can enjoy year after year.
FAQ – Layered Christmas Tree Crochet – Pattern
Q1: Is the layered Christmas tree crochet pattern beginner-friendly?
Yes, it’s great for beginners. The pattern uses basic stitches like chains and double crochets, with easy increases to create the circular layers.
Q2: What type of yarn works best for this project?
Worsted-weight acrylic or cotton yarn is ideal. You can also use novelty yarns like velvet or sparkle yarn to add texture and visual interest.
Q3: How many layers should I make for my tree?
Typically, 4 to 6 layers create a balanced, tree-like shape. However, you can adjust the number of layers to make your tree taller or shorter.
Q4: Can I wash the finished tree?
If using washable yarn, yes. However, if you add stiffeners, beads, or other embellishments, spot cleaning is recommended to preserve the shape and details.
Q5: How do I make the tree stand up on its own?
You can insert a foam or cardboard cone inside, or crochet a cone separately to act as the base. Some crafters also fill the bottom layer with rice or poly-pellets for stability.
Q6: Can I sell the trees I make using this pattern?
Absolutely! Just be sure the pattern allows for commercial use, and always credit the designer if required. These trees are popular at craft fairs and online markets.
Conclusion
The Layered Christmas Tree Crochet – Pattern is a delightful and creative way to bring handmade charm to your holiday season. Whether you’re decorating your home, making gifts, or simply enjoying a relaxing crochet project, this pattern offers flexibility, beauty, and festive cheer.
With endless possibilities for color, size, and decoration, no two trees have to be the same. You can personalize each one to match your style or theme, and the result is always heartwarming and memorable.
We hope this guide has inspired you to create your own crochet Christmas trees. If you’ve tried this pattern or have tips, please share your honest opinion and suggestions in the comments. Happy crocheting and Merry Christmas!