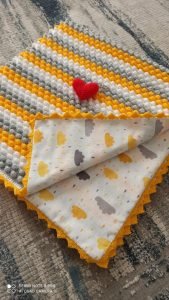
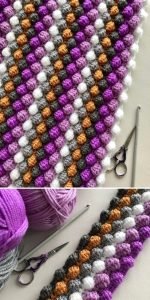
The Bobble Stitch is a classic crochet technique that adds texture and dimension to any project. Whether you’re creating a blanket, a scarf, or a decorative pillow, the bobble stitch brings a playful, tactile element to your crochet work.
In this tutorial, we’ll guide you through the process of mastering the bobble stitch, from understanding the basics to implementing it in various projects.
We’ll cover each step in detail, ensuring that you can confidently incorporate this stitch into your crochet repertoire.

What is the Bobble Stitch?
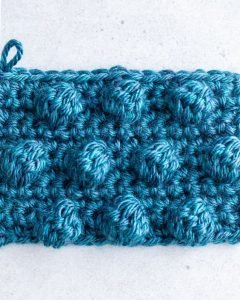
The Bobble Stitch is a type of crochet stitch that creates a raised, rounded texture resembling small, round “bobbles” on the fabric. This stitch is achieved by working several incomplete double crochets (DC) into the same stitch and then closing them together. The result is a stitch that stands out from the fabric, creating a 3D effect.
The bobble stitch is often used in patterns to create interesting textures and patterns, such as polka dots, flowers, or even letters. It’s a versatile stitch that can be used in both simple and complex designs, making it a favorite among crocheters of all skill levels.
Materials You’ll Need
To begin working with the bobble stitch, you’ll need a few basic materials. These include:
- Yarn: Choose a yarn that complements your project. Worsted weight yarn is a great option for beginners as it’s easy to work with and shows the texture of the bobble stitch well. However, any yarn weight can be used depending on your desired project outcome.
- Crochet Hook: Select a hook size that matches your yarn. For worsted weight yarn, a 5.5mm (I) hook is typically recommended. The hook size can affect the size and definition of your bobbles, so experiment with different sizes to find what you prefer.
- Scissors and Yarn Needle: You’ll need scissors to cut your yarn and a yarn needle to weave in the ends of your project once it’s complete.
- Pattern: If you’re following a specific pattern, make sure to have it on hand. The bobble stitch can be incorporated into various designs, so understanding your pattern is key.
Understanding the Bobble Stitch Technique
Before diving into a project, it’s important to understand the basic technique behind the bobble stitch. Unlike a regular double crochet, the bobble stitch involves working multiple half-finished double crochets into the same stitch and then pulling them together at the end. This creates the characteristic “bobble” effect.
Each bobble is formed by working five double crochets together, but you only complete the last step of the double crochet once all five have been started. This creates a cluster that pops out from the fabric. Understanding this basic concept is crucial before you start implementing it in your projects.

Step-by-Step Instructions
Now that you have your materials ready, let’s walk through the process of creating a bobble stitch. Follow these steps to master the technique:
- Start with a Foundation Row
- Begin by creating a foundation chain of your desired length. For practice, start with a simple chain of 20 stitches.
- Work a row of single crochets (SC) across the foundation chain. This will serve as the base for your bobbles.
- Create the Bobble Stitch
- Yarn over (YO), insert your hook into the designated stitch, YO again, and pull through. You should have three loops on your hook.
- YO, pull through the first two loops (you now have two loops left on your hook). This is the beginning of your double crochet, but do not finish it.
- Repeat the above steps four more times in the same stitch, leaving you with six loops on your hook.
- YO and pull through all six loops on your hook. This completes the bobble stitch.
- Work a single crochet in the next stitch to secure the bobble.
- Continue the Row
- Repeat the bobble stitch process across the row, leaving a single crochet between each bobble.
- Once you reach the end of the row, chain one and turn your work. The next row should be worked in single crochet stitches, with the bobbles aligned as desired.
- Finishing Your Project
- Continue working rows of bobble stitches followed by single crochet rows until your project reaches the desired length.
- Finish with a row of single crochets and then fasten off your work.
- Use a yarn needle to weave in any loose ends, ensuring a clean finish.
Tips for Perfecting Your Bobble Stitch
Even though the bobble stitch is relatively simple, a few tips can help you perfect your technique and avoid common mistakes:
- Keep Your Tension Consistent: Consistent tension is key to creating uniform bobbles. If your tension is too tight, your bobbles might not pop out as much, and if it’s too loose, they might be too large and loose.
- Use Contrasting Colors: When working with multiple colors, use a contrasting color for your bobbles to make them stand out more. This is particularly effective in patterns that highlight the texture of the bobble stitch.
- Practice Makes Perfect: The bobble stitch may take a bit of practice to get the hang of, especially if you’re new to crochet. Don’t be discouraged if your first few attempts aren’t perfect—keep practicing, and you’ll soon have a neat, consistent bobble stitch.

Creative Uses for the Bobble Stitch
Once you’ve mastered the bobble stitch, the creative possibilities are endless. Here are a few ideas on how to incorporate this stitch into your crochet projects:
- Bobble Blankets: Use the bobble stitch to create a textured blanket. Alternate rows of bobbles with plain double crochet rows to create a pattern that is both visually interesting and cozy.
- Decorative Pillows: Add a touch of texture to your home decor by incorporating the bobble stitch into your crochet pillows. Create a design using bobbles, such as polka dots or geometric shapes, to add a playful element to your pillows.
- Bobble Stitch Borders: Enhance the edges of your projects with a bobble stitch border. This can be a fun way to add a finishing touch to blankets, scarves, or even garments.

The bobble stitch is a fun and versatile crochet technique that can add texture and visual interest to a wide range of projects.
Whether you’re creating a cozy blanket, a decorative pillow, or simply experimenting with new stitches, the bobble stitch offers endless possibilities.
By following this tutorial, you’ll be able to master the bobble stitch and incorporate it into your crochet repertoire, creating beautiful, textured projects that are sure to impress. Happy crocheting!

