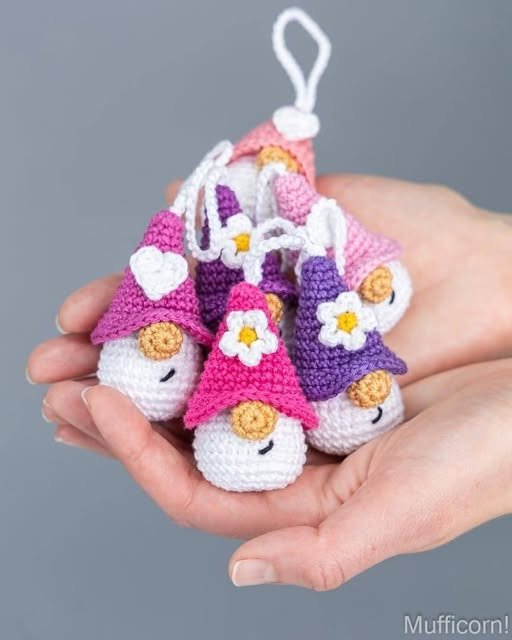
Mini Crochet Gnomes – Pattern is a delightful and rewarding craft that combines charm, creativity, and the calming rhythm of crochet. These whimsical little characters are beloved by crafters around the world for their versatility and decorative appeal. Whether you’re a seasoned crochet artist or just getting started, working on your own mini crochet gnomes pattern is a fantastic way to practice your skills and create something truly magical.
The popularity of mini crochet gnomes has grown significantly due to their association with Scandinavian folklore, seasonal décor, and handmade gifting. These miniature gnomes are perfect for Christmas, Easter, Halloween, or even as everyday home accents. Best of all, they require very little yarn and can be completed in just a few hours, making them ideal for weekend projects or last-minute gifts.
This guide will walk you through everything you need to know about the mini crochet gnomes – pattern, from choosing the right materials to understanding pattern basics, assembling your gnome, and adding personal touches. Let’s dive in and explore the wonderful world of tiny yarn gnomes!
1. What You Need to Start a Mini Crochet Gnomes Pattern
Before starting your first mini crochet gnome, it’s important to gather the right tools and materials. Each item you select contributes to the overall look and feel of your finished gnome. Planning ahead ensures a smoother and more enjoyable crafting experience.
Yarn selection is crucial. For mini gnomes, worsted weight or lightweight yarns work best. Cotton or acrylic yarns are popular choices because they hold their shape and come in a wide range of colors. Choose vibrant colors for hats and muted tones for the body to make your gnome pop.
Crochet hook sizes typically range from 2.5mm to 4mm for mini gnomes. The smaller the hook, the tighter your stitches, which helps maintain the structure of your gnome. Always match your hook size to the yarn’s recommended gauge for best results.
You’ll also need fiberfill stuffing, which is used to give your gnome shape and volume. Small bags of stuffing go a long way, and you can adjust the firmness depending on your preference for a softer or firmer toy.
Safety eyes or embroidery thread can be used for facial features. Safety eyes give a professional touch, while embroidery allows for more customization, especially for expressive or themed gnomes.
Other important tools include tapestry needles for sewing parts together, scissors, and stitch markers to help keep track of rounds and stitch counts during the project.
Having a printed or digital mini crochet gnomes pattern on hand is essential. Look for beginner-friendly patterns with clear instructions, step-by-step photos, or even video tutorials to guide you through each part of the project.
2. Understanding the Mini Crochet Gnome Pattern Structure
Knowing how to read and interpret a mini crochet gnome pattern is a foundational skill that helps avoid confusion and ensures accuracy in your project. These patterns are often written using standard abbreviations and structured in easy-to-follow rounds.
Most patterns begin with the gnome’s base or body, typically worked in continuous rounds using single crochet stitches. This forms the foundation of your gnome and determines its overall size and shape.
Next comes the gnome hat, one of the most distinctive features. It’s often worked separately and attached later. Some patterns use color changes or textured stitches to create a knit-like effect, adding character and charm to your mini crochet gnome.
The nose is a tiny detail that brings your gnome to life. Usually made from a small ball of yarn or a wooden bead, the nose is stitched between the hat and body to peek out adorably from under the brim.
Beards and braids are often made with brushed yarn or wool roving, giving your gnome a soft and fluffy appearance. You can glue or stitch these pieces in place depending on your preference and the pattern instructions.
Many patterns also include arms, legs, or accessories such as small presents, mushrooms, or pumpkins. These can be crocheted separately and attached to give your gnome a seasonal or themed look.
Finally, assembling your gnome is like putting together a puzzle. Carefully stitch each piece using a tapestry needle, double-check placement, and shape the finished product by adjusting stuffing and smoothing seams.
3. Creative Ways to Customize Your Mini Crochet Gnomes
One of the joys of working with a mini crochet gnomes pattern is the freedom to personalize and create unique variations. You can add your own style and flair to each gnome, turning a basic pattern into something that’s truly one-of-a-kind.
Start by choosing unique color combinations. Use bold colors for holidays like red and green for Christmas or orange and black for Halloween. Pastels work beautifully for springtime or baby shower gifts.
You can also get creative with different yarn textures. Use fuzzy yarn for beards, sparkly yarn for magical gnome hats, or multicolored yarn to create a whimsical striped effect. This gives your gnomes extra personality and charm.
Add embellishments like tiny buttons, sequins, or miniature pom-poms to hats and bodies. These little details make your gnomes stand out and show off your personal style.
For themed gnomes, consider adding props or accessories. A mini crochet heart for Valentine’s Day, a candy cane for Christmas, or a small crochet pumpkin for fall can instantly set the tone and season of your gnome.
You can even mix and match pattern elements from different designs. For example, use the body from one pattern and the hat from another. This keeps your crochet experience fresh and gives you endless creative possibilities.
Don’t forget to personalize your gnome’s face or name them! Embroidering initials or adding a little name tag is a lovely finishing touch, especially if you’re gifting the gnome to someone special.
4. Where to Find and Share Mini Crochet Gnomes Patterns
Whether you’re searching for new inspiration or want to share your own creations, there are plenty of resources for mini crochet gnomes patterns online and within the crafting community.
One of the best places to start is Etsy, where independent designers offer a wide variety of downloadable PDF patterns. These often include detailed instructions and support from the pattern creator.
Ravelry is another excellent platform for discovering free and paid crochet patterns. You can filter by difficulty level, yarn weight, and project size to find exactly what you need.
YouTube and Pinterest are also great for visual learners. Many crochet influencers share mini crochet gnome tutorials, perfect for beginners who benefit from step-by-step video instructions.
Don’t underestimate the value of crochet Facebook groups and Reddit forums. These communities are incredibly helpful for troubleshooting, pattern suggestions, and sharing photos of your work for feedback or encouragement.
If you create your own gnome designs, consider publishing your pattern on crafting blogs or marketplaces like Etsy. There’s a growing audience eager for fresh ideas, and pattern sales can be a fun way to earn passive income.
Finally, remember to share your finished mini crochet gnomes on social media. Use hashtags like #minicrochetgnomes, #crochetlove, or #handmadegnomes to connect with other crafters and inspire others with your creativity.
FAQ – Frequently Asked Questions About Mini Crochet Gnomes Pattern
Q1: How long does it take to complete a mini crochet gnome?
A: On average, a mini crochet gnome can be completed in 2 to 4 hours, depending on your crochet speed and the complexity of the pattern.
Q2: Can I sell gnomes made from purchased patterns?
A: Most designers allow the sale of finished items made from their patterns, but always check the specific terms. Give credit to the pattern creator when required.
Q3: What skill level is needed to crochet a mini gnome?
A: Many mini crochet gnomes patterns are beginner-friendly, using simple stitches like single crochet. However, some may require experience with shaping or color changes.
Q4: What yarn is best for mini crochet gnomes?
A: Worsted weight or DK yarns are commonly used. Cotton yarn holds shape well, while acrylic is affordable and comes in many colors.
Q5: How do I stuff the gnome evenly?
A: Use small amounts of fiberfill at a time and press firmly into corners to shape the gnome evenly. Avoid overstuffing, which can stretch the stitches.
Q6: Can I crochet gnome accessories separately?
A: Yes! Many crafters make accessories like mini gifts, flowers, or signs to pair with gnomes. These add personality and are often part of advanced patterns.
Conclusion
Creating a Mini Crochet Gnomes – Pattern is more than just a fun pastime—it’s a way to express creativity, bring joy, and craft something meaningful by hand. From understanding pattern basics to customizing your gnome and exploring resources, this guide covered everything you need to get started with confidence.
Whether you’re crocheting for fun, gifting, or even selling, these charming mini gnomes are sure to bring smiles. If this article helped you, we’d love to hear from you! Please leave a sincere opinion and suggestions on what you’d like to see next—your feedback helps improve the crafting experience for everyone.
Happy crocheting!