A Mini Crochet Tulip Bouquet – Pattern is the perfect way to bring a touch of everlasting spring into your home without ever needing to worry about watering. Whether you are looking for a charming handmade gift or a delicate piece of desk decor, this crochet project offers a blend of simplicity and elegance. In this guide, we will explore everything you need to create your own floral arrangement using basic yarn techniques that result in stunning, professional-looking results.
Creating a Mini Crochet Tulip Bouquet – Pattern is an incredibly rewarding experience for crafters of all skill levels. Because of their small scale, these crochet flowers work up quickly, making them an ideal “afternoon project” for those who want instant gratification. By mastering a few fundamental stitches, you can produce a variety of colorful tulips that look beautiful individually or gathered together in a vibrant, handmade bouquet.
The beauty of the Mini Crochet Tulip Bouquet – Pattern lies in its versatility and the ability to customize colors to suit any occasion. Using the right cotton yarn and a small crochet hook, you can achieve a refined texture that mimics the soft petals of a real flower. Throughout this article, we will break down the essential components of this pattern, ensuring you have all the knowledge required to start your floral crochet journey today.
1 Understanding the Mini Crochet Tulip Bouquet – Pattern Essentials
The Mini Crochet Tulip Bouquet – Pattern is a detailed set of instructions designed to help you create small-scale, 3D floral structures. Unlike flat motifs, this pattern focuses on creating volume using rounds of stitches that eventually fold or cinch to form the iconic tulip “cup.” It is the blueprint that guides your hook to transform simple string into a piece of art.
To begin your Mini Crochet Tulip Bouquet – Pattern, you must first select the appropriate materials, such as mercerized cotton yarn in weights like Sport or Fingering. These thinner yarns allow the miniature details to shine without looking bulky. Choosing a high-quality yarn ensures that your crochet tulips maintain their shape and don’t pill over time.
A crucial part of any Mini Crochet Tulip Bouquet – Pattern is the use of the magic ring (or magic circle) technique. This method allows you to start your work with a tightly closed center, which is vital for the bottom of the flower bud. Without a solid foundation, the structural integrity of your crochet bouquet might be compromised.
The pattern will also specify the use of increases and decreases to create the bulbous shape of the tulip. By strategically adding stitches in the middle rounds and maintaining a consistent tension, you create the “bloom” effect. Precision is key here to ensure all your crochet flowers in the bouquet look uniform.
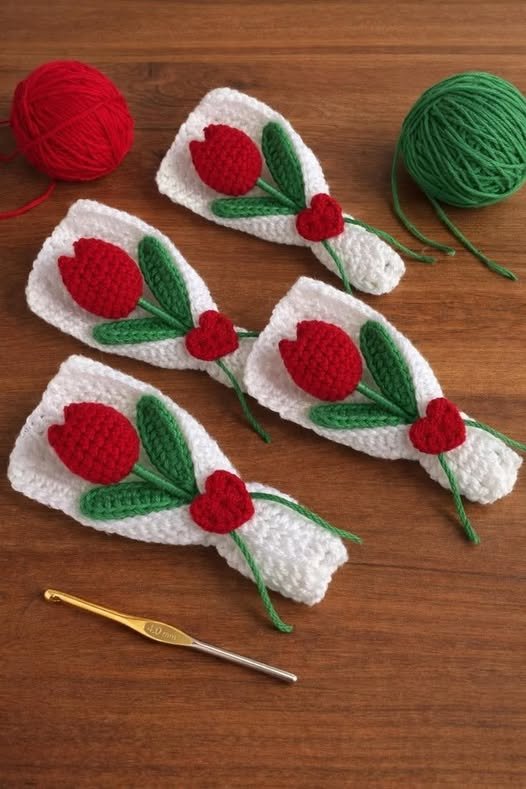
Beyond the flower head, a complete Mini Crochet Tulip Bouquet – Pattern includes instructions for the stems and leaves. Most crafters use floral wire or bamboo skewers covered in green yarn to provide support. This structural element is what turns a simple crochet piece into a realistic botanical display.
Finally, reading the Mini Crochet Tulip Bouquet – Pattern requires familiarity with standard crochet abbreviations like SC (single crochet), HDC (half double crochet), and DC (double crochet). Mastering these basics allows you to follow the pattern fluidly, resulting in a handmade gift that looks like it was made by a professional artisan.
2 Materials and Tools for Your Mini Crochet Project
Before diving into your Mini Crochet Tulip Bouquet – Pattern, gathering the right tools is the first step toward success. You will need a crochet hook that is slightly smaller than what the yarn label suggests; this creates a tight fabric so the fiberfill stuffing doesn’t peek through the stitches. A 2.0mm or 2.5mm hook is usually the “sweet spot” for miniature crochet.
The star of the show is the yarn, and for a Mini Crochet Tulip Bouquet – Pattern, color selection is everything. Soft pastels like lavender, mint, and baby pink create a classic look, while bold reds and yellows make the bouquet pop. Using natural fibers provides a matte finish that looks more realistic under various lighting conditions.
In addition to yarn, you will need stuffing material, typically polyester fiberfill, to give your tulips their 3D shape. Since these are miniature tulips, you only need a small amount for each bud. It is important to stuff them firmly enough to hold the shape but not so much that the crochet stitches stretch and distort.
For the structural components of the Mini Crochet Tulip Bouquet – Pattern, you should acquire floral tape and floral wire. The wire allows you to bend the stems into natural positions, giving your handmade bouquet a lifelike flow. Some patterns also suggest using a bit of hot glue to secure the yarn ends to the wire stems.
Don’t forget the finishing tools like a tapestry needle for weaving in ends and sharp scissors. A stitch marker is also highly recommended, as the Mini Crochet Tulip Bouquet – Pattern is usually worked in continuous spirals. Losing track of your starting point can lead to an asymmetrical flower, which we want to avoid.
Lastly, consider how you will present your Mini Crochet Tulip Bouquet – Pattern creation. Small glass jars, tiny ceramic vases, or even wrapping paper and ribbons can turn your individual flowers into a complete gift set. The presentation is just as important as the crochet work itself when it comes to the final impact.
3 Step-by-Step Guide to Stitching the Tulip Buds
The first stage of the Mini Crochet Tulip Bouquet – Pattern involves working the bud from the bottom up. Start with a magic ring and work 6 single crochets into the center. This tight start is the foundation for a professional crochet flower. In the following rounds, you will double your stitch count to expand the base of the tulip.
As you progress through the Mini Crochet Tulip Bouquet – Pattern, you will reach the “body” of the flower. This section usually involves several rounds of even stitching without any increases. This creates the cylindrical height of the flower bud. Maintaining even tension here is vital to ensure the walls of your crochet tulip are smooth and consistent.
Once you reach the desired height specified in the Mini Crochet Tulip Bouquet – Pattern, it is time to fasten off, leaving a long tail for sewing. Unlike amigurumi which is often closed in a point, many tulip patterns use a “cross-stitch” closing method. You flatten the top and sew across the center in two directions to create four distinct “petals” at the top.
Before closing the top completely, remember to insert your fiberfill. If the Mini Crochet Tulip Bouquet – Pattern calls for a wire stem, insert the wire through the bottom of the bud (the magic ring) before you finish sewing the top. Securing the wire inside the stuffing ensures that the flower head doesn’t wobble or fall off the stem.
The leaves are usually worked as separate flat pieces using chain stitches and varying heights of stitches (SC, HDC, DC) to create a tapered, pointed look. A well-designed Mini Crochet Tulip Bouquet – Pattern will include leaf instructions that complement the scale of the buds. These are then sewn or glued onto the stem to complete the botanical look.
Once all components are finished, the assembly phase of the Mini Crochet Tulip Bouquet – Pattern begins. You can group three, five, or even a dozen flowers together. Arranging them at different heights within the bouquet adds depth and visual interest, making your crochet project look like a professional floral arrangement.
4 Tips for Customizing and Scaling Your Crochet Bouquet
One of the best things about the Mini Crochet Tulip Bouquet – Pattern is how easy it is to customize. If you want a “micro” version, simply switch to embroidery thread and a 1.0mm hook. This allows you to create jewelry or tiny charms using the exact same crochet techniques but on a much smaller scale.
You can also experiment with variegated yarn to give your Mini Crochet Tulip Bouquet – Pattern a unique, “parrot tulip” appearance. These yarns have multiple colors in one strand, which creates natural-looking streaks on the petals. This adds a level of complexity to your crochet bouquet without requiring any extra effort in color changes.
If you prefer a larger display, you can scale up the Mini Crochet Tulip Bouquet – Pattern by using bulky yarn and a larger hook. While the original design is for a miniature version, the geometric principles remain the same. A giant crochet tulip can serve as a quirky throw pillow or a bold statement piece in a nursery.
Adding embellishments to your Mini Crochet Tulip Bouquet – Pattern can further personalize the project. Consider sewing small beads onto the petals to represent dew drops, or using a bit of blush/makeup to add a gradient tint to the edges of the crochet flowers. These “mixed media” touches elevate the handmade feel of the work.
For those looking to sell their work, the Mini Crochet Tulip Bouquet – Pattern is a high-value item for craft fairs. Because they are everlasting flowers, they are popular for Valentine’s Day, Mother’s Day, and weddings. Packaging them in clear cellophane with a personalized tag can significantly increase their perceived value.
Finally, don’t be afraid to tweak the Mini Crochet Tulip Bouquet – Pattern to make it your own. Maybe you want longer leaves or a more rounded bud. Crochet is a flexible art form, and once you understand the basic structure of the tulip pattern, the creative possibilities for your floral bouquet are truly endless.
FAQ – Frequently Asked Questions
1. Is the Mini Crochet Tulip Bouquet – Pattern suitable for absolute beginners?
Yes! While it requires knowledge of working in rounds, it primarily uses the single crochet stitch. It is a fantastic “second project” for someone who has mastered the basics of crochet hooks and yarn tension.
2. How long does it take to finish one tulip?
Depending on your speed, a single flower from the Mini Crochet Tulip Bouquet – Pattern usually takes between 20 to 40 minutes. You can easily complete a whole bouquet over a weekend.
3. What is the best yarn for crochet flowers?
Cotton yarn is widely considered the best choice for a Mini Crochet Tulip Bouquet – Pattern. It provides great stitch definition and the stiffness required for the flowers to hold their shape without drooping.
4. Can I wash my crochet tulip bouquet?
If you used floral wire or glue, machine washing is not recommended. You can lightly spot clean the yarn petals with a damp cloth or use a soft brush to remove dust from your handmade flowers.
5. Do I need to use stuffing?
Yes, to get the 3D effect of the Mini Crochet Tulip Bouquet – Pattern, a small amount of fiberfill or even scrap yarn ends is necessary to keep the bud from collapsing.
6. How do I make the stems stand up straight?
Using a sturdy floral wire (18-22 gauge) inside the stem is the most effective way. If you are making this for a child, you can use a plastic straw or a thick pipe cleaner as a safer alternative to sharp wire.
Conclusion
In this article, we have explored the wonderful world of the Mini Crochet Tulip Bouquet – Pattern, covering everything from the essential crochet tools to the step-by-step assembly of the flower buds. We learned that by using cotton yarn, the right crochet hook, and techniques like the magic ring, anyone can create a beautiful and everlasting floral arrangement.
Whether you are making these for yourself or as a handmade gift, the process is a therapeutic and creative outlet that results in a timeless piece of decor.