Mini crocheted wreath – Pattern projects are becoming increasingly popular among crochet lovers who enjoy creating small, charming, and meaningful handmade pieces. Right from the beginning of this article, using the keyword Mini crocheted wreath – Pattern helps strengthen SEO and ensures Google-friendly optimization. This type of crochet project is ideal for both beginners and experienced crafters because it is simple, quick to complete, and highly customizable. From holiday decorations to small gifts, mini wreaths add a warm and personal touch wherever they are used.
One reason the Mini crocheted wreath – Pattern has won so many hearts is its versatility. You can adapt colors, textures, and embellishments to match any occasion. Whether you want a festive Christmas ornament, a spring-inspired floral wreath, or a minimalist decorative piece for year-round display, the same basic pattern works beautifully. The size makes it easy to craft several wreaths in one sitting, making them great for gifts, craft fairs, or home décor.
Another benefit is how accessible this pattern is for beginners. Even with basic stitches such as single crochet or double crochet, the results look impressive and polished. The small scale of the Mini crocheted wreath – Pattern makes it affordable and fast, allowing you to experiment with different designs without feeling overwhelmed. Before diving into the first steps, it’s helpful to understand how the structure, materials, and creativity behind these projects come together.
1. Understanding the Structure of the Mini Crocheted Wreath
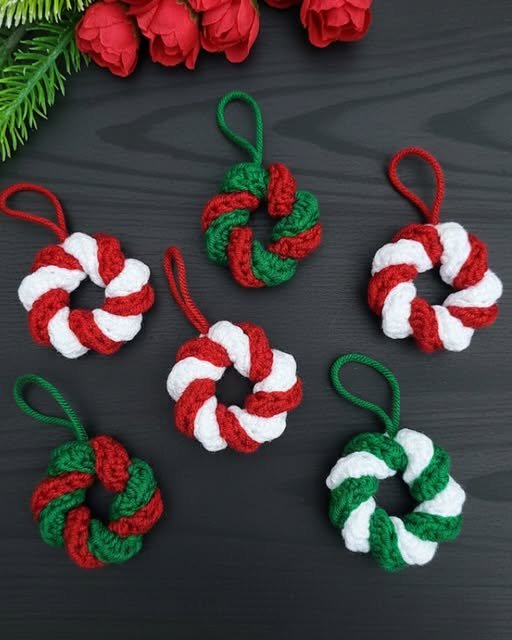
The foundation of the Mini crocheted wreath – Pattern is a simple circular shape. This can be created by working around a small craft ring or by crocheting a tube that is stitched into a circle. Both methods work well, and your preference may depend on the style you want or the materials you have on hand.
Most mini wreaths are made with tight stitches to ensure the shape stays firm and neat. Single crochet is one of the most popular stitches for this purpose because it forms a dense, sturdy fabric. By keeping your tension even and consistent, your wreath will maintain its circular form and look professionally finished.
Crocheters often add texture to simulate foliage. Stitches like puff stitch, bobble stitch, or cluster stitch create a beautifully raised surface that mimics greenery or soft leaves. Adding texture is optional but can bring extra dimension to your wreath, making the Mini crocheted wreath – Pattern appear more lifelike and decorative.
The bow is usually the central accent on a wreath. Some choose a classic yarn bow, while others use ribbons or crocheted embellishments. The bow is typically placed at the top or bottom of the wreath and serves as a charming highlight that completes the look. A simple crocheted rectangle cinched in the middle can create a lovely handmade bow.
Mini wreaths can also be decorated with tiny details. These may include small crocheted berries, tiny stars, miniature flowers, or even a tiny amigurumi ornament in the center. These features make the wreath unique and allow you to tailor the design to any season or theme.
Because mini wreaths are small, they require minimal yarn. This makes them an excellent project for using leftover yarn scraps. Even a small amount of yarn can produce several wreaths, making this pattern affordable and eco-friendly.
2. Materials and Tools for the Mini Wreath Project
To create a beautiful Mini crocheted wreath – Pattern, choosing the right materials is essential. Yarn weight plays a big role in the final appearance. DK and worsted-weight yarns are the most common choices. Thicker yarn creates a fuller wreath, while thinner yarn results in a more delicate and detailed look.
Your crochet hook size should match your yarn, but using a slightly smaller hook can help maintain tighter stitches. Common hook sizes for mini wreaths range from 3.0 mm to 4.5 mm. Tighter stitches help keep the wreath firm, especially if you’re not using a base ring.
A small ring, such as a plastic or wooden circle, is optional but helpful, especially for beginners. This provides structure and shape, ensuring your wreath stays perfectly round. Without a base, you would crochet a small tube and join the ends to create a circle.
Other basic tools include scissors, a yarn needle for sewing pieces together, and stitch markers. Since mini wreaths are worked in small rounds, stitch markers can help you track rows or find the start of a round easily. They are especially useful for beginners learning the Mini crocheted wreath – Pattern.
For decorations, you can use buttons, beads, embroidery thread, ribbons, metallic yarn, or mini pom-poms. These extras allow you to personalize your wreath and create a unique finished piece. Holidays like Christmas, Easter, or Valentine’s Day can inspire color choices and decorative accents.
If you want your wreath to be extra firm, you can use a small amount of fiberfill for stuffed wreaths or a light spray of fabric stiffener. These optional additions help the wreath hold its shape better, especially if you plan to use it as a keychain or bag charm. The right materials help ensure your project turns out beautiful, durable, and long-lasting.
3. Step-by-Step Guide for Crafting the Mini Crocheted Wreath
To begin your Mini crocheted wreath – Pattern, start with the circular base. If you’re using a craft ring, attach your yarn with a slip knot and begin single crocheting around the ring, making sure to pack the stitches tightly together. Continue crocheting until the entire ring is covered, then join with a slip stitch to finish the round neatly.
If you’re creating the wreath without a ring, begin by chaining around 20–30 stitches and joining them to form a loop. Work several rounds of single crochet or your stitch of choice, creating a tube. Once you’re satisfied with the thickness, lightly stuff the tube with fiberfill and sew the two ends together to form a circle.
Next, create the bow. A simple method is crocheting a small rectangle—around 6–10 stitches wide and 4–6 rows tall—and then wrapping yarn around its center to form the bow shape. Another method is chaining a length of 20–25 stitches, tying it into a bow, and securing it with a knot. The bow is a signature detail of the Mini crocheted wreath – Pattern and adds elegance to your wreath.
Add embellishments to personalize the wreath. Tiny berries can be made with mini pom-poms or crocheted balls. Flowers can be crocheted using small five-petal designs. Leaves can be created with chains and slip stitches. These small touches make your wreath stand out and bring personality to the piece.
Once the wreath is decorated, attach your bow using a yarn needle. Make sure the bow is centered and firmly secured so it stays in place. You can adjust it until it looks balanced and visually appealing.
Finally, add a hanging loop if you want your wreath to be used as an ornament or wall decoration. A simple chain loop works perfectly. With the loop attached, your Mini crocheted wreath – Pattern is complete and ready to display or gift.
4. Creative Customization and Design Variations
One of the greatest joys of making a Mini crocheted wreath – Pattern is experimenting with different styles. You don’t have to stick to traditional green. Try pastel colors for spring, rich earth tones for autumn, or multicolor yarn for a playful effect.
If you enjoy rustic décor, use yarns in shades of brown, beige, and olive green. Add wooden beads, crocheted pinecones, or jute bows to give your wreath a warm, natural look. This style pairs beautifully with farmhouse decorations or handcrafted home accents.
For a modern minimalist approach, stick to neutral or monochrome colors like white, gray, and muted gold. Pairing soft cotton yarn with a metallic thread can make your wreath look luxurious and contemporary. This style works well for elegant winter decorations or chic gift toppers.
Another fun idea is to add tiny amigurumi characters. A small Santa, snowman, gingerbread figure, or bunny can be placed at the center of the wreath, turning it into a mini diorama. This adds charm and can make your Mini crocheted wreath – Pattern even more special.
Experiment with textures to change the style of your wreath. Puff stitches mimic foliage, while boucle or chenille yarn creates a fluffy, snow-covered appearance. You can even mix different yarn types for a multi-textured effect.
Seasonal themes also offer endless inspiration. A heart-themed wreath for Valentine’s Day, a floral wreath for Mother’s Day, or a pastel wreath for Easter all use the same basic pattern. With creativity, your mini wreaths can be adapted for any event all year long.
FAQ – Mini Crocheted Wreath Pattern
1. Is the Mini crocheted wreath – Pattern beginner-friendly?
Yes, it uses basic stitches and simple construction, making it great for beginners.
2. How long does it take to complete a mini wreath?
Most crafters finish one in 20–45 minutes, depending on decorations.
3. Can I make the wreath without a ring base?
Yes, simply crochet a small tube and sew the ends together to form a circle.
4. What yarn works best for mini wreaths?
DK or worsted-weight yarn provides the best structure and appearance.
5. Can I sell mini wreaths I make using this pattern?
Generally yes—handmade items can be sold, though crediting the pattern designer is often appreciated.
6. How can I make the wreath firmer?
Use a small hook, tight stitches, and optionally add stiffener or a base ring.
Conclusion
This detailed guide explored everything you need to know about the Mini crocheted wreath – Pattern, from understanding its structure to choosing materials, crafting each element, and customizing the final piece.
Mini wreaths are quick, adorable, and incredibly versatile, making them ideal for gifts, decorations, or craft fair inventory. I hope this article has inspired you to create your own mini crocheted wreaths.