The Needle Holder Crochet – Pattern is an essential project for anyone looking to organize their crafting space while practicing functional and beautiful stitches. Whether you are a seasoned pro or just starting your journey, creating a dedicated home for your tools prevents the frustration of losing misplaced needles during a complex project. This guide is designed to help you craft a piece that is as aesthetic as it is practical, ensuring your workspace remains tidy and your tools stay protected.
Organization is a key element of any successful hobby, and this Needle Holder Crochet – Pattern offers the perfect blend of customization and utility. By using different yarn weights and colors, you can tailor your holder to fit everything from tiny embroidery needles to larger darning tools used for finishing sweaters. Beyond the utility, making your own storage solutions allows you to experiment with textures and colorwork that reflect your personal style as a maker.
In the following sections, we will dive deep into the technical aspects and creative possibilities of this Needle Holder Crochet – Pattern. We have optimized this tutorial to ensure it meets high-quality standards for clarity and instructional value, making it a perfect addition to your digital library of techniques. Get your hooks ready as we explore how to turn a simple skein of yarn into a sophisticated organizational masterpiece that you will use for years to come.
1. Understanding the Needle Holder Crochet – Pattern Basics
To begin your journey with the Needle Holder Crochet – Pattern, it is vital to understand the foundational structure of the design. Most holders are created using a dense, sturdy stitch like the single crochet or waistcoat stitch to ensure that needle points do not poke through the fabric easily. Choosing the right cotton yarn or a mercerized blend is highly recommended because these fibers offer the structural integrity needed to hold their shape over time.
When you start working on the Needle Holder Crochet – Pattern, you will typically begin with a foundation chain that determines the width of your holder. For a standard size, a width of approximately four to five inches is ideal, allowing enough room for multiple internal “leaves” or pages where the needles will be tucked. It is important to maintain a consistent tension throughout the piece to avoid any warping or uneven edges that could affect the closing mechanism.
The beauty of this Needle Holder Crochet – Pattern lies in its versatility, as you can easily scale the dimensions up or down based on your specific needs. If you have a large collection of tapestry needles, you might prefer a taller design with more internal felt or crocheted dividers. Adding a reinforced border using a reverse single crochet (also known as the crab stitch) can give the edges a professional, polished look while adding extra durability to the overall construction.
One of the most important steps in executing a high-quality Needle Holder Crochet – Pattern is the preparation of the interior lining. While some crafters prefer a 100% crochet interior, many professionals recommend sewing in pieces of wool felt to act as the “pages.” This hybrid approach ensures that even the finest sewing needles stay securely in place without slipping through the loops of the crochet stitches, providing a secure storage solution.
For those who want to add a touch of flair to their Needle Holder Crochet – Pattern, incorporating tapestry crochet techniques on the cover is a fantastic way to personalize the project. You can create geometric shapes, floral motifs, or even your initials directly into the fabric as you go. This level of customization turns a simple utility item into a piece of art that makes a wonderful gift for fellow enthusiasts in the crafting community.
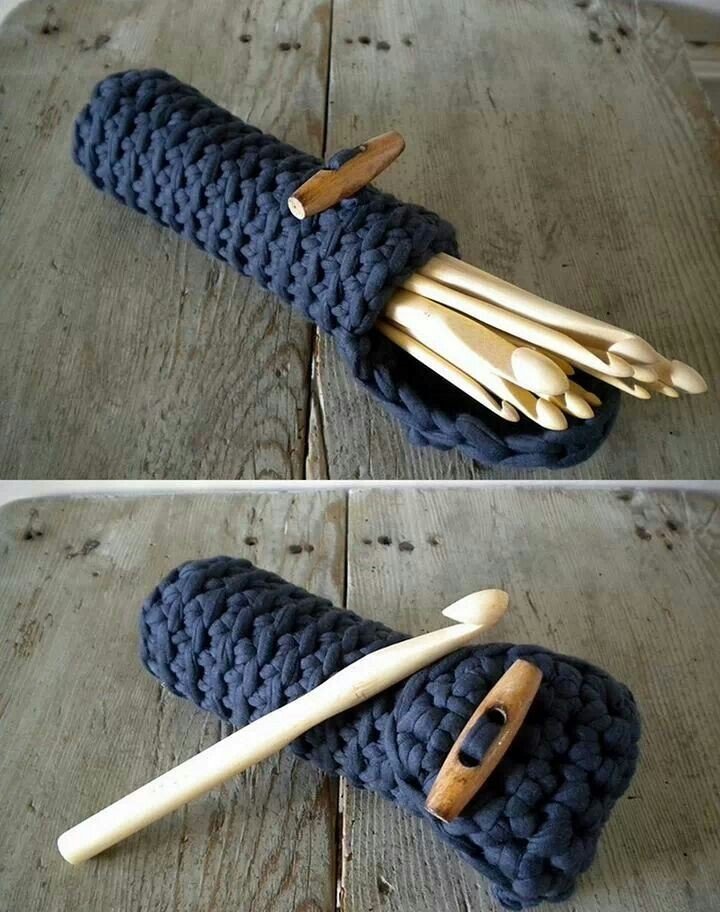
Finally, consider the closure method for your finished Needle Holder Crochet – Pattern. A simple button loop or a fold-over flap with a decorative wooden button works beautifully to keep everything contained. You could also use ribbon ties or a magnetic snap hidden inside the lining for a more modern appearance. Regardless of the closure you choose, make sure it is attached firmly so it can withstand the frequent opening and closing of daily use.
2. Essential Materials and Tool Selection
Selecting the right materials is the first step toward a successful Needle Holder Crochet – Pattern outcome. You will need a high-quality hook that matches your yarn choice, usually a size or two smaller than what is recommended on the yarn label to create a tighter fabric. Using a size 3.25mm (D) or 3.5mm (E) hook with worsted weight yarn often produces a firm, protective casing that is perfect for holding sharp objects safely.
The type of yarn you choose for the Needle Holder Crochet – Pattern significantly impacts the longevity of the finished product. Natural cotton fibers are preferred because they do not stretch as much as acrylic or wool, ensuring the holder stays compact. Furthermore, multi-colored yarn or variegated skeins can hide small imperfections and add a vibrant energy to your sewing kit, making the project both fun to look at and easy to locate in a messy bag.
In addition to yarn and hooks, you will need stitch markers to keep track of your rows, especially if you are working in a continuous spiral. Keeping an accurate row count is essential for ensuring that the front and back covers of your Needle Holder Crochet – Pattern are perfectly symmetrical. Accurate measurements are the hallmark of a well-crafted DIY item, so having a flexible measuring tape nearby is always a smart move during the assembly phase.
Don’t forget the “soft” components of the Needle Holder Crochet – Pattern, such as the fabric used for the needle pages. Synthetic felt is inexpensive and widely available, but 100% wool felt is the gold standard because the natural lanolin in the wool can actually help prevent your needles from rusting over time. This small upgrade in material quality can make a massive difference in the long-term maintenance of your expensive sewing and embroidery tools.
If your version of the Needle Holder Crochet – Pattern includes a pocket for small scissors or a thimble, you may also want to have some fabric glue or needle and thread on hand for extra reinforcement. While crochet is strong, the high-friction areas where heavy tools are stored benefit from a bit of extra support. Using nylon thread to sew on buttons or snaps ensures that the most stressed parts of the holder won’t snap under pressure.
Lastly, think about the aesthetic finish of your project. Small details like wooden beads, embroidery floss for decorative top-stitching, or even a small handmade label can elevate the Needle Holder Crochet – Pattern from a simple craft to a professional-grade accessory. Taking the time to gather all these supplies before you sit down to hook will make the process smoother and much more enjoyable from the first chain to the final knot.
3. Step-by-Step Assembly and Stitch Guide
The core of the Needle Holder Crochet – Pattern usually involves creating two identical rectangular panels that serve as the outer shell. You will start by making a slip knot and chaining the desired length, then working in rows of single crochet until the height matches the width, forming a square or a slightly elongated rectangle. Remember to chain one and turn at the end of every row to keep your edges straight and prevent the work from leaning.
Once the main panels are complete, the next phase of the Needle Holder Crochet – Pattern focuses on the “spine” of the book. You can either crochet a separate thin strip to join the two panels or simply fold a larger single rectangle in half. If you choose the joining method, using a slip stitch join on the wrong side creates a clean, invisible seam, while a whipstitch using a yarn needle can add a decorative, rustic touch to the outer spine.
Inserting the pages into your Needle Holder Crochet – Pattern is where the magic happens. Cut your felt pieces slightly smaller than the crochet panels, then stack them neatly in the center. Using your yarn needle and a matching piece of yarn, sew a straight line down the center fold, piercing through both the felt and the crochet spine. This creates a “book” effect that allows you to flip through your needles just like pages in a story.
For those looking to add internal storage, this Needle Holder Crochet – Pattern can be modified to include inner pockets. By crocheting a smaller square and attaching it to the inside of the front cover, you create a perfect spot for stitch markers or a small measuring tape. This adds a layer of complexity to the design but significantly increases the value of the holder as a complete all-in-one tool kit for your portable projects.
The finishing touches on the Needle Holder Crochet – Pattern involve “blocking” your work. Blocking is the process of wetting the finished crochet and pinning it into the correct shape until it dries. This step is crucial because it relaxes the stitches and ensures the holder lies flat rather than curling at the corners. A well-blocked project looks significantly more professional and handles much better once the needles are inserted.
To complete the Needle Holder Crochet – Pattern, you will add the closure system. If you opted for a button closure, sew the button onto the center of the front panel and create a chain-stitch loop on the back panel that reaches over the top. Test the tension of the loop several times to ensure it is tight enough to keep the holder closed securely, but loose enough that you can unfasten it with one hand while working.
4. Customizing Your Design for Different Needs
Every crafter has a different collection, so your Needle Holder Crochet – Pattern should reflect what you own. If you primarily do cross-stitch, you might need many small pages to hold different sizes of blunt-ended needles. On the other hand, if you are a quilter, you might want longer pages to accommodate long applique needles or safety pins. Adjusting the height of your rows during the initial phase is the easiest way to customize the fit.
Color theory plays a big role in the success of your Needle Holder Crochet – Pattern. Using high-contrast colors between the outer shell and the inner pages makes it much easier to see the eyes of the needles when you are in a dimly lit room. For example, a dark navy blue crochet exterior with bright white or yellow felt pages creates a visual pop that is both stylish and highly functional for those who struggle with eye strain.
You can also experiment with different stitch patterns on the cover to give your Needle Holder Crochet – Pattern a unique texture. The waffle stitch or alpine stitch provides a thick, padded feel that offers extra protection for your tools. These textures not only look impressive but also provide a “grip” to the holder, making it less likely to slide off a table or out of a smooth project bag while you are traveling.
If you are an eco-conscious crafter, consider using scrap yarn or upcycled materials for your Needle Holder Crochet – Pattern. Small amounts of leftover cotton from previous projects are perfect for these small-scale designs. Mixing different colors of scraps can create a boho-chic or “scrap-book” look that is unique to your stash. This approach makes the project nearly free to create while reducing waste in your craft room.
The Needle Holder Crochet – Pattern is also an excellent canvas for surface crochet or embroidery on crochet. Once the panels are finished, you can use a smaller hook to “draw” on the surface with yarn, adding swirls, hearts, or even the word “Needles.” This adds a layer of hand-crafted charm that mass-produced plastic cases simply cannot replicate, making your tool kit feel like a cherished heirloom.
Finally, think about adding a wrist strap or a keychain loop to your Needle Holder Crochet – Pattern. This is particularly useful for “on-the-go” crafters who like to sew while commuting or waiting at appointments. By attaching the holder to your bag or your wrist, you ensure that your most vital tools are always within reach and never get buried at the bottom of your bag, keeping your crochet workflow smooth and efficient.
FAQ: Frequently Asked Questions about Needle Holders
What is the best yarn for a Needle Holder Crochet – Pattern?
The best yarn is generally a 100% cotton or a cotton-linen blend. These fibers are non-elastic, meaning the holder will not stretch out of shape over time. Cotton is also very durable and can withstand the sharp points of needles better than soft acrylics.
How do I stop my needles from falling out of the holder?
The secret is using felt pages inside the crochet shell. The dense fibers of the felt grip the needles tightly. Additionally, ensuring your crochet tension is firm and using a secure closure like a button or zipper will keep everything safely inside.
Can a beginner finish this Needle Holder Crochet – Pattern?
Absolutely! This project is perfect for beginners because it mostly uses basic stitches like the chain and single crochet. It is a small-scale project, which means it provides quick gratification and helps you practice maintaining straight edges and consistent tension.
How do I clean my crochet needle holder?
If you used cotton yarn and felt, you should gently hand wash the holder in cool water with a mild detergent. Avoid wringing it out; instead, roll it in a towel to remove excess moisture and lay it flat to air dry. This preserves the shape and prevents the felt from pilling.
What size should a standard needle holder be?
A common size is about 4 inches by 4 inches when closed. This is large enough to hold standard sewing needles but small enough to fit inside a pocket or a small craft pouch. However, you can easily adjust the pattern to be larger if you have long knitting or darning needles.
Conclusion
Creating a Needle Holder Crochet – Pattern is a rewarding project that combines organization with the meditative rhythm of crochet. Throughout this article, we have explored the essential materials, the step-by-step assembly process, and various ways to customize your holder to fit your specific crafting needs.
By following these techniques, you now have the knowledge to create a durable, beautiful, and highly functional accessory that protects your tools and showcases your skills.