Making an Owl Granny Square Crochet – Pattern is one of the most delightful ways to combine traditional crafting with whimsical character design. For many enthusiasts, the Owl Granny Square Crochet – Pattern represents a perfect intermediate project that allows for color experimentation while producing a functional piece of art. Whether you are looking to create a themed nursery blanket or a quirky tote bag, mastering the Owl Granny Square Crochet – Pattern will elevate your repertoire and bring a sense of handmade charm to your home.
The beauty of the Owl Granny Square Crochet – Pattern lies in its versatility and the way it transforms a standard geometric shape into a recognizable, feathered friend. When you dive into an Owl Granny Square Crochet – Pattern, you aren’t just following stitches; you are sculpting eyes, beaks, and “ears” using clever increases and decreases. This specific Owl Granny Square Crochet – Pattern focuses on texture and visual appeal, ensuring that your finished squares look professional and adorable.
To get the best results with your Owl Granny Square Crochet – Pattern, choosing the right materials is essential. Most designers recommend a soft worsted weight yarn and a 4.0mm or 5.0mm crochet hook to achieve the perfect tension. As you work through the Owl Granny Square Crochet – Pattern, you will notice how the central owl motif is framed by a traditional square border, making it easy to join multiple pieces together. Let’s explore the intricate details of this project and how you can perfect your technique.
1. Understanding the Owl Granny Square Crochet – Pattern Basics
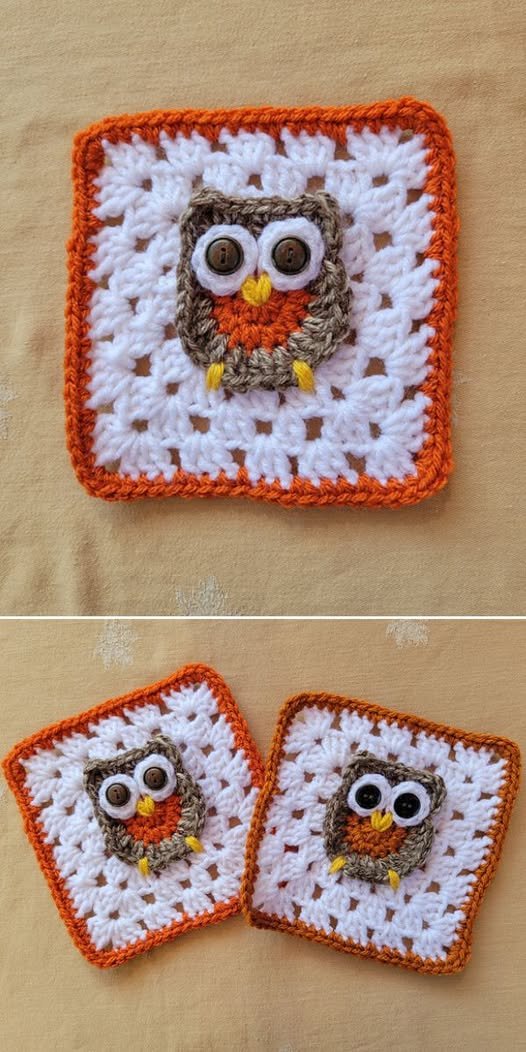
The core of the Owl Granny Square Crochet – Pattern begins with the “eyes” or the central circle that forms the owl’s face. Unlike a standard solid square, this crochet pattern requires you to work in the round for several rows before transitioning into a square shape. Using vibrant yarn colors for the iris of the eye can make your owl appear more lifelike and engaging.
Mastering the magic ring technique is highly recommended for starting your Owl Granny Square Crochet – Pattern. This ensures that the center of the owl’s head is tightly closed, preventing any stuffing or gaps from showing through. If you are new to this crochet technique, you can substitute it with a chain-2 start, but the magic ring provides a much cleaner finish for amigurumi-style squares.
Transitioning from a circle to a square is the most technical part of the Owl Granny Square Crochet – Pattern. You will use a combination of half-double crochets (hdc), double crochets (dc), and treble crochets (tr) to build up the corners. By placing taller stitches in the corners and shorter stitches on the sides, the round owl face begins to take on its architectural granny square form.
Color changes are frequent in a high-quality Owl Granny Square Crochet – Pattern. To keep the back of your work neat, it is vital to learn how to weave in ends as you go. Many crocheters prefer using a tapestry needle to secure the yarn tails within the stitches of the same color, ensuring the owl motif remains the star of the show without messy threads.
The “ears” of the owl are often created using a picot stitch or a cluster of stitches in the top corners of the inner circle. In this Owl Granny Square Crochet – Pattern, the ears give the square its personality, distinguishing the bird from a simple circular design. Paying close attention to the placement of these ears ensures your owl looks symmetrical and wise.
Finally, the border rows of the Owl Granny Square Crochet – Pattern provide the structural integrity needed for larger projects. You can choose to use a classic granny stitch (clusters of 3 double crochets) or a solid single crochet border. A solid border often highlights the central owl more effectively, while the classic stitch adds a vintage flair to the overall crochet design.
2. Essential Tools and Materials for Your Owl Project
To successfully complete the Owl Granny Square Crochet – Pattern, you need high-quality acrylic or cotton yarn. Cotton yarn offers excellent stitch definition, which is great for showing off the owl’s features, while acrylic yarn provides a softer, loftier feel for crochet blankets. Ensure you have at least three contrasting colors to make the owl pattern pop.
Your choice of crochet hook size will significantly impact the final dimensions of your Owl Granny Square Crochet – Pattern. If you crochet tightly, consider moving up a half-size to keep the square from puckering. A ergonomic hook is often preferred for projects involving many squares, as it reduces hand fatigue during repetitive crochet stitches.
Don’t forget the small details that bring the Owl Granny Square Crochet – Pattern to life, such as safety eyes or small black buttons. If you are making a gift for a baby, it is safer to crochet the pupils using black embroidery floss or yarn instead of using plastic parts. This ensures the crochet project is child-safe and durable.
Measuring your work is a key part of the Owl Granny Square Crochet – Pattern process, especially if you plan to join squares together. A blocking board can be a lifesaver; it helps stretch the finished squares into perfect 90-degree angles. This step is often overlooked but is the secret to a professional-looking handmade crochet afghan.
Stitch markers are incredibly helpful when working on the Owl Granny Square Crochet – Pattern. Use them to mark the first stitch of each round or to identify where the corner increases should occur. This prevents the common mistake of having a “wonky” square and keeps your pattern count accurate throughout the entire crafting session.
Lastly, a good pair of sharp embroidery scissors and a collection of darning needles are essential. Since the Owl Granny Square Crochet – Pattern involves multiple color swaps, you will be doing a fair amount of cutting and hiding yarn tails. Keeping your workspace organized with these tools will make the crochet experience much more enjoyable and efficient.
3. Step-by-Step Guide to Stitching the Owl Motif
The first step in our Owl Granny Square Crochet – Pattern involves creating the eyes using two small white circles. You will work 12 double crochets into a magic ring for each eye, then join them together. This “figure-eight” base forms the foundation of the face, giving the owl square its iconic wide-eyed expression.
Once the eyes are joined, the Owl Granny Square Crochet – Pattern moves to the body color. You will work around the joined eyes, using increases to expand the circle. This part of the crochet pattern requires focus, as you need to ensure the stitches are evenly distributed to keep the face flat rather than curling into a bowl shape.
Adding the beak is a small but transformative step in the Owl Granny Square Crochet – Pattern. Usually worked in a bright orange or yellow yarn, the beak is a simple triangle stitch worked directly onto the face or sewn on afterward. This tiny detail instantly gives the crochet owl its character and charm.
As you reach the outer edges of the owl’s head, the Owl Granny Square Crochet – Pattern introduces the cornering technique. By working a sequence of (2 tr, ch 2, 2 tr) into a single stitch, you create a sharp corner. This is where the magic happens, as the organic shape of the bird meets the geometric requirements of a standard granny square.
Texture can be added to the Owl Granny Square Crochet – Pattern by using front post double crochets (fpdc). These stitches sit slightly forward, mimicking the appearance of feathers. While optional, incorporating texture into your crochet owl adds a sophisticated touch that makes your work stand out from basic flat patterns.
The final round of the Owl Granny Square Crochet – Pattern is usually a round of single crochet or half-double crochet in a neutral background color. This “frames” the owl and provides a consistent edge for joining. Consistency in your stitch tension during this final round is crucial for ensuring all your squares are the exact same size.
4. Creative Ways to Use Your Finished Owl Squares
One of the most popular uses for the Owl Granny Square Crochet – Pattern is a decorative crochet throw pillow. By joining 9 or 16 squares, you can create a beautiful cushion cover that adds a touch of “cottagecore” aesthetic to your living room. The repeated owl motif creates a stunning visual rhythm that guests will surely admire.
Baby blankets are another fantastic application for the Owl Granny Square Crochet – Pattern. You can alternate the owl squares with solid color granny squares to create a balanced design that isn’t too busy. Because the pattern is modular, you can easily adjust the size of the blanket by adding or removing rows of squares.
For those who love fashion, the Owl Granny Square Crochet – Pattern can be turned into a trendy crochet tote bag. Use a sturdy cotton yarn to ensure the bag can hold weight without stretching too much. Joining the squares with a slip stitch join or a whip stitch will provide the durability needed for a functional everyday accessory.
If you enjoy smaller projects, a single square from the Owl Granny Square Crochet – Pattern makes an excellent crochet coaster or a wall hanging. You can stiffen the square using a fabric stiffener or a mix of water and glue to ensure it hangs perfectly flat. It’s a great way to practice the pattern without committing to a large-scale project.
Garments like crochet cardigans or vests can also incorporate the Owl Granny Square Crochet – Pattern. By using the squares as oversized pockets or as a statement back panel, you can create a truly unique piece of wearable art. This crochet style has seen a massive resurgence in recent years, making it a very fashionable choice.
Finally, consider gifting individual squares from the Owl Granny Square Crochet – Pattern as part of a “crochet-along” with friends. You can swap colors and styles, eventually joining everyone’s unique owls into a community friendship quilt. It’s a wonderful way to share the joy of the Owl Granny Square Crochet – Pattern with fellow crafters.
Frequently Asked Questions (FAQ)
1. What is the best yarn for an Owl Granny Square Crochet – Pattern? For the best stitch definition and durability, a cotton-acrylic blend or a high-quality merino wool is ideal. These yarns hold the shape of the owl features well and are easy to wash.
2. Can a beginner attempt this Owl Granny Square Crochet – Pattern? Yes! While it is slightly more complex than a basic square, a beginner who knows the basic crochet stitches (sc, hdc, dc) can successfully follow this pattern with a bit of patience.
3. How do I prevent my squares from curling at the corners? Curling usually happens due to tight tension or not enough stitches in the corners. Ensure you are following the chain-2 space instructions in the corners of your Owl Granny Square Crochet – Pattern to allow the work to lay flat.
4. How many colors do I need for a standard owl square? Ideally, you should use at least four colors: one for the eyes, one for the beak, one for the owl’s body, and one for the background/border. This provides the best contrast for the owl design.
5. How do I join multiple Owl Granny Squares? The most seamless way to join them is using the invisible join or the mattress stitch. If you want a more textured look, a braid join or a flat slip stitch join works beautifully with this pattern.
6. Is this pattern suitable for a baby blanket? Absolutely. The Owl Granny Square Crochet – Pattern is a favorite for nurseries. Just be sure to weave in all ends securely and avoid using plastic safety eyes for infants; embroidered eyes are much safer.
Conclusion
In this article, we have explored the wonderful world of the Owl Granny Square Crochet – Pattern, covering everything from the essential tools to the step-by-step construction of the motif.
We learned how to transition from a circular face to a square frame and discussed various ways to utilize these squares in larger projects like blankets, bags, and home decor. The Owl Granny Square Crochet – Pattern is a rewarding project that allows for endless creativity and color customization, making it a staple for any crochet enthusiast.