Creating a Phone Sleeve Cover Crochet – Pattern is one of the most rewarding quick projects for any yarn enthusiast, blending utility with a personalized aesthetic. In today’s digital age, our smartphones are our most constant companions, and protecting them from scratches and minor drops is a top priority. A crochet phone sleeve offers a soft, cushioned barrier that plastic cases simply can’t replicate, all while allowing you to express your unique style through color and texture.
When you decide to follow a Phone Sleeve Cover Crochet – Pattern, you are diving into a world of endless customization where the yarn weight, stitch choice, and hook size come together to create something functional. This guide is designed to help both beginners and experienced crafters navigate the process of making a durable and stylish phone protector. Whether you are looking for a minimalist design or something more intricate, understanding the foundation of the pattern is the first step toward success.
The beauty of a Phone Sleeve Cover Crochet – Pattern lies in its portability and the minimal amount of materials required to get started. You likely already have the scrap yarn and the crochet hook needed to complete this project in a single afternoon. Beyond being a great personal accessory, these sleeves make thoughtful, handmade gifts for friends and family. Let’s explore how to master this craft, focusing on the specific techniques and terminology that make your crochet project stand out.
1 Understanding the Phone Sleeve Cover Crochet – Pattern Basics
The Phone Sleeve Cover Crochet – Pattern refers to the specific set of instructions used to create a snug-fitting pouch for a mobile device. Most patterns begin with a foundation chain that matches the width of the phone, ensuring a tight fit that prevents the device from sliding out.
When following a crochet pattern, you will encounter various abbreviations like sc (single crochet), dc (double crochet), and sl st (slip stitch). For a phone sleeve, using a dense stitch like the single crochet is often recommended because it creates a solid fabric without large gaps.
The gauge is another critical element of any Phone Sleeve Cover Crochet – Pattern. Since phone sizes vary significantly between models like the iPhone or Samsung Galaxy, you must adjust your stitch count to match the dimensions of your specific hardware.
Choosing the right yarn fiber is essential for longevity; mercerized cotton is a popular choice for phone covers because it is durable, doesn’t pill easily, and offers great stitch definition. You want a material that feels good in the hand but can withstand being pulled in and out of pockets.
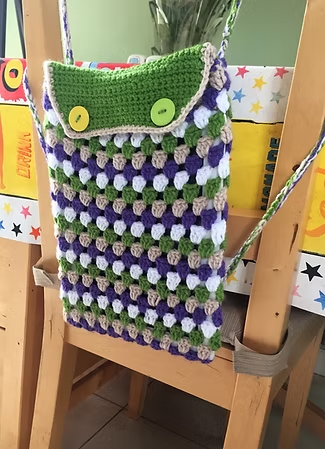
A well-written Phone Sleeve Cover Crochet – Pattern will also include instructions for a closure system. This could be a simple button loop, a fold-over flap, or even a drawstring, depending on the level of security and style you desire for your handmade case.
Finally, the finishing touches like weaving in ends and blocking your work ensure that the final product looks professional. A crochet sleeve is more than just a bag; it is a custom-engineered piece of yarn art tailored to protect your tech.
2 Essential Materials for Your Crochet Project
To successfully execute a Phone Sleeve Cover Crochet – Pattern, you need to gather the correct tools before making your first slip knot. The most important tool is your crochet hook, typically ranging from 3.5mm to 4.5mm depending on the thickness of the yarn you select.
Your choice of yarn dictates the “vibe” of the phone sleeve. While acrylic yarn is affordable and comes in many colors, many creators prefer cotton yarn for a Phone Sleeve Cover Crochet – Pattern because it has less stretch, keeping the phone more secure over time.
You will also need a pair of sharp scissors and a tapestry needle (also known as a yarn needle). The needle is vital for sewing the sides of the sleeve if you are not working in the round and for hiding those pesky leftover yarn tails.
Stitch markers are highly recommended, especially if the Phone Sleeve Cover Crochet – Pattern involves working in continuous spirals. These little clips help you keep track of the start of each row, preventing mistakes in your stitch count.
Don’t forget the fasteners! If your pattern calls for a button, choose one that complements your yarn color. Alternatively, some people use velcro or magnetic snaps, which require a bit of extra sewing but offer a very modern feel to the crochet cover.
Measuring tape is the final must-have item. Since the goal of a Phone Sleeve Cover Crochet – Pattern is a perfect fit, you will need to measure your phone’s height, width, and depth to ensure the crochet fabric wraps around it perfectly without being too loose.
3 Step-by-Step Execution of the Pattern
Starting your Phone Sleeve Cover Crochet – Pattern usually involves creating a base chain. To get the width right, chain enough stitches to cover the bottom of the phone, then add two more stitches to account for the “turn” and the thickness of the device.
Most modern phone sleeve patterns utilize the working in the round technique. This means you crochet around both sides of your foundation chain, creating a seamless pocket that doesn’t require any sewing at the bottom, which increases the structural integrity of the sleeve.
As you move up the body of the Phone Sleeve Cover Crochet – Pattern, you can experiment with textured stitches. The moss stitch or waistcoat stitch are excellent choices because they provide extra padding, offering better protection against bumps and scratches.
Consistency in tension is key during the middle section of the project. If you crochet too tightly, the phone sleeve will be difficult to put on; too loose, and the phone might fall out. Keep a steady hand to ensure the crochet stitches look uniform.
Once you reach the desired height—usually just below the top edge of the phone—you can begin the edging. A simple crab stitch or reverse single crochet creates a beautiful, sturdy border that prevents the top of the crochet cover from stretching out over time.
The final step in the Phone Sleeve Cover Crochet – Pattern is adding the strap or closure. If you want to carry it like a small purse, you can crochet a long i-cord or a simple chain strap, attaching it firmly to the sides with a slip stitch.
4 Tips for Customizing and Personalizing Your Design
Personalizing a Phone Sleeve Cover Crochet – Pattern is where the real fun begins. You can use color pooling techniques or striping to make a vibrant, eye-catching accessory that stands out in your bag or on your desk.
Adding embroidery on top of the finished crochet fabric is a great way to add detail. You can stitch small flowers, initials, or geometric shapes onto the phone sleeve after the main body is completed, giving it a truly “one-of-a-kind” feel.
For those who want extra functionality, consider adding a small back pocket to your Phone Sleeve Cover Crochet – Pattern. This can be a simple crochet square sewn onto the back to hold a credit card, ID, or some emergency cash.
If you are worried about the crochet stitches being too porous, you can line the sleeve with fabric. Sewing a piece of felt or cotton fabric inside the crochet cover adds an extra layer of luxury and ensures that no dust reaches the phone screen.
Using variegated yarn is a “cheat code” for making a complex-looking Phone Sleeve Cover Crochet – Pattern without actually changing yarn colors. The yarn does the work for you, creating a beautiful transition of hues as you work through the rows.
Finally, remember that the Phone Sleeve Cover Crochet – Pattern is just a template. Don’t be afraid to change the hook size or add extra rows to accommodate a bulky phone case that is already on your device. The best pattern is the one that fits your life perfectly.
Frequently Asked Questions (FAQ)
What is the best yarn for a phone sleeve?
The best yarn is generally 100% cotton or a cotton blend. Cotton is durable, has excellent stitch definition, and doesn’t stretch as much as wool or acrylic, which helps the phone sleeve maintain its shape over time.
How do I make sure the sleeve fits my specific phone model?
The easiest way is to measure your phone and create a foundation chain that is slightly wider than the device. Remember that crochet fabric has some give, so a “snug” fit is better than a “loose” fit.
Can a beginner finish this pattern?
Absolutely! A Phone Sleeve Cover Crochet – Pattern is one of the best projects for a beginner. It uses basic stitches and takes very little time to complete, providing instant gratification.
Is it better to crochet in the round or sew the sides?
Crocheting in the round is generally preferred because it eliminates seams, making the sleeve stronger and giving it a cleaner, more professional appearance.
How do I clean my crochet phone cover?
If you used cotton or acrylic yarn, you can usually hand wash the sleeve in cool water with mild soap. Lay it flat to dry to ensure it doesn’t lose its shape.
Can I add a strap to my phone sleeve?
Yes! You can easily add a crossbody strap or a wristlet strap by crocheting a long chain and working a row of single crochets back over it, then attaching it to the sides of the sleeve.
Conclusion
In this article, we have explored the comprehensive world of the Phone Sleeve Cover Crochet – Pattern, covering everything from the initial material selection to the final customization steps. We learned that choosing the right cotton yarn and maintaining consistent tension are the secrets to a high-quality finish.
We also discussed how working in the round creates a seamless, durable pocket for your device, and how simple additions like buttons or pockets can elevate the design.