The Pizza Pie Crochet Granny Square – Pattern is a delightful and creative crochet design that takes inspiration from the popular dish, pizza!
This fun and colorful pattern is perfect for crocheters of all levels, offering a playful twist on the classic granny square.
In this article, we’ll guide you through the steps to create your very own Pizza Pie Crochet Granny Square, providing tips, materials, and customization ideas, as well as answering some of the most common questions related to this project.
Whether you are looking to create a cozy blanket, a unique pillow cover, or a trendy tote bag, the Pizza Pie Crochet Granny Square offers endless possibilities. The playful combination of colors, textures, and stitches gives the square a fun and eye-catching appearance. Additionally, this pattern allows you to experiment with various yarn colors to represent the toppings of your “pizza,” such as red for sauce, yellow for cheese, and green for vegetables. The result is a project that is both whimsical and functional, perfect for adding a creative touch to your home or wardrobe.
Crochet is a wonderful way to relax and express your creativity, and the Pizza Pie Crochet Granny Square – Pattern is an excellent choice for both beginners and experienced crocheters. This project introduces new techniques while still offering an easy-to-follow structure. Whether you are creating a single square or working on an entire blanket, you will find joy in the process of bringing this unique design to life. Now, let’s dive into the materials you’ll need and the steps involved in making your own Pizza Pie Crochet Granny Square.
1. Materials Needed for the Pizza Pie Crochet Granny Square
Before you start working on your Pizza Pie Crochet Granny Square – Pattern, it’s important to gather all the necessary materials to ensure a smooth crochet experience. Here is a list of the materials you will need:
- Yarn: For this pattern, medium-weight yarn (such as worsted weight) works best. Choose colors that represent the various elements of a pizza, such as red for sauce, yellow for cheese, and green for toppings. You will need multiple colors, including a base color for the background and several colors for the toppings.
- Crochet Hook: Use a hook size that corresponds to the yarn you are using. Typically, a 5mm (H-8) crochet hook is suitable for worsted weight yarn. However, always check the yarn label for any specific recommendations regarding hook size.
- Scissors: A good pair of sharp scissors is essential for cutting your yarn once you finish your square and when changing colors.
- Yarn Needle: You will need a yarn needle to weave in any loose ends when you’re finished crocheting each square. This helps ensure a clean, professional-looking finish.
- Stitch Markers: These are optional but useful for marking your starting point in rounds and keeping track of your stitches as you work in the round.
- Measuring Tape: It’s a good idea to use a measuring tape to ensure your granny square is the correct size. You can adjust the size as needed by adding or removing rounds.
With these materials in hand, you’re ready to start your Pizza Pie Crochet Granny Square – Pattern and embark on a creative crochet journey!
2. Step-by-Step Instructions for Creating the Pizza Pie Crochet Granny Square
Now that you have your materials, it’s time to start crocheting! The Pizza Pie Crochet Granny Square involves working in rounds, starting from the center and building outwards. Follow these step-by-step instructions to make your own square:
- Start with a Magic Ring: Begin by creating a magic ring to start your square. This technique helps create a tight and adjustable loop that will form the foundation of your granny square.
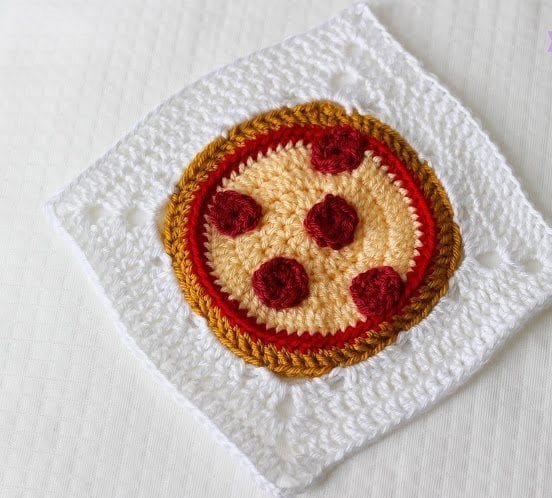
- Round 1: Create the Pizza Base: For the first round, crochet several double crochet stitches into the magic ring to create a solid center. This forms the “pizza crust” of your square. You’ll want to work several stitches to ensure the center is large enough to build on.
- Round 2: Add Sauce and Cheese: In the second round, change to a red or tomato-colored yarn to represent the pizza sauce. Continue working in double crochet stitches and place them in each space between the previous stitches. After completing the second round, switch to yellow yarn to create the “cheese” layer.
- Round 3: Add Toppings: The third round is where you get creative! Use different colors of yarn to represent various pizza toppings like pepperoni, vegetables, and olives. You can use the popcorn stitch or a puff stitch to give texture and dimension to the toppings.
- Round 4: Finish the Square: For the final round, create a clean edge around your square using a contrasting color. This will give the granny square a neat, finished appearance and help to frame the design.
- Cut and Weave in Loose Ends: Once you have completed your Pizza Pie Crochet Granny Square, use a yarn needle to weave in any loose ends. This ensures that your square is secure and has a clean, professional finish.
Congratulations! You’ve successfully completed your Pizza Pie Crochet Granny Square – Pattern. Repeat these steps to make additional squares and connect them to create a larger project, such as a blanket, pillow, or tote bag.
3. Customizing the Pizza Pie Crochet Granny Square
The beauty of the Pizza Pie Crochet Granny Square – Pattern lies in its versatility and ability to be customized. Here are a few ways you can make your granny square uniquely yours:
- Color Variations: While the traditional pizza colors are red, yellow, and green, feel free to experiment with different color combinations. You could create a vegetarian pizza with green and purple toppings, or go for a fun, unconventional look with bright, bold colors.
- Size Adjustments: If you want to create a larger or smaller square, simply add or remove rounds. Just keep in mind that increasing the size may require additional yarn.
- Texture Variations: Add texture to your square by incorporating different crochet stitches, such as the puff stitch, shell stitch, or popcorn stitch. These can help add more dimension and depth to your pizza toppings.
- Shape Variations: While the pattern is traditionally square, you can also experiment with changing the shape of the granny square. Consider trying out a circular or hexagonal shape to add variety to your project.
- Add Embellishments: Take your square to the next level by adding embellishments like buttons, beads, or decorative stitches. These small touches can enhance the overall design and make your granny square stand out even more.
- Join Multiple Squares: Once you have completed several Pizza Pie Crochet Granny Squares, join them together using your preferred method, such as whipstitch or slip stitch. This allows you to create larger projects, such as blankets, throws, or even a unique piece of wall art.
By customizing your Pizza Pie Crochet Granny Square, you can create a one-of-a-kind design that reflects your style and creativity.
4. Tips for Using the Pizza Pie Crochet Granny Square in Projects
Once you’ve mastered the Pizza Pie Crochet Granny Square, you might be wondering what other creative projects you can make with it. Here are some ideas for incorporating your granny squares into larger projects:
- Make a Blanket: Join several Pizza Pie Crochet Granny Squares together to create a colorful and playful blanket. This is an excellent project for showcasing your crochet skills while adding a fun, whimsical touch to your home decor.
- Create a Pillow Cover: If you want to add some fun and personality to your living room, consider using the Pizza Pie Crochet Granny Square pattern to create a pillow cover. A set of matching pillow covers could be a great addition to your sofa or bed.
- Craft a Tote Bag: Use the Pizza Pie Crochet Granny Squares to create a trendy and functional crochet tote bag. Join the squares together, then add handles for a stylish bag that is perfect for carrying groceries, books, or beach gear.
- Design a Wall Hanging: Create a unique and vibrant wall hanging by arranging several Pizza Pie Crochet Granny Squares in a pattern. Hang them on the wall for a fun, homemade decoration that’s sure to catch the eye.
- Make a Scarf or Shawl: Join the granny squares to make a colorful scarf or shawl. This is an excellent way to showcase the pizza-inspired design while creating a wearable piece of crochet art.
- Gift a Personalized Item: If you’re looking for a thoughtful gift, create a custom Pizza Pie Crochet Granny Square project for someone special. Whether it’s a blanket, pillow, or tote bag, the recipient will appreciate the time and effort you put into making a unique and personalized item.
The possibilities for using the Pizza Pie Crochet Granny Square in different projects are endless, limited only by your creativity!
FAQ about the Pizza Pie Crochet Granny Square – Pattern
Q1: How do I make the star stitch used in the Pizza Pie Crochet Granny Square? The star stitch is created by making multiple yarn overs and pulling them through loops on your hook. It’s a fun and textured stitch that adds dimension to the toppings.
Q2: Can I use different yarns for this project? Yes, you can use any yarn that matches the texture and thickness of the one recommended in the pattern. However, keep in mind that the size and texture of your granny square may change depending on the yarn you choose.
Q3: How can I make my Pizza Pie Crochet Granny Square larger or smaller? To adjust the size, you can add or remove rounds. Just ensure that you
maintain the pattern’s structure, and consider using a larger or smaller hook for different sizes.
Q4: Can I use this pattern for other projects? Absolutely! The Pizza Pie Crochet Granny Square can be used for a variety of projects, including blankets, pillows, tote bags, and more. Let your creativity guide you!
Q5: How do I join multiple granny squares together? You can join your Pizza Pie Crochet Granny Squares using a whipstitch or slip stitch. Alternatively, you can crochet them together using the same yarn.
Conclusion
The Pizza Pie Crochet Granny Square – Pattern is a delightful and versatile crochet project that combines creativity with fun. Whether you’re creating a blanket, a pillow, or a tote bag, this pattern is an excellent way to showcase your crochet skills and add a unique touch to your home or wardrobe. We hope you enjoyed this guide, and we encourage you to try out different customizations and project ideas. Let us know your thoughts and suggestions in the comments below, and happy crocheting!