If you love colorful, whimsical crochet projects that bring joy and creativity to life, then the Rainbow Amigurumi Jellyfish Crochet – Pattern is a perfect choice. This adorable and vibrant sea creature combines the soothing art of amigurumi with a playful rainbow palette, making it a favorite among crocheters of all skill levels. With its soft tentacles and cheerful colors, the finished jellyfish can be used as a toy, nursery decoration, or even a thoughtful handmade gift.
The Rainbow Amigurumi Jellyfish Crochet – Pattern is simple enough for beginners but detailed enough to keep experienced crafters engaged. It involves basic stitches like single crochet, increase, and decrease, allowing you to focus on shaping and color changes. The result is a cute and squishy jellyfish that captures the magic of the ocean and the beauty of handmade art.
In this article, we’ll explore everything you need to know to create your own rainbow jellyfish — from materials and tools to step-by-step instructions, customization ideas, and tips for perfecting your project. With a little patience and creativity, you’ll bring this delightful sea creature to life while mastering one of the most joyful amigurumi projects available: the Rainbow Amigurumi Jellyfish Crochet – Pattern.
1. Understanding the Rainbow Amigurumi Jellyfish Crochet – Pattern
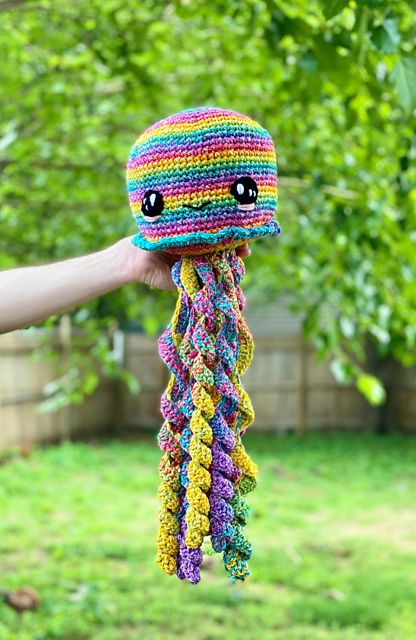
The Rainbow Amigurumi Jellyfish Crochet – Pattern is a fun crochet design inspired by the beauty of jellyfish and the charm of rainbow colors. The pattern usually consists of two main parts: the jellyfish’s rounded head (or bell) and its flowing tentacles. Together, they create a stunning 3D effect that makes this piece visually striking and irresistibly cute.
Amigurumi is the Japanese art of crocheting or knitting small stuffed creatures, and this jellyfish pattern perfectly showcases the technique’s whimsical spirit. It’s an ideal introduction to amigurumi for beginners because it uses basic stitches and simple shaping while allowing plenty of room for creativity.
The signature feature of this Rainbow Amigurumi Jellyfish Crochet – Pattern is the gradient of colors used throughout the body and tentacles. Whether you use a self-striping rainbow yarn or switch colors manually, the result is always vibrant and eye-catching. You can customize the color scheme to match your personal taste or the décor of a child’s room.
Another reason crocheters love this pattern is its versatility. You can make the jellyfish small enough to use as a keychain or large enough to hang from the ceiling as a playful nursery mobile. The design adapts easily to different yarn weights and hook sizes, giving you full creative control.
Because the jellyfish’s body is stuffed, it holds its shape well and feels soft to the touch. The tentacles, usually made using chains and curls, add movement and texture that bring the jellyfish to life. Every part of this pattern reflects the joy and imagination behind amigurumi crafting.
Lastly, this project is perfect for using up leftover yarns. Since it features multiple colors, you can combine small amounts of different shades to create a one-of-a-kind rainbow jellyfish. It’s both eco-friendly and a great way to practice color blending in crochet.
2. Materials You’ll Need for the Rainbow Amigurumi Jellyfish Crochet – Pattern
Before starting your Rainbow Amigurumi Jellyfish Crochet – Pattern, it’s important to gather all the materials you’ll need. Using the right tools and yarn will make your project easier to complete and ensure that your finished jellyfish looks vibrant and well-shaped.
First, choose your yarn. Soft, lightweight yarns such as cotton or acrylic are ideal for amigurumi because they’re durable and hold stitches well. For the rainbow effect, you can use either a self-striping yarn that automatically changes colors or several solid-colored yarns that you switch between manually.
Next, select a crochet hook that matches your yarn weight. Most amigurumi patterns recommend a smaller hook than usual to create tight stitches and prevent stuffing from showing through. A 2.5mm to 3.5mm hook is generally perfect for this project.
You’ll also need fiberfill stuffing to give your jellyfish its plush, rounded shape. Be sure not to overfill; the goal is to keep it soft while maintaining structure. Use a yarn needle to sew the parts together neatly and to weave in loose ends.
Safety eyes are a great addition if you want to give your jellyfish a cute, expressive face. Alternatively, you can embroider the eyes with black yarn for a softer look, which is safer for young children.
Lastly, a stitch marker will help you keep track of rounds, especially since amigurumi is usually worked in continuous spirals. A pair of scissors and a measuring tape will also be useful to ensure even tentacle lengths and neat finishing touches for your Rainbow Amigurumi Jellyfish Crochet – Pattern.
3. Step-by-Step Guide to Making the Rainbow Amigurumi Jellyfish Crochet – Pattern
Now that your materials are ready, it’s time to bring your Rainbow Amigurumi Jellyfish Crochet – Pattern to life. Follow these simple steps to create your own colorful and adorable sea creature.
Start by making the jellyfish’s head or bell. Using your first color, create a magic ring and crochet six single crochets into it. Continue working in rounds, increasing evenly in each round until you reach the desired width. This forms the top part of the jellyfish’s dome.
Once the head is wide enough, crochet several rounds without increasing to give the jellyfish some height. Then begin decreasing gradually to close the shape. Before completely closing, add the fiberfill stuffing, making sure it’s evenly distributed and soft. Securely close the bottom once you’re satisfied with the firmness.
Next, move on to the tentacles. These are typically made by chaining a length of yarn (anywhere from 30 to 60 chains) and then working multiple stitches into each chain stitch to create a curly effect. Alternate colors to create the rainbow pattern. You can make as many tentacles as you like — more curls make the jellyfish look fuller and more dynamic.
Attach the tentacles evenly around the base of the head. Use a yarn needle to sew them securely and ensure they hang naturally. If desired, you can add shorter tentacles or extra loops for variety. The Rainbow Amigurumi Jellyfish Crochet – Pattern allows for endless customization.
Finally, attach safety eyes or embroider a smiling face near the top of the head. Small details like a tiny blush or eyelashes can make your jellyfish even cuter. Tie a small loop of yarn at the top if you plan to hang it as decoration.
When finished, your jellyfish will showcase a mesmerizing swirl of rainbow colors, soft tentacles, and an irresistibly friendly expression — a perfect handmade piece that reflects the joy of crochet.
4. Customizing and Decorating Your Rainbow Amigurumi Jellyfish Crochet – Pattern
One of the best things about the Rainbow Amigurumi Jellyfish Crochet – Pattern is that you can customize it in endless ways. This flexibility allows every crocheter to express their creativity and make each jellyfish unique.
You can start by playing with different color schemes. While rainbow shades are the most popular, pastel tones create a gentle, dreamy look, and ocean blues or purples give a realistic undersea vibe. Metallic or gradient yarns can also add a magical shimmer to your jellyfish.
If you want to make your project more interactive, consider adding a rattle insert or crinkly material inside the head. This makes it a great toy for babies and toddlers, offering both sound and texture stimulation.
You can also vary the size of your jellyfish by changing the yarn weight and hook size. Chunky yarn creates a large plushie, while thinner yarn makes a delicate keychain-sized jellyfish. This adaptability is one of the key strengths of the Rainbow Amigurumi Jellyfish Crochet – Pattern.
Adding embellishments like small bows, beads, or embroidery can further personalize your creation. You can even make multiple jellyfish and connect them into a hanging mobile or wall decoration for a child’s bedroom.
Lastly, if you’re making your jellyfish as a gift, consider packaging it in a handmade crochet pouch or wrapping it in tissue paper for a personal, eco-friendly presentation. Every handmade detail enhances the love and care behind your project.
FAQ About the Rainbow Amigurumi Jellyfish Crochet – Pattern
1. Is the Rainbow Amigurumi Jellyfish Crochet – Pattern suitable for beginners?
Yes, it’s an excellent project for beginners! It uses basic stitches like single crochet, increases, and decreases.
2. What yarn works best for amigurumi jellyfish?
Cotton or acrylic yarn works best because it holds stitches tightly and keeps the shape well.
3. How many colors should I use for a rainbow jellyfish?
You can use six to seven colors for a full rainbow or fewer if you prefer a gradient or pastel effect.
4. Can I make the jellyfish larger or smaller?
Yes! Use thicker yarn and a larger hook for a bigger jellyfish or thinner yarn and a smaller hook for a mini version.
5. How do I keep the tentacles curly?
Crochet multiple stitches into each chain stitch — such as two or three single crochets per chain — to achieve a tight curl.
6. Is this pattern safe for babies and kids?
Yes, but if making it for small children, use embroidered eyes instead of plastic safety eyes to avoid choking hazards.
Conclusion
The Rainbow Amigurumi Jellyfish Crochet – Pattern is a delightful, creative, and rewarding project that brings joy to both makers and recipients. Its combination of soft texture, playful colors, and whimsical design makes it a perfect addition to any handmade collection.
With simple stitches and endless customization options, anyone can create their own unique jellyfish, whether for play, decoration, or gifting. We hope this guide has inspired you to pick up your crochet hook and start crafting today. Don’t forget to share your honest opinions, photos, and suggestions — your creativity helps keep the crochet community colorful and full of inspiration!