Rosa Crochet – Pattern designs have captured the hearts of DIY enthusiasts worldwide, offering a timeless way to bring the everlasting beauty of nature into the home through the art of yarn. Creating a crochet flower is more than just a hobby; it is a meticulous craft that combines geometry, tension, and creativity to produce a 3D masterpiece that never wilts. Whether you are looking to create a single long-stemmed rose for a gift or an entire floral bouquet for home decor, mastering the specific stitches required for a realistic finish is the key to success.
The popularity of the Rosa Crochet – Pattern stems from its incredible versatility and the emotional value attached to handmade items. Unlike store-bought decorations, a handmade crochet rose carries the signature of the maker in every loop and knot, making it a favorite for wedding decor, anniversary gifts, and delicate apparel embellishments. As more people turn to mindful crafts for stress relief, the rhythmic motion of the hook and the gradual blooming of the layered petals provide a therapeutic experience that results in a stunning visual reward.
To achieve a professional look with your Rosa Crochet – Pattern, selecting the right materials is the first and most vital step. Using a high-quality cotton yarn ensures that the petals hold their shape and definition, while a smaller ergonomic crochet hook helps maintain a tight gauge, preventing the stuffing or wire from showing through. By understanding the anatomy of a flower—from the sepals and calyx to the tightly coiled center—you can transform a simple strip of crochet lace into a sophisticated botanical work of art that rivals the real thing.
1. Understanding the Essentials of a Rosa Crochet – Pattern
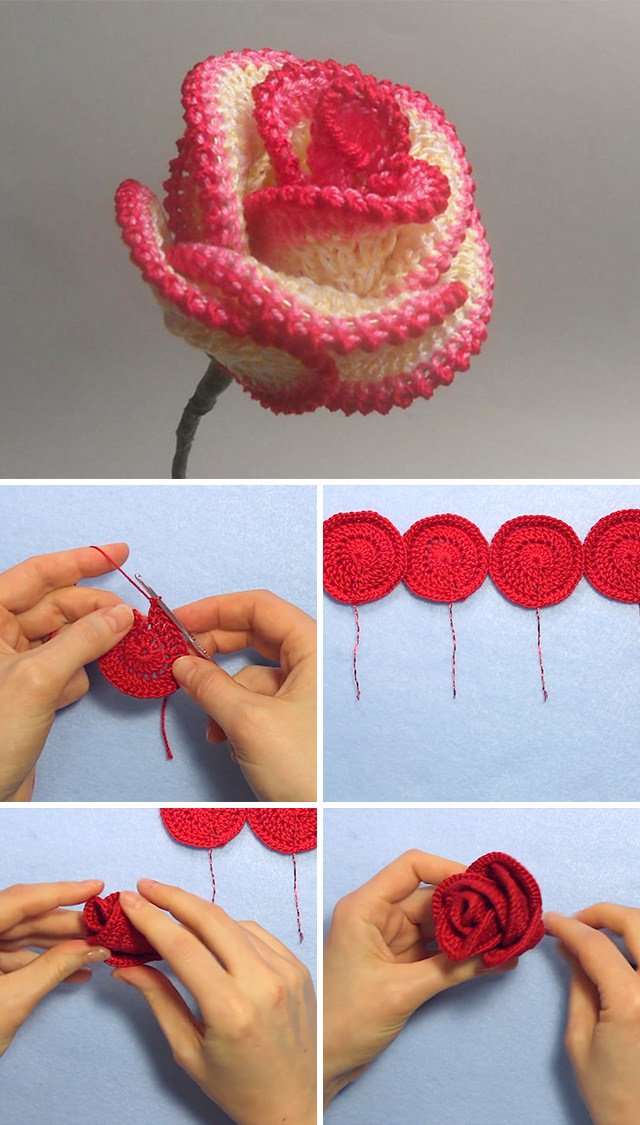
To begin your journey with a Rosa Crochet – Pattern, you must first familiarize yourself with the basic construction methods. Most patterns use a “strip method” where you crochet a long, scalloped band that is later rolled into a spiral. This technique is perfect for beginners because it allows you to see the petal definition clearly before the final assembly.
Choosing the correct yarn weight is crucial for the final size of your flower. A mercerized cotton in weight 3 or 4 is often recommended for a Rosa Crochet – Pattern because it has a slight sheen that mimics the natural glow of real petals. If you prefer a more delicate, vintage look, opting for a lace weight thread will produce a tiny, intricate rosebud.
The crochet hook size should generally be one size smaller than what is recommended on the yarn label. This creates a dense fabric which is essential for the Rosa Crochet – Pattern to maintain its structural integrity. If the stitches are too loose, the petals will flop over instead of standing upright in a realistic, curved fashion.
Advanced versions of the Rosa Crochet – Pattern might involve “continuous round” techniques or working into the back loops only (BLO). These methods allow for more organic shapes and easier attachment of the greenery and stems. Experimenting with different textures, such as mohair for a soft, velvety feel, can also add a unique artistic flair to your project.
Color selection plays a massive role in the realism of your Rosa Crochet – Pattern. While a classic red rose is always a winner, using variegated yarn or manual color changes between rows can simulate the natural gradients found in nature. Soft pinks, deep burgundies, and even “blue roses” offer endless possibilities for personalization.
Finally, don’t forget the tools needed for assembly. Beyond the hook and yarn, you will need a tapestry needle for weaving in ends and a hot glue gun or floral wire if you intend to create a stiffened stem. Having these ready before you start your Rosa Crochet – Pattern ensures a smooth transition from the stitching phase to the final floral arrangement.
2. Step-by-Step Stitches for Realistic Petal Texture
The secret to a lifelike Rosa Crochet – Pattern lies in the variation of stitch heights within the petals. To create a rounded edge, most patterns transition from a single crochet (sc) to a half double crochet (hdc), then multiple double crochets (dc), and back down again. This creates the characteristic “arch” of a flower petal that looks natural when rolled.
Increasing the number of double crochet stitches in the outer rows of your Rosa Crochet – Pattern will result in a more “open” or “bloomed” appearance. If you want a tighter, younger rosebud, you should keep the stitch count lower and the tension slightly tighter. This manipulation of stitch volume is what separates a generic flower from a professional-grade pattern.
The picot stitch is another fantastic addition to any Rosa Crochet – Pattern. By adding a small picot at the very center of a petal’s edge, you can simulate the tiny “point” often seen on real rose varieties. This small detail adds a layer of botanical accuracy that makes your work stand out in the world of crochet art.
For those looking for a 3D effect, working in front post stitches can create ridges that look like the veins of a leaf or the folds of a petal. Incorporating these into your Rosa Crochet – Pattern adds a tactile dimension that is very satisfying to touch. It makes the crochet fabric much thicker and more durable over time.
Don’t overlook the importance of the slip stitch (sl st). In a Rosa Crochet – Pattern, the slip stitch is used to “anchor” the petals to the base, creating the valleys between the curves. Proper placement of these anchors ensures that when you roll the rose, the petals sit at different heights, mimicking the asymmetrical beauty of a garden rose.
After finishing the crochet work, many crafters use a technique called blocking. By pinning your Rosa Crochet – Pattern petals and lightly steaming them, you can set the shape permanently. This is especially helpful if you are using natural fibers like wool or cotton, ensuring that your handcrafted rose stays perfect for years to come.
3. Assembling and Shaping Your Crochet Masterpiece
Once the stitching of your Rosa Crochet – Pattern is complete, the magic happens during the assembly phase. If you used the strip method, you will begin by rolling the narrowest end inward to form the heart of the rose. Using a darning needle, you should secure each rotation at the base to prevent the flower from unraveling.
The tension you use while rolling the Rosa Crochet – Pattern determines the final “mood” of the flower. A tight roll creates a sophisticated, formal rosebud, while a loose, staggered roll results in a wild rose or a flower in full bloom. You can even “pinch” the centers of the petals as you go to add more naturalistic ruffles.
Integrating a floral wire into the base of your Rosa Crochet – Pattern allows you to create long-stemmed versions for vases. You can wrap the wire in green yarn using a simple slip stitch join to create a seamless transition from the flower head to the stem. This turns a simple motif into a functional decor piece.
To complete the look, every Rosa Crochet – Pattern needs a calyx—the green leaf-like structure at the base of the flower. This is usually crocheted as a small star-shaped piece that is slid up the stem and glued or sewn to the bottom of the rose. It hides the messy assembly points and provides a clean, professional finish.
Adding crochet leaves is the final touch for your project. Most leaves in a Rosa Crochet – Pattern follow a similar logic to the petals but use treble crochets (tr) to achieve a more elongated shape. You can stiffen these leaves with a mixture of water and glue or by inserting a thin gauge wire along the edges.
Creative embellishments can further elevate your Rosa Crochet – Pattern. Consider sewing a pearl or bead into the center for a “dewdrop” effect, or using a bit of fabric paint to blush the edges of the petals. These tiny artistic choices turn a standard crochet project into a unique piece of fiber art that reflects your personal style.
4. Creative Ways to Use Your Rosa Crochet – Pattern Designs
The applications for a finished Rosa Crochet – Pattern are nearly limitless, ranging from fashion to interior design. One of the most popular trends is creating a crochet bouquet for brides. These “forever bouquets” are not only eco-friendly but serve as a lasting memento of the wedding day that will never fade or die.
You can also use the Rosa Crochet – Pattern to breathe new life into your wardrobe. Sewing a few small roses onto a denim jacket, a knit beanie, or a canvas tote bag adds a touch of “cottagecore” charm. Because they are made of yarn, these embellishments are usually washable and durable enough for everyday wear.
For home decor, a Rosa Crochet – Pattern can be turned into a stunning floral wreath or a decorative garland. By mixing different sizes of roses and varying the shades of green for the foliage, you can create a lush, textured piece of wall art that brings a sense of the outdoors inside without the maintenance of real plants.
Gift-giving is another area where the Rosa Crochet – Pattern shines. Instead of a traditional bow, try topping a gift box with a crochet rose. It serves as an extra “bonus gift” that the recipient can keep as a brooch, a hair clip, or a reusable ornament. It shows a level of thoughtfulness that commercial packaging simply cannot match.
If you are a fan of micro-crochet, scaling down the Rosa Crochet – Pattern allows you to create exquisite jewelry. Using embroidery floss and a 0.5mm hook, you can make tiny rose earrings or a delicate pendant. These intricate pieces are highly sought after at craft fairs and on online marketplaces like Etsy.
Finally, consider the Rosa Crochet – Pattern for seasonal decorating. Deep red and white roses are perfect for Valentine’s Day, while pastels suit Easter, and burnt oranges work beautifully for Autumnal displays. Once you master the pattern, you have a year-round tool for adding a handmade, soulful touch to any celebration or space.
FAQ: Frequently Asked Questions about Rosa Crochet – Pattern
What is the best yarn for a Rosa Crochet – Pattern?
For most projects, 100% mercerized cotton is the gold standard. It provides the necessary stiffness so the petals don’t sag and offers a beautiful stitch definition that makes the Rosa Crochet – Pattern look professional. If you want a softer look, a cotton-acrylic blend is also a great choice.
How do I make my crochet rose look more realistic?
Realism comes from varying stitch heights and careful assembly. Avoid rolling the rose too symmetrically; in nature, petals are slightly offset. Also, adding a green calyx at the base and using a wire to curve the petals slightly outward will instantly boost the realistic appeal of your Rosa Crochet – Pattern.
Is this pattern suitable for beginners?
Yes! The “strip method” for a Rosa Crochet – Pattern is very beginner-friendly. It primarily uses basic stitches like chains, single crochets, and double crochets. The most challenging part is the assembly, but with a little patience and a hot glue gun or needle, anyone can master it.
Can I wash items that have a crochet rose attached?
If you used cotton or acrylic yarn, the rose itself is generally washable. However, if you used floral wire or glue during assembly, you should stick to spot cleaning or very gentle hand washing. Always air dry your Rosa Crochet – Pattern to maintain the petal shape.
How many yards of yarn do I need for one rose?
A standard medium-sized rose using the Rosa Crochet – Pattern typically requires about 20 to 40 yards of yarn. This makes it an excellent stash-buster project for using up leftover scraps from larger blankets or sweaters.
How do I stop my crochet rose from drooping?
If your rose is too heavy for its stem, try using a thicker gauge floral wire or doubling up the wire. For the petals themselves, if they are too floppy, you can use a fabric stiffener spray or a light starch to help the Rosa Crochet – Pattern maintain its upright form.
Conclusion
In this guide, we have explored the intricate and rewarding world of the Rosa Crochet – Pattern, covering everything from the essential yarn selection to the advanced shaping techniques that bring these fiber flowers to life. We learned that by combining different stitch heights and focusing on botanical details like the calyx and leaves, any crafter can create a stunning, everlasting rose.
Whether you are making a wedding bouquet, enhancing your fashion accessories, or simply looking for a relaxing creative hobby, the versatility of the Rosa Crochet – Pattern makes it a must-have skill in your crochet repertoire. We hope this article has inspired you to pick up your hook and start your own yarn garden!