Creating a Rose Crochet – Pattern is one of the most rewarding projects for both beginners and seasoned crafters because it transforms a simple strand of yarn into a timeless symbol of beauty. Whether you are looking to embellish a sun hat, create a lasting bouquet for a loved one, or simply practice your tension, mastering the Rose Crochet – Pattern offers a gateway into the world of 3D floral textures. The versatility of these handmade crochet flowers is unmatched, as they can be used in home decor, fashion accessories, or even as wedding favors that never wilt.
The beauty of a Rose Crochet – Pattern lies in its construction, which usually involves a long, scalloped strip that is rolled and stitched together to form layers of delicate petals. By varying your hook size or yarn weight, you can create everything from tiny rosebuds to large, dramatic blooms. This guide is designed to help you navigate the nuances of floral crochet designs, ensuring your finished project looks professional, vibrant, and structurally sound for years to come.
As you dive into this Rose Crochet – Pattern, it is essential to focus on the details of stitch definition and yarn selection. Using the right crochet techniques will ensure your petals have that natural curve seen in real botanical specimens. In the following sections, we will break down the essential components of the pattern, explore the best materials to use, and provide a step-by-step approach to assembling your very own yarn roses with confidence and ease.
1. Essential Materials for Your Rose Crochet – Pattern
Selecting the right yarn is the foundational step for a successful Rose Crochet – Pattern. For a realistic look, many enthusiasts prefer mercerized cotton yarn, which provides a slight sheen and excellent stitch definition. This type of yarn ensures that your crochet petals hold their shape without drooping over time.
Your choice of crochet hook size is equally vital to the outcome of your project. Typically, a hook that is slightly smaller than what the yarn label suggests will create a tighter fabric. This tightness is beneficial for a Rose Crochet – Pattern because it prevents the stuffing or the internal structure from showing through the stitches.
Don’t forget the importance of tapestry needles and sharp scissors when working on your crochet rose project. You will need these tools for weaving in ends and, more importantly, for sewing the base of the rolled flower. A sturdy needle makes the assembly process much smoother and ensures the flower remains intact.
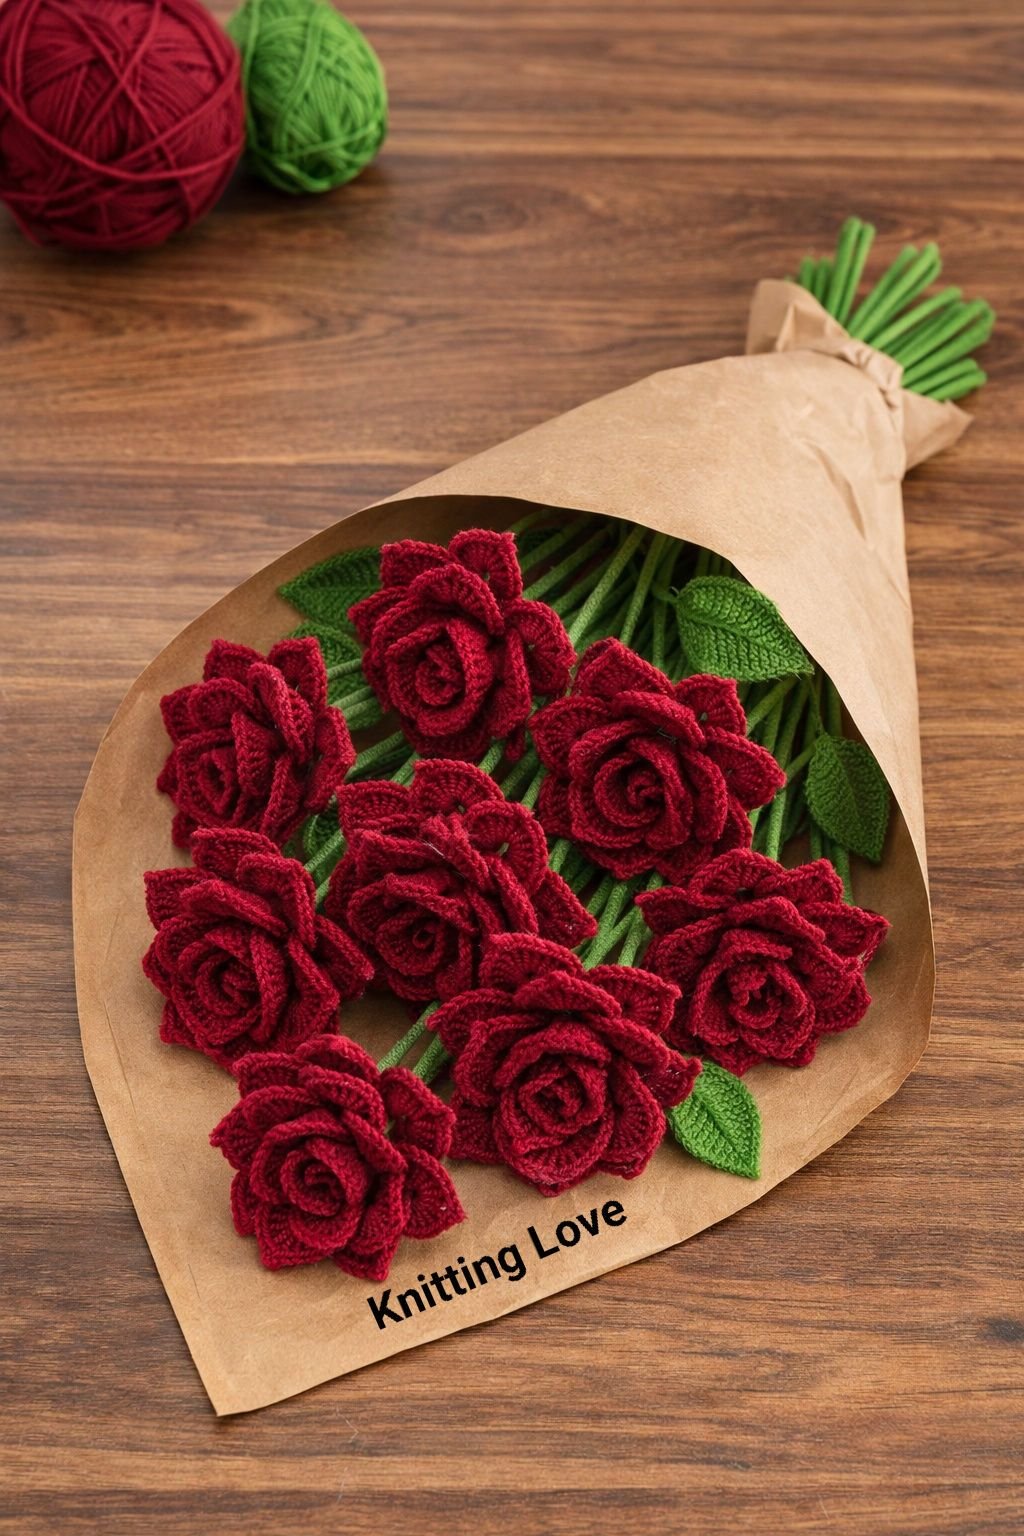
Color selection can turn a standard Rose Crochet – Pattern into a work of art. While classic red is always popular, experimenting with variegated yarn or soft pastels can give your roses a unique, organic appearance. Consider using ombre yarns to mimic the natural color gradients found in garden roses.
Stitch markers are a “must-have” for anyone following a detailed Rose Crochet – Pattern. Even though roses are often worked in flat rows before being rolled, keeping track of your scalloped edges and stitch counts prevents lopsided petals. Organization is the key to a professional-looking finished product.
Lastly, consider adding floral wire if you intend to create a crochet bouquet. Inserting wire into the stem or the outer petals allows for posing and shaping. This small addition elevates the Rose Crochet – Pattern from a simple appliqué to a realistic 3D sculpture suitable for vases.
2. Understanding the Stitches in a Rose Crochet – Pattern
The most common stitch used in a Rose Crochet – Pattern is the double crochet (dc), which provides the height needed for lush petals. By grouping several double crochets into a single space, you create the rounded “shell” shape that mimics a flower petal. This technique is fundamental for creating volume.
Another crucial element is the chain stitch (ch), which acts as the skeleton for your Rose Crochet – Pattern. Most patterns begin with a long foundation chain. The length of this chain directly determines how many layers of petals your finished crochet rose will have once it is rolled up.
To create the tapered look of a real petal, a Rose Crochet – Pattern often incorporates a mix of stitch heights. You might see a sequence of single crochet (sc), half-double crochet (hdc), and double crochet within the same petal. This graduated height creates a natural, soft curve that looks incredibly realistic.
The slip stitch (sl st) is used for joining and transitioning between petal sections. In a Rose Crochet – Pattern, the slip stitch helps define the “valleys” between the petals. This creates a clear distinction between each layer, ensuring the flower doesn’t look like a solid, undefined mass of yarn.
For more advanced Rose Crochet – Patterns, you might encounter the treble crochet (tr). This extra-tall stitch is perfect for the outer, larger petals of a full-bloom rose. Using trebles allows the outer layers to fan out beautifully, providing that iconic “open” look of a rose in peak summer.
Mastering the V-stitch can also be a game-changer for your Rose Crochet – Pattern. Many designers use V-stitches in the second row to create “seats” for the petals in the third row. This architectural approach ensures that your crochet flower is structurally balanced and easy to roll.
3. Step-by-Step Assembly of the Rose Crochet – Pattern
Once you have finished crocheting your long strip of petals, the real magic of the Rose Crochet – Pattern happens during the assembly. You start by taking the narrowest end of your strip—usually the end with the smallest petals—and begin rolling it inward. This creates the tight center of the rosebud.
As you continue rolling the Rose Crochet – Pattern strip, it is important to keep the bottom edge aligned. Do not roll it too tightly, or the flower will look constricted; conversely, rolling too loosely might make the rose fall apart. Finding the right tension is a hallmark of expert crochet crafting.
While rolling, use your tapestry needle and a matching strand of yarn to secure the base every few turns. This “stitch-as-you-go” method is often more secure than trying to sew through the entire base at the end. It ensures each layer of your Rose Crochet – Pattern stays exactly where you want it.
The way you position the outer petals of your Rose Crochet – Pattern can change the entire look of the flower. For a “blooming” effect, pull the outer petals slightly downward and stitch them into place. This mimics the way a real rose opens up to the sun, adding a touch of botanical realism to your work.
After the sewing is complete, spend some time “massaging” the petals of your Rose Crochet – Pattern. Because yarn is flexible, you can manually shape the petals to be more rounded or pointed. This final grooming step is what separates a handmade crochet rose from a generic store-bought decoration.
To finish your Rose Crochet – Pattern assembly, you might choose to add a crochet calyx (the green part at the base). This small star-shaped piece provides a professional finish and covers the messy sewing stitches at the bottom. It also provides a sturdy attachment point for a stem or a brooch pin.
4. Customizing Your Rose Crochet – Pattern for Different Projects
The versatility of the Rose Crochet – Pattern makes it suitable for a wide variety of applications beyond just a simple flower. For instance, you can use thin lace weight yarn and a tiny hook to create micro-crochet roses. These are perfect for delicate jewelry like earrings or dainty necklaces.
If you prefer home decor, a bulky yarn Rose Crochet – Pattern can be turned into a stunning 3D throw pillow. By scaling up the pattern, the rose becomes a focal point of the room. These chunky crochet flowers add a cozy, bohemian vibe to any living space or bedroom.
You can also incorporate the Rose Crochet – Pattern into wearable fashion. Stitching several roses onto a headband creates a beautiful “flower crown” effect. Alternatively, a single rose attached to a cardigan acts as a sophisticated crochet brooch, adding a pop of color to a neutral outfit.
For those interested in gift-giving, a crochet rose bouquet made using this pattern is a sentimental choice. Unlike real flowers, these everlasting crochet roses serve as a permanent reminder of your affection. They are particularly popular for Mother’s Day, Valentine’s Day, or anniversaries.
Advanced crafters can combine the Rose Crochet – Pattern with other elements like crochet leaves or baby’s breath. Creating a full arrangement involves varying the sizes of the roses—some in full bloom and some as small buds. This variety adds depth and visual interest to your floral crochet arrangements.
Finally, don’t be afraid to experiment with textures. You can use velvet yarn for a soft, romantic Rose Crochet – Pattern or even twine for a rustic, farmhouse look. The possibilities are truly endless when you have mastered the basic construction of this classic crochet motif.
Frequently Asked Questions (FAQ)
How long does it take to complete a Rose Crochet – Pattern?
For an intermediate crocheter, a single rose usually takes between 30 to 60 minutes. This includes the time for crocheting the strip and the assembly. Larger, more complex roses with more petals may take longer.
What is the best yarn for a Rose Crochet – Pattern?
Cotton yarn is generally considered the best choice because it provides excellent stitch definition and holds its shape well. However, acrylic yarn is a budget-friendly alternative that works well for larger projects like pillows.
Can a beginner try this Rose Crochet – Pattern?
Yes! As long as you know the basic stitches (chain, single crochet, and double crochet), you can successfully complete this pattern. The most challenging part is usually the rolling and sewing, but that gets easier with practice.
How do I wash a flower made from a Rose Crochet – Pattern?
It is best to hand wash crochet flowers in cold water with a mild detergent. Lay them flat to dry and reshape the petals while they are damp to ensure they maintain their beauty.
Do I need to use wire for my crochet rose?
Wire is only necessary if you want the rose to stand up in a vase or if you want to pose the petals. For appliqués on hats or blankets, you do not need wire.
How can I make my Rose Crochet – Pattern look more realistic?
Use multiple shades of the same color (like a dark pink center and lighter pink outer petals) and ensure you use a smaller hook to keep your stitches tight and structured.
Conclusion
In this guide, we have explored the intricate and beautiful world of the Rose Crochet – Pattern, covering everything from the essential materials to the final assembly. We learned that the choice of yarn and hook size is fundamental to the structure, and that mastering basic stitches like the double crochet is key to creating lush, lifelike petals. By following the step-by-step rolling technique, you can transform a simple strip of crochet into a stunning 3D flower that will last a lifetime.
Whether you are making a single crochet rose as a gift or an entire bouquet for home decor, the techniques shared here provide a solid foundation for your creativity. The Rose Crochet – Pattern is more than just a craft project; it is a way to express artistry through yarn and hook. We hope this article has inspired you to pick up your materials and start blooming!