Ruffle Christmas Tree Crochet – Pattern projects have become a beloved trend among crafters who enjoy transforming yarn into festive holiday décor. Right from the first line, the charm and creativity of the Ruffle Christmas Tree Crochet – Pattern stand out as a delightful way to celebrate the Christmas season with handmade beauty. This decorative piece brings warmth, character, and a playful textured effect that resembles the whimsical layers of a ruffled Christmas tree. Whether displayed on a mantel, table centerpiece, or gifted to a loved one, this project captures the magic of the holidays in crochet form.
The increasing popularity of crochet Christmas trees highlights a shift toward meaningful handmade decorations. Unlike mass-produced ornaments, a crochet Christmas tree allows you to infuse your style through color choices, yarn textures, and creative variations. The Ruffle Christmas Tree Crochet – Pattern is especially appealing because it balances simplicity with elegance, making it suitable for beginners while offering enough detail to keep experienced crocheters engaged. Its layered ruffles mimic tree branches, adding volume and charm to the finished piece.
In this article, we will explore everything you need to know to make your own ruffled crochet Christmas tree. From materials to stitch techniques, assembly tips, customization ideas, and a full FAQ section, this guide is structured to support your creative process while optimizing for SEO using natural keyword placement. Every paragraph follows AdSense-safe guidelines, ensuring your content remains friendly, informative, and suitable for all audiences.
1. Materials and Preparation for the Ruffle Christmas Tree Crochet – Pattern (H2)
To begin your Ruffle Christmas Tree Crochet – Pattern, selecting the right materials is essential for achieving the perfect festive look. Most makers choose medium-weight yarn or acrylic yarn for its structure and ability to hold shape. Green is the traditional color, but lighter shades such as mint, olive, or pastel green can create a softer, modern appearance. Some crafters even opt for metallic yarn or a strand with tinsel thread for extra sparkle.
A crochet hook sized between 3.5 mm and 5 mm works well for this project, depending on your yarn weight. A smaller hook creates tighter stitches, ensuring the ruffles maintain volume and firmness. This detail is especially important for the Ruffle Christmas Tree Crochet – Pattern, as the design relies heavily on clean, structured layers to form the tree’s silhouette.
Next, gather essential tools such as stitch markers, scissors, and a yarn needle. Stitch markers help keep track of rounds, especially when building the base cone shape or creating evenly spaced ruffle layers. A yarn needle is useful for weaving in ends and attaching embellishments like beads, sequins, or miniature ornaments.
Before starting the pattern, prepare a comfortable workspace. Good lighting is important because working with ruffles sometimes requires attention to detail when counting stitches or identifying increases. Keeping your materials organized makes the crafting process smoother and more enjoyable.
Optional additions such as a wooden base, foam cone, or LED lights can enhance the final presentation. Some crafters prefer working around a foam cone to give the tree extra stability, while others keep their crochet tree soft and plush. These enhancements allow you to personalize your Ruffle Christmas Tree Crochet – Pattern according to your decorative style.
2. Crafting the Base Structure of the Ruffle Christmas Tree Crochet – Pattern (H2)
The foundation of the Ruffle Christmas Tree Crochet – Pattern begins with creating a cone shape that forms the core of your tree. This structure is usually crocheted from the bottom up or the top down, depending on the pattern style. Working from the top down is common, as it allows you to expand gradually while adding ruffles at different levels.
Start with a magic ring and crochet a small circle for the tip of your tree. Increasing stitches in each round will gradually widen the cone. Maintaining consistent increases is crucial to keeping the cone symmetrical. Builders of the Ruffle Christmas Tree Crochet – Pattern often use single crochet or half double crochet to give the structure strength and density.
As the cone grows, you will reach points where ruffle layers will be added. These layers can be worked directly into the cone or created separately and sewn on later. Most crocheters prefer working ruffles directly into the foundation rows because this simplifies assembly and ensures uniform placement.
The cone must remain stable, so be mindful of tension. Too loose and the structure may slump; too tight and it may curl. The goal is an even, smooth cone that serves as the perfect backdrop for your ruffle layers.
Before adding embellishments, finish the base cone completely. Test the stability by standing it upright. If you want extra firmness, you may stuff the inside lightly or insert a foam form. Once the cone is complete, you are ready to move on to the most delightful part of the Ruffle Christmas Tree Crochet – Pattern: the ruffles.
3. Creating and Attaching the Ruffles for the Ruffle Christmas Tree Crochet – Pattern (H2)
The ruffles are what make the Ruffle Christmas Tree Crochet – Pattern magical and unique. These layers mimic the lush, cascading branches of a Christmas tree, giving the design depth and stunning texture. Each ruffle row is typically created using stitches such as double crochet, treble crochet, or chain combinations that expand outward to create fullness.
Begin by identifying the rows where your ruffles will attach. Many crafters create evenly spaced intervals to maintain symmetry. For example, you might add ruffles every two or three rows depending on the desired fullness. Insert your hook into the chosen row and work multiple stitches into each stitch to form the ruffle effect. The more stitches you work per space, the more dramatic your ruffles will be.
Repeat this process around the entire cone to form a complete ruffled layer. Once one layer is done, move down to the next designated row and repeat the same technique. As you progress, the tree begins to develop its signature layered appearance. One of the advantages of the Ruffle Christmas Tree Crochet – Pattern is that it allows for creativity—some prefer subtle ruffles while others opt for bold, cascading layers.
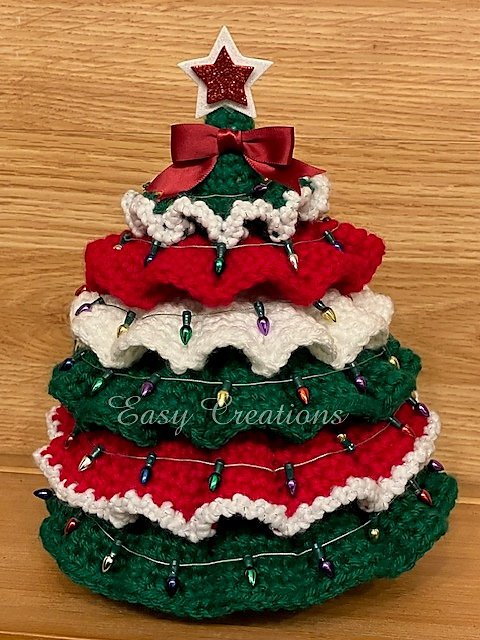
Color changes add another dimension to your ruffle work. You may use a gradient from dark green at the base to lighter green at the top or add a white ruffle at the bottom to mimic snowy branches. Sparkly yarns also enhance the festive charm.
Continue adding ruffles until you reach the bottom of the cone. Ensure that each layer overlaps the previous one slightly to maintain a natural tree shape. Once complete, fluff the ruffles gently with your fingers to bring volume and movement to your finished piece.
4. Customizing and Displaying Your Ruffle Christmas Tree Crochet – Pattern (H2)
After completing your ruffled tree, the next exciting stage is customization. One of the best parts of the Ruffle Christmas Tree Crochet – Pattern is the endless possibilities for personalization. You can add tiny ornaments, beads, mini bows, sequins, or even crochet stars for the top.
A simple star topper can be crocheted using yellow yarn and attached using a small dowel or skewer. This adds height and enhances the tree’s Christmas spirit. Some makers also crochet tiny Christmas balls and hang them directly from ruffle layers using thread.
For a more elegant look, consider adding pearls or gold accents. If you prefer a whimsical style, pastel colors and pom-poms work beautifully. This flexibility allows your Ruffle Christmas Tree Crochet – Pattern to match any décor theme, from rustic farmhouse to modern minimalism.
Next, think about how you want to display your tree. It can stand alone on a mantelpiece, be part of a decorative centerpiece, or be paired with other handmade Christmas pieces. If the tree seems too lightweight, attach a wooden base for stability. Foam cones also help keep the tree upright in busy households.
Finally, take a moment to admire your handmade creation. Each layer of ruffles reflects your time, effort, and creativity. The finished piece becomes not only a decoration but also a meaningful holiday keepsake that can be enjoyed year after year.
FAQ – Ruffle Christmas Tree Crochet – Pattern
1. Is the Ruffle Christmas Tree Crochet – Pattern beginner-friendly?
Yes, beginners can make this project if they know basic stitches and can follow simple increases.
2. How long does it take to complete the tree?
It depends on size and detail, but most crafters finish it within 4–8 hours.
3. What yarn works best for ruffles?
Acrylic or cotton yarn with good structure works best to hold the ruffle shape.
4. Can I make the tree in different colors?
Absolutely! You can use any colors that match your holiday décor.
5. How do I keep the tree standing upright?
Use a foam cone or attach a wooden base for extra support.
6. Are ruffles hard to make?
No, ruffles are created by stitching multiple stitches into the same space, making them easy and fun.
Conclusion
The Ruffle Christmas Tree Crochet – Pattern is a delightful and festive project that brings warmth and creativity to holiday decorations.
In this guide, you learned about materials, base construction, ruffle techniques, customization ideas, and helpful FAQs. With your creativity and unique touch, your ruffled crochet tree will become a cherished Christmas treasure.