The Seaside Crochet Shawl/Scarf – Pattern is a beautiful and versatile project that combines elegance with functionality.
Whether you’re an experienced crocheter or a passionate beginner, this pattern offers the perfect opportunity to create a wearable piece that embodies the calm and refreshing essence of the seaside.
From a breezy summer evening to a cool winter stroll, this accessory adapts effortlessly.
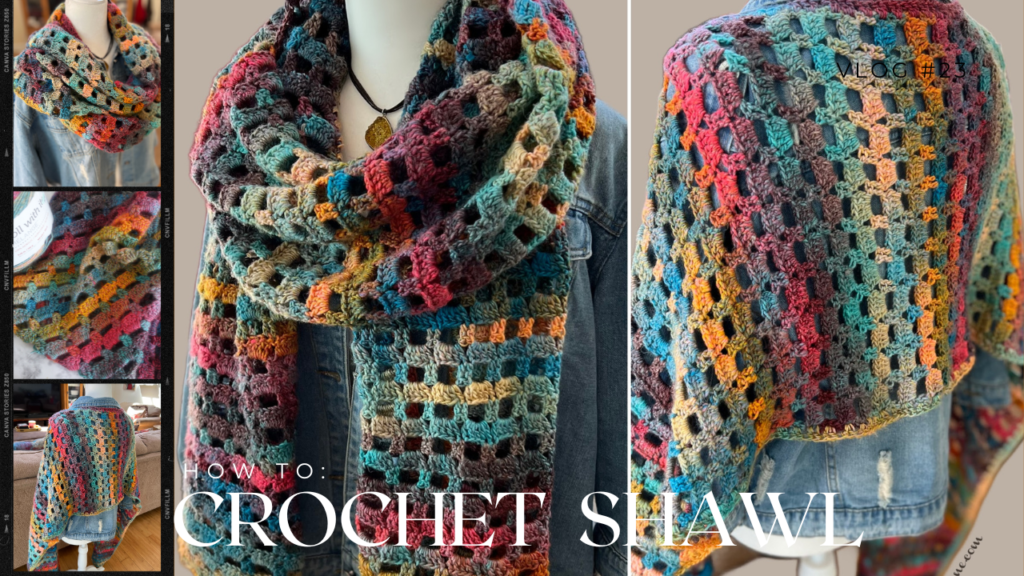
Crafted with love and inspired by coastal tones and textures, the Seaside Crochet Shawl/Scarf – Pattern is ideal for those who want to bring a touch of handmade charm into their wardrobe. With easy-to-follow steps and endless customization options, this crochet pattern helps you create something truly unique, personal, and stylish.
In this comprehensive guide, we’ll walk you through everything you need to know to start your seaside-inspired crochet journey. We’ll explore materials, techniques, styling ideas, and tips to help you succeed. So, pick up your hook and let’s dive into the world of the Seaside Crochet Shawl/Scarf – Pattern.
1. Choosing the Right Yarn and Hook for Your Seaside Project
When creating a Seaside Crochet Shawl/Scarf – Pattern, the first and perhaps most crucial decision is selecting the appropriate yarn and hook. These choices significantly influence the final texture, drape, and comfort of your piece.
Yarn weight is vital for this project. Lightweight yarns such as fingering or sport weight are commonly used for shawls and scarves, offering an airy and delicate finish perfect for seaside vibes. Cotton and bamboo blends are particularly recommended for warmer climates or a breezy coastal feel.
Color choice also plays an essential role. Soft blues, sandy beige tones, seafoam greens, and creamy whites echo the natural hues of the seaside and bring that calming aesthetic to life. Gradient yarns can add visual depth and subtle movement to your shawl or scarf.
When it comes to crochet hooks, you’ll typically want to go one size up from the yarn’s recommendation. This ensures that the fabric maintains a light, breathable quality—a must-have for any shawl or scarf intended for layering.
Tension or gauge isn’t too critical with this pattern unless you’re aiming for a specific size. Still, consistency in your stitch work is essential to ensure the final product lays evenly and feels comfortable when worn.
Finally, don’t forget to consider the yarn’s texture. Avoid overly fuzzy or textured yarns unless you’re confident in reading your stitches. A smooth, high-quality yarn allows the beauty of the stitches and pattern to shine through.
2. Mastering the Basic Stitches for This Pattern
The Seaside Crochet Shawl/Scarf – Pattern is beginner-friendly yet elegant. It relies on a combination of basic and slightly intermediate stitches that come together to create a stunning flow reminiscent of ocean waves.
The most commonly used stitch is the double crochet (dc). It provides length, flexibility, and openness, which is ideal for shawls and scarves that drape gracefully. If you’re a beginner, practicing this stitch will help lay a strong foundation.
Chain stitches (ch) are another critical element in the design. These stitches form the foundation row and are often used to create delicate lace patterns that give the piece its airiness.
You may also encounter the treble crochet (tr) in some variations. This stitch is taller than the double crochet and is excellent for creating openwork that adds texture without weight.
The shell stitch is a favorite among designers crafting shawl patterns. It involves working multiple stitches into a single space to form a fan-like motif—perfect for mimicking ocean ripples.
For finishing touches and borders, picot stitches can be used to add decorative edges. These tiny loops add flair without overwhelming the design.
Lastly, blocking your finished shawl is highly recommended. This process helps even out stitches and allows your lace details to truly stand out—essential for bringing the full charm of the seaside design to life.
3. Styling and Wearing Your Seaside Shawl/Scarf
One of the joys of the Seaside Crochet Shawl/Scarf – Pattern is its versatility. Whether you’re dressing up or going casual, this handmade accessory can elevate your look while keeping you cozy and comfortable.
For a chic, bohemian vibe, drape the shawl loosely around your shoulders and pair it with a sundress or maxi skirt. The light fabric and coastal colors naturally complement flowy, summery outfits.
You can also wear it as a traditional scarf, wrapped once or twice around the neck. This is a great look for cooler days and works beautifully over a plain top or coat, allowing the pattern to stand out.
The seaside crochet pattern can be styled as a headscarf or turban for a unique, fashion-forward twist. This styling not only protects your hair from wind but also adds a creative flair to your look.
Another fun option is to use the shawl as a beach cover-up. Simply tie the ends around your waist or shoulders, and you’ve got a lightweight layer perfect for lounging by the water.
In professional settings, the shawl can serve as an elegant wrap. Choose neutral tones or solid colors for a more formal appearance and pair it with tailored outfits.
Don’t forget to share your own styling ideas with the crochet community. Social platforms like Instagram or Pinterest are great for showcasing how you rock your Seaside Crochet Shawl/Scarf – Pattern.
4. Tips for Customization and Personalization
The Seaside Crochet Shawl/Scarf – Pattern is wonderfully adaptable, allowing for endless customization to suit your individual taste, climate, and wardrobe needs.
Adjusting the size is one of the simplest ways to personalize your shawl. You can increase the foundation chain or add more rows to make the piece longer or wider. Just ensure your stitch count aligns with the pattern’s repeat sections.
Playing with color is another fantastic way to make the pattern your own. Try using ombré yarns, color blocks, or even a striped pattern that mimics the layers of sand, sea, and sky.
Adding embellishments like fringe, tassels, or beads can elevate your piece from simple to stunning. These additions not only enhance the aesthetic but also give a unique, personalized touch.
Experimenting with stitch combinations can give the pattern a new twist. If you’re comfortable with more advanced techniques, try integrating puff stitches, bobbles, or mesh lace for a textured look.
If you want a more functional piece, consider adding button closures or loops that allow you to wear the shawl in multiple ways—like a capelet, wrap, or even a vest-style layering item.
Lastly, incorporating meaningful yarn—perhaps hand-dyed or from a special trip—adds a sentimental value that makes your finished shawl even more precious.
Frequently Asked Questions (FAQ)
1. Is the Seaside Crochet Shawl/Scarf – Pattern suitable for beginners?
Yes! The pattern uses basic stitches like double crochet and chain stitches. It’s perfect for beginners who want to practice their skills while making something beautiful.
2. How long does it take to complete the pattern?
The time required depends on your skill level and the size of the shawl or scarf. On average, it may take 8–12 hours for an intermediate crocheter to complete.
3. What type of yarn is best for this pattern?
Lightweight cotton, bamboo, or acrylic blends work best. These fibers offer a breathable, drapey finish suitable for seaside wear.
4. Can I modify the size of the pattern?
Absolutely. You can adjust the number of starting chains and rows to fit your desired size. Just maintain the pattern’s stitch repeat for consistency.
5. Is blocking necessary after finishing?
Yes, blocking helps define the stitches, especially if your shawl includes lace elements. It improves the overall look and feel of the finished piece.
6. Can I sell items made from this pattern?
You can sell finished products made using the pattern, but crediting the pattern designer is recommended if you’re using a published version. Always check for specific usage rights.
Conclusion
Creating your own Seaside Crochet Shawl/Scarf – Pattern is not just a fun and fulfilling project—it’s an opportunity to express your creativity and connect with the calming rhythm of the sea through yarn and hook. From choosing the perfect yarn to styling your final piece, every step brings joy and a sense of accomplishment.
We hope this guide has helped you feel more confident and inspired to begin your own seaside crochet journey. If you’ve enjoyed the article or have questions, ideas, or feedback, please leave a sincere opinion and share your suggestions below—your input helps us continue improving and inspiring fellow makers around the world.