The Simple Crochet Cord – Pattern is an excellent project for beginner and intermediate crocheters alike.
With minimal materials and simple techniques, crochet cords can be used for various purposes, from making jewelry and accessories to creating decorative elements for your home.
Whether you’re looking to add a personal touch to your knitting projects or simply want to experiment with something new, learning how to crochet a basic cord is a fun and versatile skill to have.
In this article, we’ll take you through everything you need to know about crochet cords, including a detailed pattern, helpful tips, and how to incorporate them into different projects.
Crochet cords have been a popular choice for creating intricate details in crocheted items, and the best part is they are relatively easy to make. With just a few basic crochet techniques, such as chain stitches and slip stitches, you can create a cord that is both functional and beautiful. The Simple Crochet Cord – Pattern can be adapted to different lengths and thicknesses, making it an excellent addition to any crochet repertoire.
If you’re new to crochet, don’t worry! This guide will walk you through each step of the process. Whether you’re crafting a statement necklace, a colorful keychain, or even a sturdy handle for a handmade purse, the simple crochet cord can add flair and individuality to your projects. By following this pattern, you will gain confidence in your crochet skills and open up a world of possibilities for new designs.
1. Materials Needed for Simple Crochet Cord
Before you begin working on your Simple Crochet Cord – Pattern, it’s essential to gather the right materials. The beauty of this project is that you don’t need much to get started. Here are the basic materials you’ll need:
- Yarn: The type of yarn you choose will significantly affect the final look of your crochet cord. For a basic cord, worsted weight yarn works perfectly, but you can use any yarn thickness depending on the project. Cotton yarn is a great choice for a sturdy, durable cord.
- Crochet Hook: The size of the crochet hook depends on the yarn you are using. Typically, a 4mm (G-6) or 5mm (H-8) crochet hook is suitable for worsted weight yarn. If you’re using thicker yarn, you may want to select a larger hook.
- Scissors: You will need scissors to trim any excess yarn once your crochet cord is finished.
- Tapestry Needle: A tapestry needle will help you weave in any loose ends at the end of your project, giving your crochet cord a clean finish.
- Stitch Marker (Optional): If you’re working on a long cord and want to keep track of your starting point, a stitch marker can be helpful, though it’s not strictly necessary for this simple pattern.
These are the basic tools you need to create your crochet cord. Once you have everything prepared, you’re ready to get started!
2. Step-by-Step Guide to Crocheting a Simple Crochet Cord
Now that you have your materials ready, let’s go over how to crochet a simple cord. This pattern is easy to follow and can be adapted for various uses.
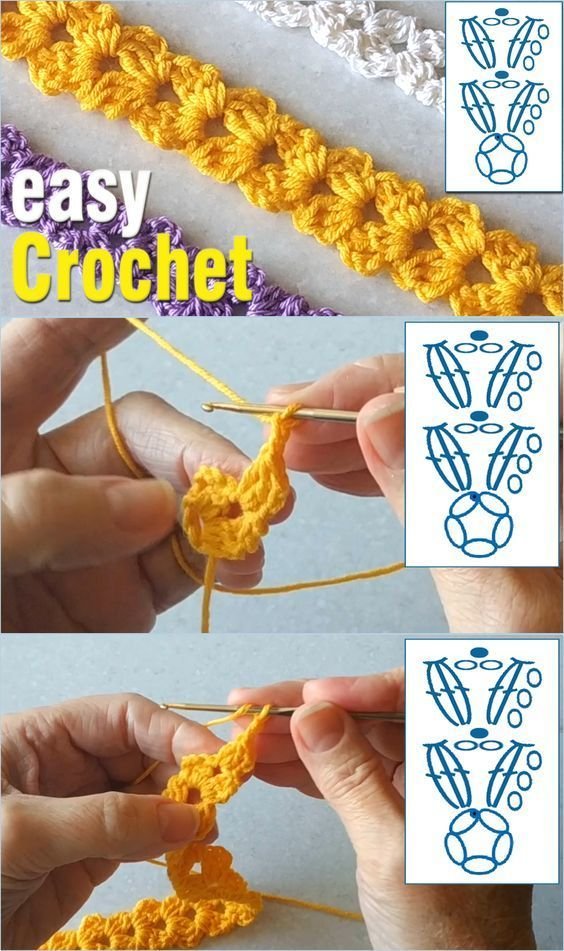
- Make a Slip Knot: Start by creating a slip knot with your yarn. Place the slip knot on your crochet hook, ensuring it’s snug but not too tight.
- Chain Stitches: Begin by making a chain stitch. The length of the chain will determine the length of your cord. For a basic crochet cord, you can chain anywhere from 20 to 30 stitches, depending on how long you want the cord to be.
- Crochet into the Back Loop Only: Once you’ve completed the chain, turn your work and crochet into the back loop of each stitch. This creates a subtle texture on the cord and helps the cord to twist naturally.
- Continue Crocheting Rows: Continue crocheting into the back loop of each stitch, working row by row, until your cord reaches the desired length. Keep your tension even throughout the process for a consistent and smooth finish.
- Fasten Off: Once your cord is the right length, fasten off the yarn by cutting it, leaving a small tail. Pull the tail through the last loop on your hook to secure the end of the cord.
- Weave in the Ends: Use a tapestry needle to weave in the loose ends of the yarn, hiding them within the cord to give it a neat, finished appearance.
That’s it! You’ve now created a basic crochet cord. This pattern is quick and simple, making it a great option for beginners or anyone looking for a quick project to add a little crochet charm to their creations.
3. Creative Ways to Use Your Simple Crochet Cord
Once you’ve mastered the basic crochet cord, there are countless ways you can incorporate it into your projects. The versatility of the Simple Crochet Cord – Pattern allows you to use it in a variety of fun and practical ways. Here are some ideas to get you started:
- Jewelry: You can create bracelets, necklaces, and anklets by simply making shorter lengths of crochet cord. Add beads or charms for extra flair, and use jump rings to connect the ends.
- Purse Handles: A crochet cord can make a durable and stylish handle for a handmade bag or purse. Just create a longer cord and attach it to your purse by sewing or crocheting the ends into the sides of the bag.
- Keychains: Crochet cords make the perfect base for creating custom keychains. You can add a small crochet flower or bead to the cord, and attach a key ring for a personal touch.
- Home Décor: Use crochet cords as decorative elements for pillows, curtains, or even as a garland for special occasions. The cords add texture and can bring a fresh, handmade look to your home.
- Ties and Closures: Crochet cords can be used as ties for securing gift bags, wrapping paper, or even as closures for knitted or crocheted garments, like sweaters or cardigans.
- Craft Projects for Kids: Create colorful crochet cords for fun kids’ crafts. From creating custom friendship bracelets to making DIY bookmarks, there are endless possibilities for fun crochet projects.
These are just a few of the many ways you can incorporate crochet cords into your creative projects. The beauty of this simple technique is that it’s adaptable and can be used in nearly every type of crafting.
4. Tips for Customizing Your Simple Crochet Cord
Once you’re comfortable with the basic crochet cord pattern, you may want to customize it to suit your needs. Here are a few tips to help you personalize your crochet cord:
- Use Multiple Strands of Yarn: To create a thicker cord, you can crochet with two or more strands of yarn at once. This will result in a sturdier, more textured cord that can be used for larger projects.
- Add Texture with Different Stitches: Instead of crocheting in the back loop only, you can experiment with different crochet stitches to add texture to your cord. For example, you could use half-double crochet or double crochet for a thicker, more substantial cord.
- Change Yarn Colors: Add a pop of color to your crochet cord by changing yarn colors every few rows. This creates a striped effect, which can be eye-catching for accessories like bracelets or keychains.
- Create Curves: To make the crochet cord twist or curl naturally, crochet loosely. The looser tension will encourage the cord to spiral and can create a fun, decorative effect for projects like bag handles or wreaths.
- Add Embellishments: Once your crochet cord is finished, you can embellish it by adding beads, buttons, or even crochet flowers to the ends. These embellishments can enhance the visual appeal of your cord and make it unique.
- Use Different Types of Yarn: Experiment with different types of yarn to achieve various effects. Try bulky yarn for a thicker cord or sparkly metallic yarn to add glamour to your creations.
By implementing these tips, you can easily modify the basic crochet cord pattern to suit your style and the specific needs of your project.
FAQ: Common Questions About Simple Crochet Cord – Pattern
- What is a crochet cord? A crochet cord is a simple, elongated piece of crochet work made by chaining and then crocheting into the back loop of the chain to form a durable, flexible cord. It can be used for a variety of crafting projects.
- How do I make a crochet cord thicker? To make a thicker crochet cord, you can crochet with multiple strands of yarn at once or use a thicker yarn. You can also adjust your crochet stitches to half-double or double crochet to create a bulkier cord.
- Can I use crochet cord for bag handles? Yes, crochet cords are commonly used to make sturdy handles for crochet bags. Simply make a longer cord, and attach it to the sides of your bag using a whip stitch or by crocheting the ends into the bag.
- How do I prevent my crochet cord from curling? If you prefer a straight crochet cord, keep your tension tight and avoid crocheting loosely. If your cord is curling, try blocking it with steam to straighten it out.
- Can I add beads to my crochet cord? Absolutely! Adding beads to your crochet cord is a great way to embellish it. You can string beads onto the yarn before starting, or you can crochet beads into the stitches as you go.
- What can I use crochet cords for? Crochet cords are versatile and can be used for a variety of purposes, including jewelry, bag handles, home décor, keychains, and even as ties or closures for garments and gifts.
Conclusion
In this article, we’ve explored the Simple Crochet Cord – Pattern, offering a step-by-step guide on how to make a basic crochet cord, as well as creative ways to incorporate it into your projects. From jewelry to home décor, crochet cords provide a versatile and customizable element that can enhance a variety of creations.
We hope this guide has inspired you to try out this simple and fun crochet project! If you have any questions or suggestions, feel free to leave a comment below. We’d love to hear your thoughts and see how you’re incorporating crochet cords into your projects!