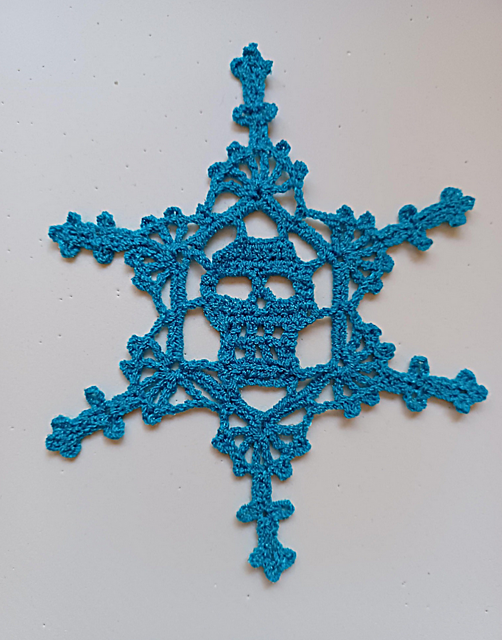
If you’re a crochet lover looking to try something creative and edgy, then this Skull Snowflake em crochet – Pattern is a perfect project for you. It’s an exciting blend of spooky and festive—a gothic twist on the classic snowflake design that brings personality and charm to your handmade decor. Whether for Halloween, a gothic Christmas theme, or simply to showcase your unique style, this pattern is sure to stand out.
The beauty of the Skull Snowflake em crochet – Pattern lies in its dual symbolism. Snowflakes are traditionally associated with purity and winter, while skulls represent the mysterious, the alternative, or even a celebration of life in cultures like Día de los Muertos. Combining these two elements creates a piece that is artistic, meaningful, and visually intriguing.
In this article, you’ll learn how to choose the right materials, understand and follow a skull snowflake pattern, personalize it to suit your tastes, and display it creatively. Whether you’re a beginner or a seasoned crocheter, this guide will help you bring your own Skull Snowflake em crochet – Pattern to life, one stitch at a time.
1. Selecting Materials for Your Skull Snowflake em crochet – Pattern
When working with any crochet project, especially a decorative one like the Skull Snowflake em crochet – Pattern, choosing the right materials is essential. Your yarn and hook selection will directly influence the appearance and structure of the finished snowflake.
For this pattern, it’s best to use a lightweight cotton yarn or crochet thread. Cotton holds its shape well and showcases details like the skull facial features and snowflake points clearly. Size 10 thread is a common choice, paired with a steel crochet hook between 1.5 mm to 2 mm.
While traditional snowflakes are white or light blue, the skull motif gives you room to experiment. Try white for a ghostly look, black for a gothic theme, or even red or purple for a bolder statement. Metallic threads can add a magical shimmer if you’re going for a festive vibe.
Stiffening the final product is highly recommended. This helps maintain the snowflake’s flat, crisp structure. You can use commercial fabric stiffener, or create your own mix with water and glue or cornstarch. Be sure to pin the piece into shape while it dries.
In addition to your hook and yarn, you’ll need sharp scissors, a tapestry needle for weaving in ends, and blocking materials such as foam board and rustproof pins. Keeping your materials organized will save you time and frustration as you work through the Skull Snowflake em crochet – Pattern.
If you’re new to working with thin thread or small hooks, take your time practicing tension and control. The intricate design of the skull within the snowflake requires attention to detail, but the result is well worth the effort.
2. How to Read and Follow the Skull Snowflake em crochet – Pattern
Understanding how to read the Skull Snowflake em crochet – Pattern is crucial to successfully completing your project. While the design may seem complex at first glance, it’s typically made up of a series of repeatable steps built around a circular foundation.
The pattern usually starts with a magic ring or a few chain stitches joined into a circle. From there, you’ll work in rounds, building out the facial features of the skull such as eye sockets, nose, and jawline using common stitches like chains, single crochet, double crochet, and treble crochet.
Many patterns use clusters and picots to form the snowflake’s points and decorative extensions. These give the snowflake its frosty, star-like edges, while the skull face remains at the center. It’s important to count your stitches carefully to maintain symmetry throughout the piece.
Stitch markers can be helpful in keeping your place, especially when working in tight or complex rounds. Make sure to follow any written abbreviations and consult the stitch guide if needed. Diagrams or charts may also accompany the pattern, which can be very helpful for visual learners.
Blocking is essential once you’ve completed the crochet work. Lay the piece flat on a blocking mat or towel, pin each snowflake point to stretch it evenly, and apply stiffener. This helps define both the skull and snowflake shapes and ensures your final product looks clean and sharp.
If you find parts of the Skull Snowflake em crochet – Pattern challenging, don’t get discouraged. Take breaks, refer to online tutorials, or look for videos that demonstrate similar stitches. With patience and practice, the pattern becomes much easier to manage.
3. Personalizing Your Skull Snowflake em crochet – Pattern
One of the best parts of working with a Skull Snowflake em crochet – Pattern is how customizable it is. Once you’ve mastered the basic structure, there are endless ways to put your own creative spin on it.
Start with color. While white is classic, try black for a Halloween vibe, red for something more dramatic, or even multicolored yarn for a fun, unexpected twist. You could even alternate colors in different rounds to highlight the skull or the snowflake shape more clearly.
Next, consider size. By using a larger hook and thicker yarn, you can turn your snowflake into a wall hanging or table centerpiece. Smaller versions made with thread and tiny hooks can be used as ornaments, coasters, or even bookmarks.
Add embellishments to elevate your design. Tiny beads can be stitched into the snowflake points, or you could embroider extra details onto the skull like flowers (for a Día de los Muertos theme) or a tiny hat or bow for character.
You can also join multiple skull snowflakes together to create a garland or bunting. String them together with ribbon or yarn, and hang them across a mantle, window, or doorway for an eye-catching and unique decorative piece.
Another idea is to frame your completed piece in a shadow box or embroidery hoop. This turns your Skull Snowflake em crochet – Pattern into a piece of fiber art that you can proudly display year-round.
Don’t forget to sign your work! Whether you’re gifting or selling your snowflakes, include a tag or label with your name or initials. It’s a small but meaningful way to add personal value to your handmade creation.
4. Creative Ways to Use and Gift Your Skull Snowflake em crochet – Pattern
Once your Skull Snowflake em crochet – Pattern is finished and blocked, it’s time to think about how you’ll use or share your handmade masterpiece. These snowflakes are not only beautiful, but also versatile and practical in many settings.
Use them as ornaments on your Christmas tree, especially if you’re going for a non-traditional or gothic holiday theme. They add a unique twist that stands out among classic decorations and can even spark conversations.
Turn them into coasters or small doilies by working with slightly thicker yarn and adding a few extra rounds for stability. This works particularly well if you want a functional yet decorative piece for Halloween parties or themed gatherings.
If you love giving handmade gifts, these snowflakes make excellent presents. Tuck one into a greeting card, gift box, or holiday basket. They’re lightweight, thoughtful, and perfect for teachers, friends, or anyone who appreciates unique crafts.
Create a spooky snowflake garland by making several and attaching them to a long ribbon or string. Hang it across bookshelves, windows, or entryways. You can even alternate snowflake designs to mix it up visually.
For sellers and crafters, these snowflakes are a great addition to your handmade inventory. Market them as Halloween or winter-themed items in your Etsy shop, at local craft fairs, or through social media. The niche appeal of the Skull Snowflake em crochet – Pattern makes it attractive to buyers looking for something different.
Lastly, keep one for yourself! Whether it’s framed on a wall, hanging in your car, or tucked into a journal, a handmade skull snowflake is a symbol of your creativity and dedication. Every stitch is a little piece of your personality.
Frequently Asked Questions (FAQ)
1. What is a Skull Snowflake em crochet – Pattern?
A Skull Snowflake em crochet – Pattern is a crochet design that combines the structure of a snowflake with the central motif of a skull, creating a unique blend of spooky and festive.
2. Is this pattern suitable for beginners?
While the design may look complex, many skull snowflake patterns are beginner to intermediate level. Basic knowledge of crochet stitches and reading patterns is helpful.
3. What type of yarn should I use?
Lightweight cotton yarn or crochet thread is ideal. These materials help the snowflake hold its shape and allow for the skull details to show clearly.
4. How do I stiffen my crochet snowflake?
You can use fabric stiffener spray, a glue-and-water mixture, or starch. Block your snowflake by pinning it in shape and applying the stiffener, then let it dry fully.
5. Can I sell finished items made from this pattern?
It depends on the pattern’s licensing. Some designers allow selling finished products with credit, while others may restrict commercial use. Always check the pattern’s terms.
6. What are some creative ways to use these snowflakes?
They make great ornaments, coasters, gift tags, wall decor, or garlands. You can also frame them or use them as party decorations.
Conclusion
The Skull Snowflake em crochet – Pattern is a perfect blend of art, tradition
, and a touch of rebellion. It challenges the norms of seasonal crochet and offers a creative outlet for those who want to express individuality through handmade items. From selecting yarn and mastering the pattern to customizing and displaying your creation, every step offers an opportunity for learning and joy.
We hope this guide inspired you to try something new and express your creativity through crochet. If you enjoyed this article or made your own skull snowflake, leave a sincere opinion or suggestion in the comments. We’d love to see your versions and hear your ideas for future crochet adventures.