If you’re looking for a visually captivating crochet project that’s as mesmerizing as it is rewarding, the Spiral star crochet – pattern is an excellent choice.
This pattern combines beautiful swirling shapes with pointed star tips, creating a design that looks intricate but is surprisingly approachable for intermediate crafters.
Whether you want to make festive decorations, unique coasters, or even wall art, this project offers creativity and versatility in equal measure.
The Spiral star crochet – pattern is perfect for practicing color changes, shaping techniques, and round-based construction. It allows you to experiment with bold yarn combinations, creating eye-catching effects that pop in any setting. What makes it truly enjoyable is how the spiral forms naturally as you work in rounds, giving the appearance of movement and depth.
In this article, we’ll walk you through the essential steps to create your own spiral star using this crochet pattern. We’ll cover materials, construction tips, creative uses, and more—all optimized for an enjoyable and successful experience. Let’s dive into the world of spiral stars and bring your crochet skills to the next level!
1. Materials and Tools for Spiral Star Crochet Projects
To start your Spiral star crochet – pattern, you’ll need a few basic materials, most of which you probably already have in your crochet toolkit. This is a low-cost project that yields high visual impact.
The most important choice is your yarn selection. Because the spiral effect is highlighted by contrasting colors, it’s best to use at least two or three distinct shades. Acrylic yarn is a great choice for its vibrant hues and durability, but cotton works well for crisp stitches.
Use a crochet hook size appropriate for your yarn. Typically, a 3.5mm to 4.5mm hook is perfect for worsted weight yarn. A smaller hook will create tighter spirals and a firmer finished product, which is ideal if the star will be used as décor.
Other helpful tools include a yarn needle for weaving in ends, scissors, and stitch markers to help track your rounds. If you’re new to working in spirals or color changes, stitch markers can make a big difference in maintaining consistent stitches.
Optional items include blocking mats and pins if you want to shape your star for a cleaner finish. A light mist of water and gentle blocking can really enhance the defined points of your star.
Make sure to work in a well-lit area, especially when using dark yarns. Spirals can be tricky to track visually, so good lighting and clear contrast will make your project more enjoyable.
Finally, have a printed or digital version of the Spiral star crochet – pattern nearby for reference. Taking notes as you go will help you refine the process and replicate your favorite results later.
2. How to Crochet the Spiral Star Step by Step
Creating a Spiral star crochet – pattern is all about building in rounds with increasing stitches and intentional color changes. The swirling effect happens as a result of these increases being staggered.
Start by creating a magic ring with your first color. Work several single crochets into the ring, then switch to your second color and crochet into the same stitches—this begins the spiral effect. Add a third color if desired, continuing in the same manner.
You’ll begin working in continuous rounds, not joined rounds. This method helps maintain the swirl’s fluidity. Use a stitch marker to mark your starting point, especially if the pattern doesn’t include regular joins.
To form the star points, you’ll start shaping after several rounds. This involves a series of increases, chains, and slip stitches that form the pointed edges typical of a star motif. Make sure to count your stitches carefully to keep each point even.
Keep your tension consistent throughout the project. Uneven tension can distort the spiral and lead to wonky points. If your stitches feel tight, try going up a hook size or loosening your grip slightly.
Once your desired size is reached and all star points are formed, fasten off your yarn and weave in the ends. It’s helpful to do this neatly to maintain the reversible beauty of the star.
After finishing the crochet portion, block your star on a flat surface using pins. This will help even out the edges and enhance the shape of both the spiral and the star points.
3. Creative Uses for the Spiral Star Crochet Pattern
One of the joys of completing the Spiral star crochet – pattern is deciding how to use your beautiful creation. The versatility of this design opens up countless possibilities for home décor and personal gifts.
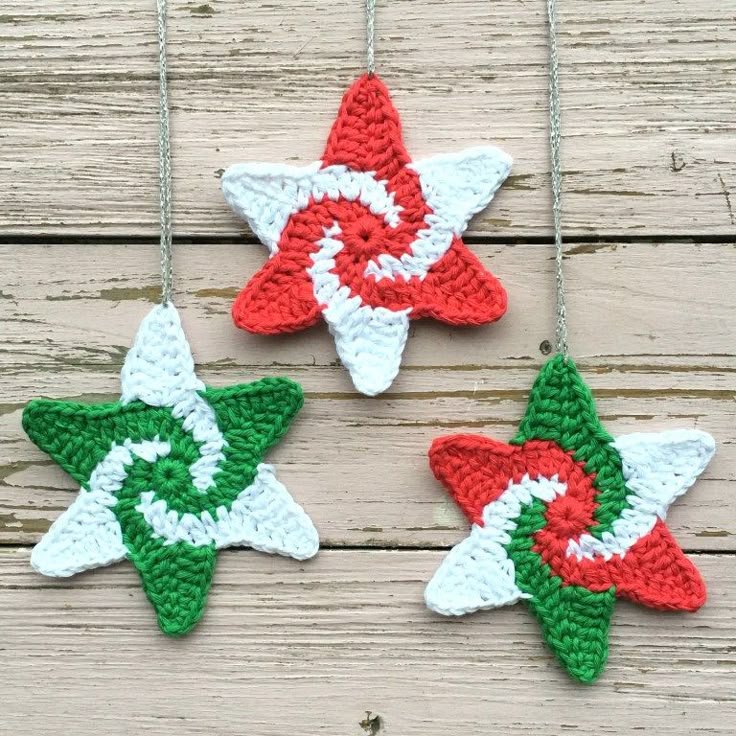
Turn your spiral stars into holiday ornaments by attaching a loop of yarn or ribbon. These stars look stunning on Christmas trees, in window displays, or strung together as festive garlands.
Use them as coasters or trivets. Made with cotton yarn, they can absorb moisture and protect surfaces, all while adding a cheerful handmade touch to your table setting.
Sew multiple stars together to create a table runner or wall hanging. When aligned properly, the swirls create an amazing sense of flow and motion, making for a dynamic visual display.
Make a large version as a centerpiece doily for special occasions. Using a finer yarn and smaller hook can create a lace-like effect, ideal for decorative purposes.
Create keychains or bag charms by adding a keyring and a bit of embellishment. These portable spiral stars make wonderful small gifts that showcase your creativity.
Another idea is to use them in children’s mobiles or playroom decorations. Their whimsical design and vibrant colors make them a hit with little ones—and they’re soft and safe.
4. Tips for Perfecting Your Spiral Star Crochet
Even though the Spiral star crochet – pattern is beginner-friendly, there are a few tricks to making your stars look polished and professional. Paying attention to small details can make a big difference.
Always count your stitches. This pattern relies on a regular increase system to maintain the spiral and shape. Losing count can lead to misaligned points or a distorted spiral.
Practice your color changes ahead of time. Changing yarn smoothly without creating bulk at the join point is important for maintaining the spiral’s flow. Carry yarn along the back or crochet over it to minimize ends.
When shaping the star points, make sure to space them evenly. Follow the pattern carefully to determine when and where to chain or decrease. Uneven spacing will throw off the overall symmetry.
Don’t rush the finishing process. Take time to weave in ends securely and block your project. A well-finished star has clean lines, firm points, and lays flat—a sign of quality craftsmanship.
Experiment with yarn textures and weights. Try metallic threads, variegated yarns, or even glow-in-the-dark fibers for fun twists on the traditional spiral star.
If you’re unsure how to fix mistakes, keep a scrap yarn sample nearby to practice. Repeating tricky parts on a test piece can help build confidence before committing to your final project.
FAQ – Spiral Star Crochet – Pattern
1. Is the Spiral star crochet – pattern suitable for beginners?
Yes, it’s accessible for adventurous beginners, especially those who have practiced working in rounds and changing colors. Familiarity with increases and slip stitches is helpful.
2. How long does it take to make one spiral star?
Most crafters can complete a small star in 1–2 hours. Larger or more intricate versions may take a bit longer, especially when using multiple colors.
3. Can I use any type of yarn for this pattern?
Yes, but for the best visual impact, use yarns that offer good stitch definition. Acrylic and cotton yarns work well. Try to choose contrasting colors to enhance the spiral effect.
4. Do I need to block the spiral star after finishing?
Blocking is optional but recommended. It helps even out the stitches, sharpens the star points, and gives your project a polished appearance.
5. What size should I make the spiral star?
That depends on its use. Small (4–6 inches) for ornaments or coasters, medium (8–10 inches) for doilies, and larger sizes for wall hangings or centerpieces.
6. Can I sell items made using the spiral star pattern?
Yes, you can sell handmade items from this pattern. If you’re using someone else’s design, be sure to follow their licensing terms and give credit where appropriate.
Conclusion
The Spiral star crochet – pattern is a vibrant, creative project that blends beauty and simplicity. Whether you’re using it to make seasonal decorations, personal gifts, or unique home accents, this pattern offers endless possibilities for expression. It’s a perfect way to explore new color combinations, master spiral techniques, and have fun with shape and structure.
We hope this guide gave you everything you need to get started with your own spiral star. If you’ve tried this pattern or have tips to share, please leave a sincere comment below with your experience, feedback, or suggestions. Your input helps build a creative community where everyone can learn and grow together. Happy crocheting!