The Star Granny Square Crochet – pattern is a delightful and versatile design that has gained immense popularity among crocheters worldwide.
Known for its distinct star-shaped center and intricate border, this crochet pattern creates a beautiful motif that can be used in various projects, such as blankets, scarves, pillows, and more.
Whether you’re a seasoned crocheter or a beginner looking to enhance your skills, the Star Granny Square Crochet – pattern offers an exciting challenge with rewarding results. In this article, we will break down the steps, provide essential tips, and explore ways to customize the pattern to fit your unique style.
Granny squares have long been a staple in the crochet world, offering a traditional yet modern appeal. The Star Granny Square takes this classic concept to the next level by introducing a beautiful star-shaped design in the center, making it ideal for a variety of creative projects. By mastering this pattern, you can experiment with different color combinations and customize your projects to suit any season or occasion. The intricate details and symmetry of the star center make it an eye-catching addition to any crochet piece.
In this guide, we will walk you through everything you need to know about the Star Granny Square Crochet – pattern. From the materials required to the step-by-step process, we will help you create stunning star granny squares that you can incorporate into your next crochet project. So, let’s dive in and learn how to crochet the star granny square!
1. Materials You’ll Need for the Star Granny Square Crochet – Pattern
Before starting any crochet project, it’s essential to gather the necessary materials. The Star Granny Square Crochet – pattern requires only a few basic supplies, but having the right tools will ensure your project goes smoothly and your results are perfect.
First, you’ll need some crochet yarn. For a standard Star Granny Square Crochet – pattern, you’ll want to choose a yarn that is of medium weight, such as worsted weight yarn. Choose colors that complement each other to create a striking contrast between the star center and the surrounding stitches. Typically, you’ll need at least two or three different colors for each square: one for the star center, one for the first round of the square, and another for the final border.
Next, you’ll need a crochet hook. For worsted weight yarn, a hook size of H/8 (5mm) or I/9 (5.5mm) is commonly used, but you can adjust the hook size depending on the yarn thickness and your personal tension. Ensure that your hook fits comfortably in your hand for ease of crocheting.
Additionally, having scissors on hand to cut your yarn once you’re finished with each square is important. A yarn needle is also helpful for weaving in the ends of the yarn to keep your project neat and tidy. Lastly, a measuring tape will assist in ensuring your squares are the correct size as you work.
2. Step-by-Step Instructions for Crocheting the Star Granny Square
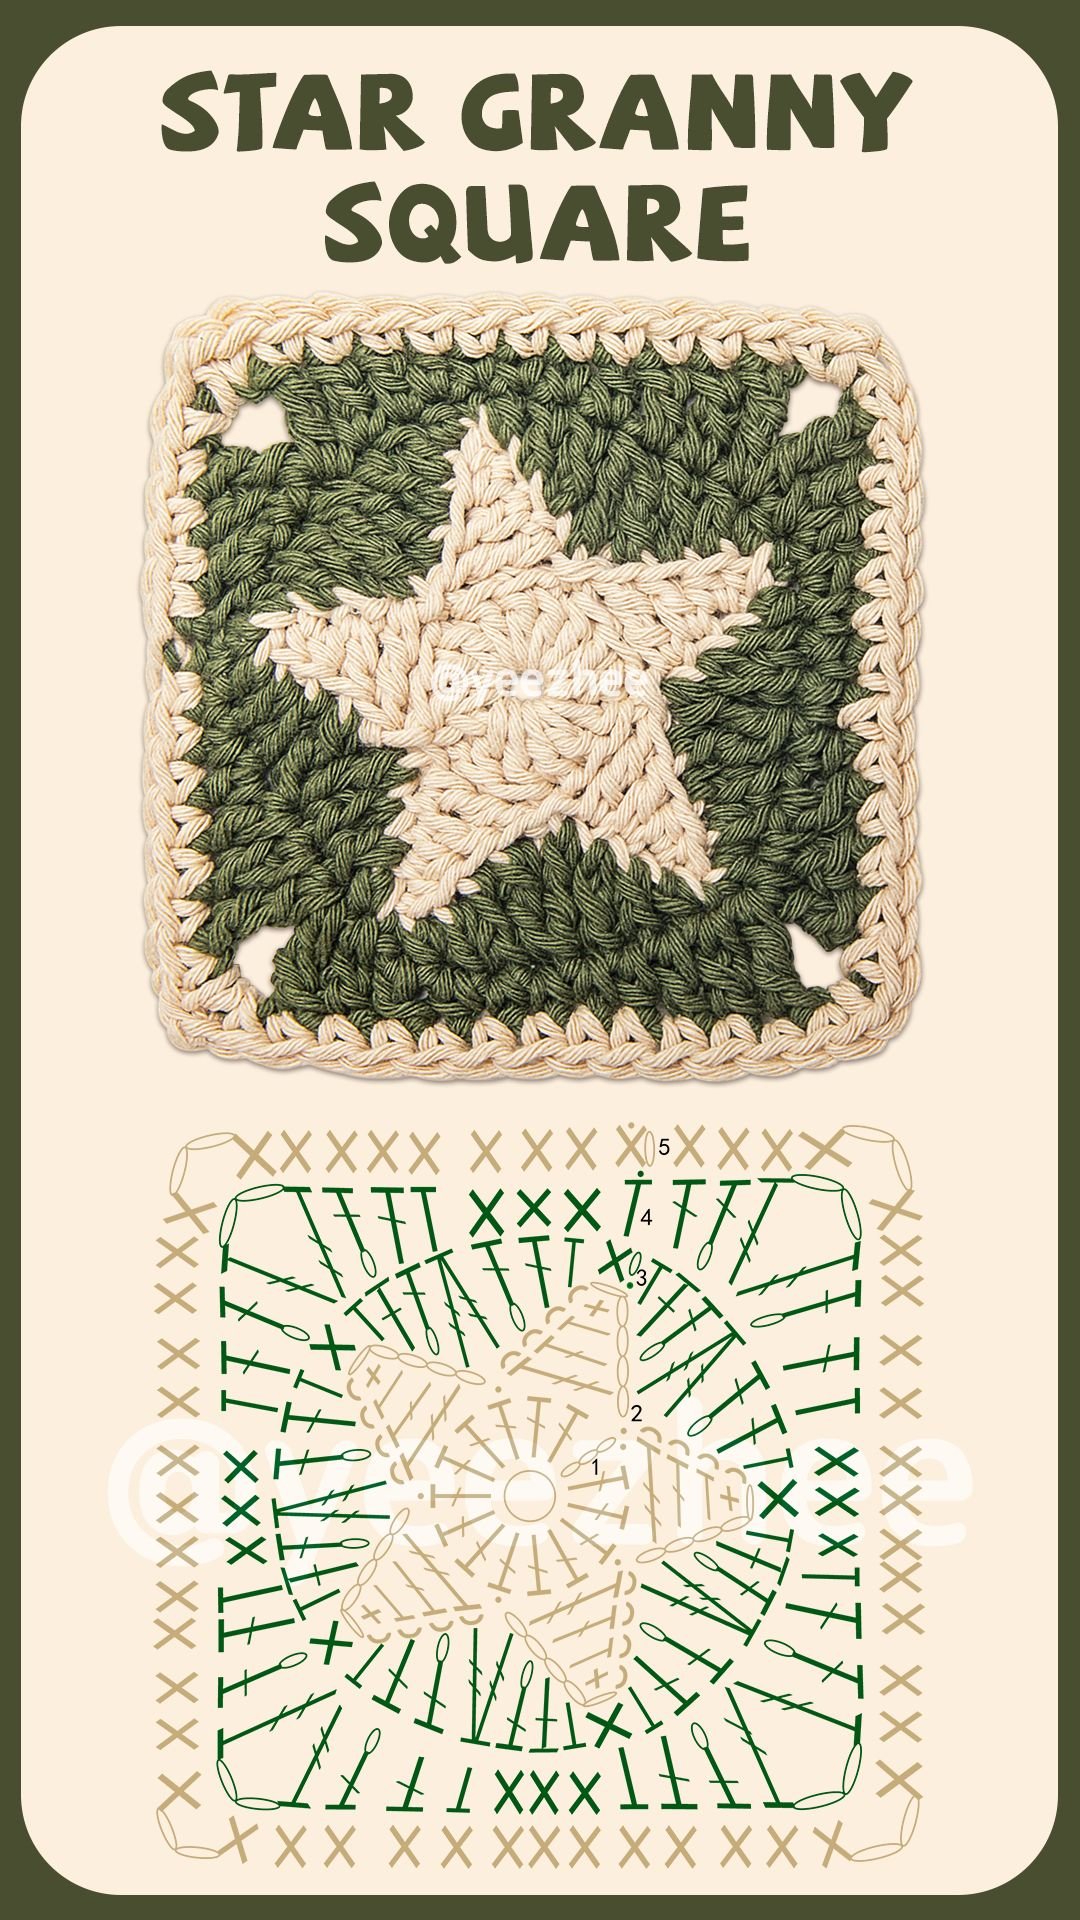
The Star Granny Square Crochet – pattern is a beautiful combination of basic crochet stitches and star-shaped motifs. To begin, you’ll want to start with a magic ring, which is an adjustable loop that forms the center of your star.
Start by making a slip knot and creating a magic ring. Then, crochet a few chains, usually three or four, to form the base of your star. Once you’ve established the base, work your first set of double crochets (DC) into the ring. These will help form the points of the star. You will continue to build upon these base stitches, ensuring that you have enough to create the distinct star shape.
The star-shaped center is worked by creating clusters of double crochet stitches in each section of the ring. After each set of DCs, you’ll join the stitches with a slip stitch to form the shape of the star. As you progress, make sure to maintain even tension and consistent stitch counts to create a symmetrical design.
After completing the star portion, you’ll move on to the next round, which will form the square around the star. This part involves working single crochet stitches along each side of the star’s points, effectively creating the four corners of the square. Repeat this process until you have completed the desired number of rounds for the square. Be sure to maintain the stitch count for even sides.
Once the square is complete, fasten off the yarn, leaving a long tail for weaving in. The star granny square is now ready to be incorporated into your next crochet project!
3. Customizing Your Star Granny Square Crochet Pattern
One of the best things about the Star Granny Square Crochet – pattern is the ability to personalize it to fit your preferences. By experimenting with color combinations and adding unique details, you can make the pattern your own. Here are some ideas for customization:
Start by choosing a color palette that suits your project. If you’re making a blanket, you could use a range of colors for each square, creating a rainbow effect. Alternatively, a more minimalist approach with shades of one color can give your blanket a cohesive and modern look. You can even create a gradient effect, where the colors fade from one to another, adding visual interest to the design.
For an even more personalized touch, consider adding embellishments to your Star Granny Square Crochet – pattern. Small beads, ribbons, or buttons can be sewn onto the star center for an extra pop of color and texture. You could also experiment with different yarn textures, such as a mix of cotton and acrylic, to create a quilted effect or to give your project a more rustic or refined look.
If you want to make the Star Granny Square Crochet – pattern more challenging, try adding a few extra rounds around the square, incorporating more intricate stitch patterns like shell stitches or front-post double crochet. These variations will add depth and complexity to the final design.
Another fun way to customize your squares is by changing the shape. While the traditional design is square, you can experiment with circular or hexagonal versions of the Star Granny Square, giving your project a unique twist.
4. Common Mistakes to Avoid When Crocheting the Star Granny Square
While the Star Granny Square Crochet – pattern is relatively simple to follow, there are a few common mistakes that crocheters often make. Here are some tips to help you avoid them:
One common mistake is incorrect stitch counts. Since the Star Granny Square involves multiple rounds and clusters, it’s essential to count your stitches carefully as you go. If you miss a stitch or add one by mistake, it can affect the shape and size of your square. Take your time and count your stitches in each round to ensure accuracy.
Another mistake is uneven tension. If your tension is too tight, the square may become distorted, and if it’s too loose, the stitches may not hold together properly. Pay attention to your tension throughout the process and adjust your grip on the hook if necessary to keep it consistent.
Not weaving in the yarn ends properly is another issue that often arises. After completing each square, make sure to securely weave in any loose ends with a yarn needle. This will prevent your work from unraveling and will give your project a clean, professional look.
Lastly, don’t forget to block your squares once you’ve finished crocheting them. Blocking helps even out the stitches and ensures that all the squares are the same size, making them easier to join together for larger projects.
FAQ: Frequently Asked Questions About the Star Granny Square Crochet Pattern
1. Can I use different yarn weights for the Star Granny Square Crochet?
Yes, you can use different yarn weights for the Star Granny Square Crochet – pattern, but keep in mind that the size of the square will change depending on the yarn thickness. For a standard square, medium-weight yarn (such as worsted weight) is typically used, but you can experiment with lighter or heavier yarns to adjust the size and texture.
2. How many colors should I use for a Star Granny Square?
Traditionally, the Star Granny Square uses at least two to three colors: one for the star center, one for the square border, and possibly another for the square itself. However, you can experiment with as many colors as you like, depending on the effect you’re aiming for.
3. How do I join the Star Granny Squares together?
There are several ways to join your squares, including whip stitch, slip stitch, or the join-as-you-go method. The join-as-you-go technique is often the easiest and creates a seamless look. Just make sure to join your squares neatly to avoid gaps between them.
4. Can I make the Star Granny Square pattern larger or smaller?
Yes, you can adjust the size of the Star Granny Square Crochet – pattern by changing the number of rounds or modifying the stitch patterns in each round. For a smaller square, reduce the number of rounds, and for a larger square, add additional rounds with more stitches.
5. What projects can I use the Star Granny Square for?
The Star Granny Square Crochet – pattern is highly versatile. You can use it to create blankets, pillow covers, shawls, scarves, bags, or even clothing like cardigans or skirts. The possibilities are endless!
Conclusion
The Star Granny Square Crochet – pattern is an excellent project for crocheters of all levels. It allows for creativity and customization, making it perfect for creating unique, personalized crochet pieces. Whether you’re making a blanket, pillow, or any other project, the star-shaped center and surrounding square provide a stunning visual appeal that will add charm to your work.
In this article, we’ve covered the basics of the Star Granny Square Crochet – pattern, from materials to step-by-step instructions, along with tips for customization and common mistakes to avoid. We hope you feel inspired to create your own star granny squares. Don’t forget to share your thoughts, opinions, and suggestions in the comments below!