If you’re looking for a festive and creative project this holiday season, this step-by-step tutorial for crocheting Christmas ornaments with granny squares – pattern is the perfect place to begin.
Granny squares have long been a beloved part of the crochet world, and using them to create holiday ornaments adds a warm, handmade touch to your Christmas décor. These ornaments are charming, colorful, and make meaningful gifts for friends and family.
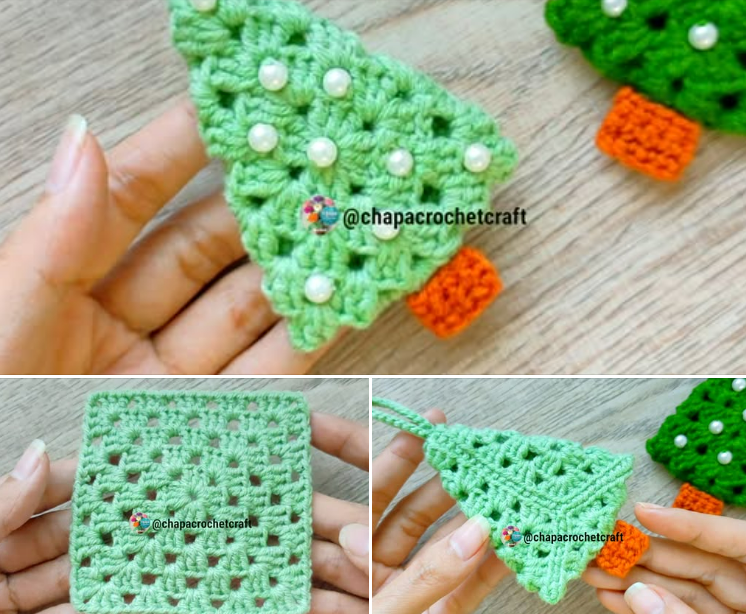
What makes this project so special is its versatility. You can customize each ornament using your favorite colors, add embellishments like beads or buttons, and shape them into stars, balls, hearts, or mini stockings. And best of all, you don’t need to be an expert! With just a few basic crochet stitches, you can follow along with this guide and create something beautiful.
In this article, we’ll provide a detailed and accessible step-by-step tutorial for crocheting Christmas ornaments with granny squares – pattern. From gathering the right materials to finishing your ornaments and adding final decorations, we’ll guide you every step of the way. Let’s bring some cozy handmade cheer to your holiday season!
1. Materials You Need to Crochet Granny Square Christmas Ornaments
Before you begin the step-by-step tutorial for crocheting Christmas ornaments with granny squares – pattern, you’ll want to prepare all the essential materials. Having everything on hand will make your crafting time more enjoyable and productive.
Start with worsted weight yarn in festive colors like red, green, white, gold, and silver. Cotton or acrylic yarns are excellent choices for ornaments since they hold their shape and offer crisp stitch definition. You can also use sparkly or metallic yarn for a little extra holiday shimmer.
Choose a crochet hook size appropriate for your yarn, typically around 4mm to 5mm for worsted weight. A slightly smaller hook than usual will help your ornaments stay compact and firm rather than loose or floppy.
You’ll also need a yarn needle for weaving in ends and sewing pieces together. Sharp scissors are essential for clean cuts, and stitch markers can help you keep track of your rounds, especially if you’re working in different colors or adding shaping.
For stuffing 3D ornaments like mini balls or stars, grab some polyester fiberfill. This will give your ornaments volume and make them look professional and puffy. Alternatively, you can use scrap yarn or fabric as stuffing.
Consider decorative extras like ribbons, beads, buttons, or bells to personalize your ornaments. These can be sewn or glued on after finishing the basic granny square structure.
And finally, keep a hot glue gun or craft glue handy in case you’d like to attach your ornaments to clips, hooks, or hangers for easy decorating on your Christmas tree or gift wrapping.
2. Crocheting the Basic Granny Square (The Foundation of Your Ornament)
The heart of the step-by-step tutorial for crocheting Christmas ornaments with granny squares – pattern starts with creating the basic granny square. This timeless crochet motif is both simple and incredibly versatile.
Begin by making a magic ring or chaining 4 and joining to form a ring. This will serve as the center of your granny square. Then, chain 3 (counts as the first double crochet) and work two double crochets into the ring.
Chain 1 (this forms the corner space), and then work 3 more double crochets into the ring. Repeat this until you have four groups of three double crochets, separated by chain-1 spaces. Slip stitch to the top of the starting chain to close the round.
For the second round, slip stitch to the corner space, chain 3, and work two more double crochets. Chain 1, then work 3 double crochets into the same space. Continue this pattern around, adding corners in each chain-1 space and sides between corner clusters.
Depending on the ornament size you want, you can stop at two or three rounds. The smaller the square, the more delicate your ornament will appear. You can also experiment with color changes between rounds to create a more festive, layered look.
After completing the final round, fasten off your yarn and weave in the ends using a yarn needle. You can make several granny squares in matching or contrasting colors depending on the type of ornament you’re creating.
Repeat this process to create a second identical square if you’re making a two-sided ornament. Later, you can join these together and stuff them to give your ornament depth and dimension.
3. Transforming Granny Squares into Christmas Ornaments
Now that your granny squares are ready, it’s time to turn them into delightful holiday ornaments. The step-by-step tutorial for crocheting Christmas ornaments with granny squares – pattern continues with assembling and shaping.
For flat ornaments, you can use a single granny square, stiffen it with fabric stiffener or diluted glue, and attach a hanger or ribbon at the top. These are great for gift tags, cards, or minimalistic tree décor.
To make a puffy ornament, place two granny squares back to back, wrong sides facing each other. Use single crochet or whipstitch to join them around the edges, leaving a small opening. Stuff lightly with fiberfill, then close the opening securely.
Try creating star-shaped ornaments by folding and joining the corners of the square inward, adding points with small triangle-shaped motifs, or using a star-shaped granny square pattern from the start.
You can also crochet around a foam or plastic ornament ball, using your granny squares as decorative panels. This adds structure and makes for a reusable ornament that holds its shape well.
For a mini stocking or mitten, fold a granny square in half and seam two sides together, leaving the top open. Add a loop at the top for hanging, and you’ve got an adorable miniature stocking.
Once shaped and joined, decorate your ornaments! Sew or glue on buttons, sequins, or miniature bows. Add jingle bells for that perfect Christmas sound. A hanging loop made of ribbon or chain is the final touch to complete your ornament.
4. Styling Ideas and Display Tips for Granny Square Ornaments
The beauty of this step-by-step tutorial for crocheting Christmas ornaments with granny squares – pattern is that the final pieces are not only functional but highly decorative. Here are a few styling and display tips to bring your creations to life.
Hang your handmade ornaments on a traditional green Christmas tree for a classic look, or on a white or minimalist tree to really let the colors pop. The contrast between yarn texture and tree lights creates a cozy, nostalgic atmosphere.
Use these ornaments as gift toppers by tying them onto wrapped presents. It’s a charming way to give an extra handmade touch, and your loved ones can reuse the ornament year after year.
Granny square ornaments also look beautiful as part of a holiday garland. String several together with yarn or twine and hang them across a fireplace mantel, doorway, or window. Alternate colors and shapes for visual interest.
Display them as hanging window décor. Attach a few ornaments to suction hooks or curtain rods, letting them dangle and catch the light. It’s a festive way to brighten up any room.
Consider turning smaller granny square ornaments into keychains or car mirror decorations for a fun, portable version of your holiday spirit. Add a little bell or tag for extra flair.
Lastly, if you’re into holiday markets or crafting for charity, these ornaments make perfect items to sell or donate. They’re inexpensive to make, lightweight to ship, and always popular during the holiday season.
FAQ: Frequently Asked Questions
Q: Is the granny square ornament pattern beginner-friendly?
A: Yes, absolutely! The basic granny square uses only simple stitches—chain and double crochet. This pattern is ideal for beginners who want to make something festive and functional.
Q: How long does it take to make one ornament?
A: On average, it takes 30 minutes to 1 hour to make one ornament, depending on your skill level and whether you’re adding embellishments or stitching two squares together.
Q: What yarn is best for Christmas granny square ornaments?
A: Acrylic or cotton worsted-weight yarn is best. Choose holiday colors like red, green, and white. You can also add sparkle with metallic or glitter yarn.
Q: Can I sell ornaments made using this pattern?
A: Yes! Handmade granny square ornaments are great for craft fairs and online shops. Just make sure your design is original or the pattern used allows commercial use.
Q: How do I make the ornaments hold their shape?
A: You can stiffen single-layer ornaments with fabric stiffener or glue. For 3D versions, stuff them with polyfill and use tighter stitches for a firmer shape.
Q: Are there different shapes I can make besides squares?
A: Yes! You can use variations of the granny square to make stars, circles, hexagons, or even mini stockings and mittens for a more diverse ornament collection.
Conclusion
This step-by-step tutorial for crocheting Christmas ornaments with granny squares – pattern has shown how easy and joyful it can be to create handmade decorations. From choosing yarn and crafting basic granny squares, to assembling, shaping, and personalizing your ornaments, this guide covered all the steps to help you crochet with confidence and creativity.
Handmade ornaments add warmth and meaning to the holiday season. They’re not only
fun to make but also treasured keepsakes that bring smiles year after year. Whether you’re gifting them, selling them, or decorating your home, granny square ornaments are a timeless expression of holiday cheer.
We hope you enjoyed this tutorial! Please leave your sincere opinion in the comments below, and don’t forget to share your suggestions or ideas for future crochet patterns you’d love to see. Let’s keep the handmade tradition alive—one stitch at a time!