Strawberry Keychain Crochet – Pattern is one of the most delightful projects you can undertake if you are looking to combine utility with sheer cuteness. Whether you are a seasoned professional with a hook or a curious beginner looking for your first win, creating a Strawberry Keychain Crochet – Pattern offers a rewarding experience that results in a functional piece of art. These tiny berries are perfect for organizing your keys, accessorizing your favorite handbag, or even giving away as thoughtful, handmade gifts to friends and family.
The beauty of a Strawberry Keychain Crochet – Pattern lies in its simplicity and the speed at which you can complete it. In the world of Amigurumi, which is the Japanese art of knitting or crocheting small, stuffed yarn creatures, the strawberry is a classic staple because it uses basic stitches to create a recognizable and beloved shape. By mastering this specific crochet pattern, you gain confidence in working in the round and managing color changes, which are foundational skills for any fiber artist.
When you dive into this Strawberry Keychain Crochet – Pattern, you are not just making a trinket; you are engaging in a mindful hobby that has been proven to reduce stress. The repetitive motion of the stitches, combined with the vibrant red and green yarns, makes the process incredibly satisfying. As we explore the details of this project, you will find that the Strawberry Keychain Crochet – Pattern is highly customizable, allowing you to play with different yarn weights and hook sizes to create berries of all shapes and sizes.
1. Essential Materials for Your Strawberry Keychain Crochet – Pattern
To begin your Strawberry Keychain Crochet – Pattern, you need to gather high-quality materials that ensure your fruit looks professional and lasts a long time. The most common choice for Amigurumi is mercerized cotton yarn because it provides excellent stitch definition and doesn’t pill easily. You will need vibrant red for the body of the strawberry and a bright leaf-green for the stem and sepals.
Selecting the right crochet hook is the next vital step in the process. For a Strawberry Keychain Crochet – Pattern, it is generally recommended to use a hook that is slightly smaller than what the yarn label suggests, such as a 2.5mm or 3.0mm hook. This creates a tight tension that prevents the polyester fiberfill stuffing from peeking through the holes between your stitches.
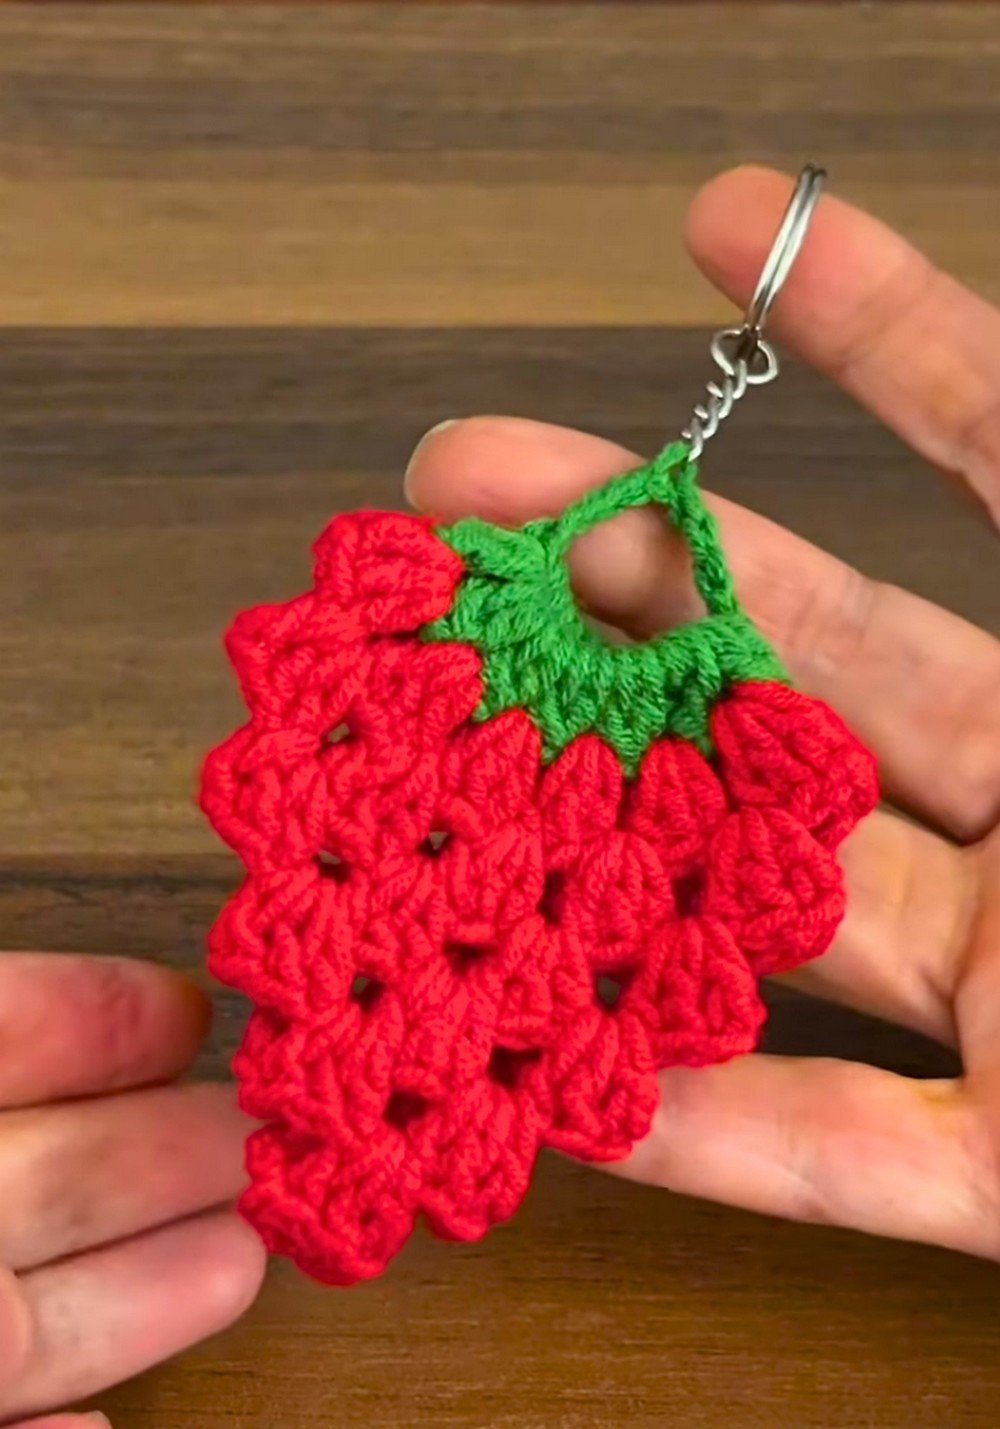
Aside from yarn and hooks, you will need a few haberdashery essentials to finish your Strawberry Keychain Crochet – Pattern. A pair of sharp embroidery scissors, a yarn needle for weaving in ends, and stitch markers are indispensable. Since we are making a keychain, don’t forget to have a sturdy metal split ring or a lobster clasp ready to attach to the top of your finished strawberry.
If you want to add some personality to your berry, you might consider using safety eyes or black embroidery thread to create a “Kawaii” face. Adding a face to your Strawberry Keychain Crochet – Pattern transforms it from a simple fruit into a charming character. Small white or yellow beads can also be sewn onto the surface to represent the strawberry seeds, giving it a realistic texture.
The stuffing material is what gives your Strawberry Keychain Crochet – Pattern its iconic teardrop shape. Use high-quality synthetic stuffing that is washable and hypoallergenic. It is important to stuff the berry firmly but carefully, ensuring the shape is even and there are no lumps, as the stuffing dictates the final silhouette of your handmade accessory.
Lastly, having a printed or digital copy of the Strawberry Keychain Crochet – Pattern instructions is helpful for tracking your rows. Many crafters find it useful to use a row counter app or a physical clicker. Being organized with your materials from the start makes the journey of creating your crochet strawberry much more enjoyable and efficient.
2. Understanding the Stitches in the Strawberry Keychain Crochet – Pattern
The foundation of any Strawberry Keychain Crochet – Pattern is the Magic Ring (or Magic Circle). This technique allows you to start crocheting in the round without leaving a hole in the center, which is crucial for the tip of the strawberry. Mastering the magic ring is a rite of passage for many, but once you get it, it makes all your circular crochet projects look much more professional.
The primary stitch used throughout the Strawberry Keychain Crochet – Pattern is the Single Crochet (sc). In some regions, this is known as the double crochet, but in US terms, it is the simple, compact stitch that builds the fabric of the berry. These stitches need to be worked in a continuous spiral rather than joined rounds to avoid a visible seam running up the side of your work.
To create the tapering shape of the fruit, the Strawberry Keychain Crochet – Pattern utilizes increases (inc) and decreases (dec). An increase involves placing two single crochet stitches into the same stitch from the previous row. Conversely, an invisible decrease is preferred for the top of the strawberry because it blends seamlessly into the fabric, preventing gaps where the stuffing might show through.
The green leaves at the top of the Strawberry Keychain Crochet – Pattern often involve slightly more complex stitches like the Slip Stitch (sl st), Half Double Crochet (hdc), or even a Picot Stitch. These variations allow the leaves to flare out and look organic. Learning how to transition from the red body to the green top requires a clean color change technique to keep the finish looking sharp.
Tension management is a subtle but important skill when following a Strawberry Keychain Crochet – Pattern. If your tension is too loose, the berry will be floppy; if it is too tight, your hands might tire quickly. Finding that “Goldilocks” zone of tension ensures that your handmade keychain feels durable and keeps its shape even when tossed around inside a heavy backpack or purse.
Finally, finishing the Strawberry Keychain Crochet – Pattern involves the Fasten Off technique and the Ultimate Finish for amigurumi. This involves weaving the yarn tail through the front loops of the remaining stitches and pulling it tight to close the gap perfectly. Understanding these technical nuances ensures that your crochet project isn’t just a hobby piece, but a high-quality product you could even sell at craft fairs.
3. Step-by-Step Execution of the Strawberry Keychain Crochet – Pattern
Starting the body of your Strawberry Keychain Crochet – Pattern usually begins at the bottom point. You will start with a small number of stitches in your magic ring and gradually increase the number of stitches in each round. This gradual expansion creates the conical shape that is characteristic of a real strawberry, moving from a sharp point to a wider middle section.
Once you reach the widest part of the Strawberry Keychain Crochet – Pattern, you will typically work a few rounds without any increases. This creates the “belly” of the strawberry. It is during these middle rounds that many crafters choose to embroider the seed details. Using a contrasting yellow or white thread to make small “v” shapes across the red surface adds a wonderful layer of realism to the project.
The next phase of the Strawberry Keychain Crochet – Pattern is the reduction. You will begin to decrease your stitches systematically. It is vital to start adding your fiberfill stuffing before the opening becomes too small. A good tip is to use the back of your crochet hook or a chopstick to push the stuffing into the tip of the strawberry, ensuring the entire shape is supported.
After the body is closed and fastened off, you will move on to the green topper of the Strawberry Keychain Crochet – Pattern. This part is usually worked separately and then sewn on, or it can be picked up directly from the top rounds. The leaves should sit flat against the top of the red berry, and the green yarn should be secured tightly so the keychain attachment doesn’t pull the piece apart.
Attaching the hardware is the final construction step in the Strawberry Keychain Crochet – Pattern. You can use a small scrap of green yarn to create a loop, or attach the metal jump ring directly through the crochet fabric. Ensure that you go through multiple strands of yarn so the weight of the keys doesn’t tear the crochet work over time. Strength is just as important as aesthetics here.
To give your Strawberry Keychain Crochet – Pattern a final “pro” touch, give it a gentle squeeze to distribute the stuffing evenly and trim any stray yarn fuzz. If you used cotton, the berry will have a nice weight and a slight sheen. This completed project is a testament to your patience and skill, and it’s a wonderful feeling to see a ball of yarn transformed into a cute, functional crochet accessory.
4. Customizing and Selling Your Strawberry Keychain Crochet – Pattern Creations
One of the best things about the Strawberry Keychain Crochet – Pattern is how easy it is to customize. You can make “unripe” strawberries using light pink yarn, or even “chocolate-covered” versions by starting the bottom half with brown yarn and switching to red. These variations make your crochet collection stand out and allow for endless creativity within a single pattern structure.
The Strawberry Keychain Crochet – Pattern is also a fantastic “stash buster.” Because it requires such a small amount of yarn, you can use up the leftovers from larger projects. This makes the cost of production almost zero, which is ideal if you are looking to start a small business. Handmade keychains are impulsive buys at markets, and a bowl of colorful strawberries is guaranteed to attract customers.
For those interested in the business side, the Strawberry Keychain Crochet – Pattern is a high-margin item. It takes roughly 30 to 60 minutes to complete one berry once you are familiar with the steps. If you sell them in sets or as “Best Friend” pairs, you can increase your sales volume easily. Packaging them in small organza bags or on branded cardstock adds a level of professionalism that customers love.
Social media is a great place to showcase your Strawberry Keychain Crochet – Pattern work. Platforms like Instagram and Pinterest are perfect for sharing “work in progress” (WIP) photos or short videos of you attaching the leaves. Using hashtags like #CrochetStrawberry, #AmigurumiPattern, and #HandmadeKeychain can help you connect with a global community of fiber enthusiasts and potential buyers.
You can also adapt the Strawberry Keychain Crochet – Pattern into other items. By omitting the keychain ring, these strawberries make excellent play food for children (just ensure you use embroidered eyes instead of plastic ones for safety). They can also be strung together to create a strawberry garland for a nursery or a summer-themed kitchen decoration, showing the versatility of this simple design.
Ultimately, the Strawberry Keychain Crochet – Pattern is a gateway to the broader world of crochet. Once you’ve mastered this, you’ll find yourself wanting to try pineapples, citrus slices, or even complex floral patterns. The skills you sharpen while making these little berries—patience, precision, and color theory—will serve you well in every future crochet endeavor you choose to pursue.
FAQ – Frequently Asked Questions
What is the best yarn for a Strawberry Keychain Crochet – Pattern?
The best yarn is 100% mercerized cotton. It is durable, has a beautiful sheen, and shows your stitches clearly, which is perfect for the small details of a keychain.
How long does it take to finish one strawberry?
For an intermediate crocheter, a single strawberry usually takes about 45 minutes. Beginners might take an hour or two as they learn the increase and decrease techniques.
Can I wash my crochet strawberry keychain?
Yes, if you use cotton yarn and synthetic stuffing, you can gently hand wash it in cool water and let it air dry. Be careful if you have metal parts attached; try to keep those dry to prevent rusting.
What size hook should I use?
A 2.5mm or 3.0mm hook is usually best. The goal is to have tight stitches so the stuffing doesn’t show through the red yarn.
Is this pattern suitable for absolute beginners?
Absolutely! The Strawberry Keychain Crochet – Pattern uses the most basic stitches. It is a great project to practice working in the round and learning how to read patterns.
How do I attach the keychain ring?
You can sew it on using a needle and a strand of the green yarn, or use pliers to open a metal jump ring and loop it through the top of the green stem before closing it tightly.
Conclusion
In this article, we have explored the delightful world of the Strawberry Keychain Crochet – Pattern, covering everything from the essential materials and basic stitches to the step-by-step assembly and creative customization.
We learned that using the right mercerized cotton and a small crochet hook is key to a professional finish, and that mastering the magic ring and invisible decrease makes all the difference in your Amigurumi projects. This project is not only a great way to use up scrap yarn but also a fantastic entry point into selling handmade crafts.