A Stylish Crochet Bandana – Tutorial is the perfect project for anyone looking to blend vintage aesthetics with modern flair. Whether you are a seasoned pro or a curious beginner, creating a crochet bandana offers a rewarding way to practice basic stitches while producing a practical accessory that never goes out of style. In this comprehensive guide, we will dive deep into everything you need to know to master this craft, ensuring your final piece is both durable and beautiful.
The beauty of a Stylish Crochet Bandana – Tutorial lies in its versatility, as these pieces work effortlessly for beach days, music festivals, or even just keeping your hair back during a busy afternoon. By focusing on the crochet pattern and selecting the right yarn weight, you can customize your bandana to match any outfit or season. Using high-quality cotton yarn is often recommended because it provides the breathability and structure needed for a head-turning hair accessory.
Throughout this Stylish Crochet Bandana – Tutorial, we will explore the essential crochet stitches, such as the double crochet (dc) and the chain stitch (ch), which form the foundation of the classic triangle bandana shape. We are going to prioritize SEO-friendly crochet tips to help you understand the mechanics of increasing rows and finishing edges. Get your crochet hook ready and let’s begin this creative journey into the world of handmade fashion.
1. Choosing Your Materials for a Stylish Crochet Bandana – Tutorial
When starting your Stylish Crochet Bandana – Tutorial, the first step is selecting a mercerized cotton yarn. This specific type of crochet thread is ideal because it has a slight sheen and doesn’t pill easily, ensuring your boho bandana looks new for a long time. Choosing a lightweight yarn (Category 3) or a fingering weight yarn allows the fabric to drape naturally over the head without feeling bulky or stiff.
Your crochet hook size is equally vital to the success of your crochet project. For most cotton yarns, a 3.5mm (E) or 4.0mm (G) hook works wonders to create tight, uniform stitches that hold their shape. If you tend to crochet tightly, consider moving up half a size to ensure the triangle scarf remains flexible. Remember, the goal of this Stylish Crochet Bandana – Tutorial is comfort and style combined.
In addition to yarn and hooks, you will need a few crochet notions like stitch markers, a tapestry needle, and sharp scissors. Stitch markers are particularly helpful in a Stylish Crochet Bandana – Tutorial for identifying the “peak” of your triangle, where most of your increases will happen. Having these tools organized beforehand makes the crocheting process much more relaxing and prevents mistakes in your stitch count.
Don’t overlook the importance of color theory when picking your palette. For a retro crochet look, earthy tones like mustard, terracotta, or sage green are incredibly popular in the crochet community. If you want something more modern, variegated yarn can create a stunning self-striping effect without the need to weave in dozens of ends. This Stylish Crochet Bandana – Tutorial encourages you to express your personality through your fiber choices.
The gauge swatch is a step many beginners skip, but in this Stylish Crochet Bandana – Tutorial, we recommend it. By crocheting a small square first, you can see if your tension matches the pattern requirements. If your swatch is too small, your bandana might end up being a “mini” version; if it’s too big, it may slip off your head. Proper crochet tension ensures a professional-grade handmade accessory.
Finally, consider the durability of the fiber. Since a crochet bandana sits close to your hair and skin, choosing a washable yarn is a smart move. Cotton and bamboo blends are excellent because they are breathable fibers and can handle a gentle wash. Following this Stylish Crochet Bandana – Tutorial means building a wardrobe staple that is as easy to care for as it is to wear.
2. Mastering the Basic Triangle Shape and Increases
The core of any Stylish Crochet Bandana – Tutorial is mastering the triangle increase method. Most patterns start from the center top or the bottom tip. In this tutorial, we focus on starting from a magic ring at the top center, which creates a seamless and sturdy beginning. This technique allows the crochet fabric to expand outward symmetrically, forming that iconic “V” shape.
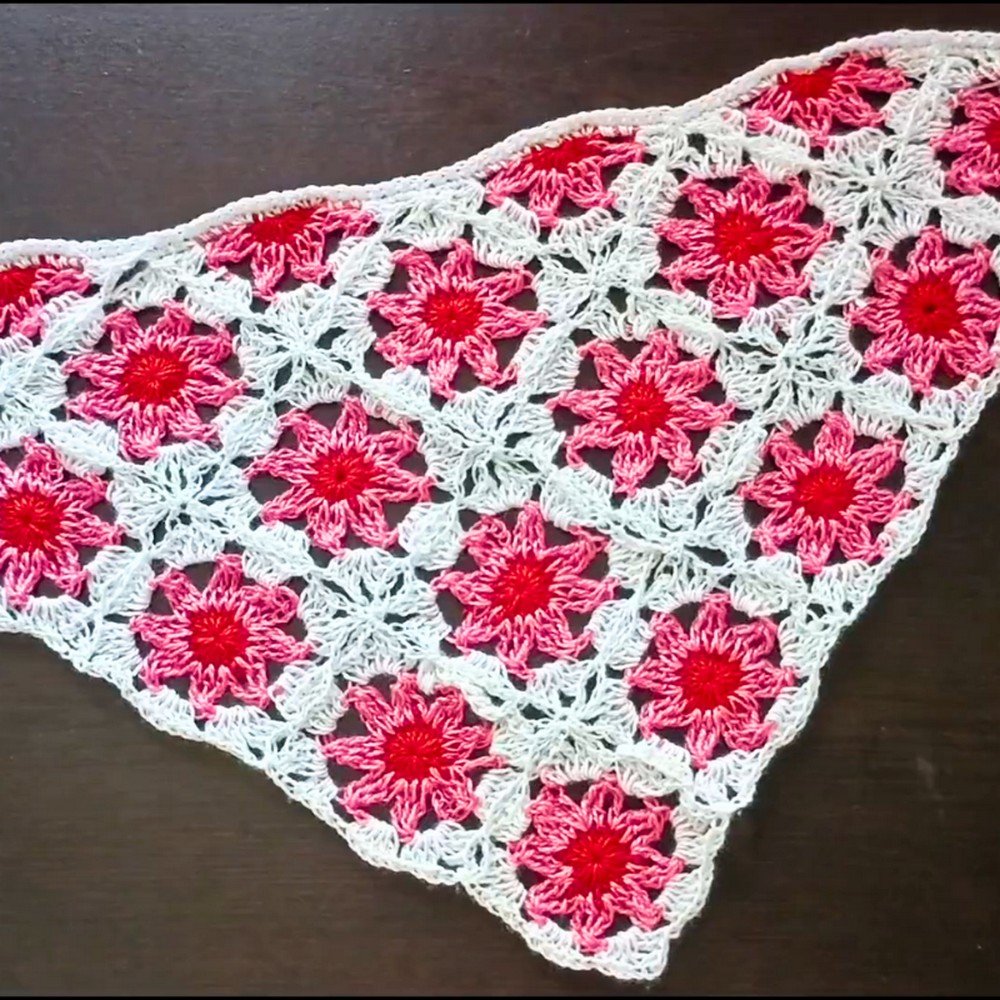
To achieve the “stylish” part of the Stylish Crochet Bandana – Tutorial, we use the Granny Square stitch variation. This involves groups of three double crochets worked into the same space. This creates a lace-like texture that is breathable and classic. Each row will increase by adding a “shell” at each end and a “peak” in the middle, ensuring the crochet bandana grows wider as it grows longer.
Consistency is key when following this Stylish Crochet Bandana – Tutorial. Make sure you are counting your clusters every few rows. It is very easy to accidentally miss an increase at the beginning or end of a row, which will lead to an asymmetrical hair kerchief. If you find your edges are curling, you might be crocheting too tightly; try to keep your loop tension relaxed and even.
As you progress through the Stylish Crochet Bandana – Tutorial, you will notice the diagonal edges forming. These edges will eventually become the part that sits along your forehead or hairline. For a standard adult size, you typically want the long edge of the triangle to measure between 18 and 22 inches. However, the beauty of DIY crochet is that you can stop whenever the size feels right for you.
For those looking for an advanced crochet look, you can incorporate filet crochet techniques or puff stitches within the rows. However, for this Stylish Crochet Bandana – Tutorial, we recommend sticking to the basics first to ensure the structure is sound. A solid foundation of double crochet stitches provides the best surface for adding decorative borders later on in the process.
The “turning chain” is a small but mighty detail in our Stylish Crochet Bandana – Tutorial. Usually, a chain 3 counts as your first double crochet. Ensuring these chains are the same height as your stitches will prevent “wavering” edges. If the edges look uneven, your Stylish Crochet Bandana – Tutorial might require a simple single crochet border at the very end to smooth everything out and give it a polished finish.
3. Adding Straps and Decorative Borders
No Stylish Crochet Bandana – Tutorial is complete without the functional elements: the tie straps. These are essential for securing the bandana to your head. You can simply continue from the corners of your triangle by creating a long chain of 50-70 stitches. To make the straps sturdier, work a row of slip stitches or half double crochets back down the chain toward the main body of the bandana.
Adding a scalloped edge or a picot border is a fantastic way to elevate your Stylish Crochet Bandana – Tutorial. A picot stitch creates small, decorative points along the edge of the fabric, giving it a delicate, bohemian vibe. To do this, you simply chain three and slip stitch into the first chain after every few regular stitches. This small detail makes your handmade bandana look like a boutique find.
If you prefer a more minimalist Stylish Crochet Bandana – Tutorial, a simple fringe can be added to the two shorter sides of the triangle. To do this, cut lengths of yarn, fold them in half, and use your crochet hook to pull the loop through the edge of the bandana, then pull the ends through the loop. Fringed bandanas are incredibly popular for summer festivals and beach outings.
The straps are also an opportunity for color blocking. You could use a contrasting yarn color for the ties to make the Stylish Crochet Bandana – Tutorial pop. Ensure that the attachment point between the strap and the triangle is reinforced with an extra stitch or two. Since this is where the most tension will be when you tie it, a strong join is necessary for the longevity of your crochet hair accessory.
Another popular variation in the Stylish Crochet Bandana – Tutorial is the “ribbed” border. By using front post double crochets, you can create a textured edge that mimics a knit look. This adds a bit of weight to the front of the bandana, which can help it stay in place on your head. However, keep in mind that post stitches use more yarn than standard flat stitches.
Lastly, consider the length of your ties. In this Stylish Crochet Bandana – Tutorial, we suggest making them long enough to tie in a comfortable bow at the nape of the neck. If you have very thick hair or plan on wearing the bandana over a wig, you may want to increase the chain length for the straps. Always try the piece on mid-process to ensure the fit and adjustment are perfect for your needs.
4. Finishing Touches and Styling Tips
The final phase of our Stylish Crochet Bandana – Tutorial involves weaving in ends. Use your tapestry needle to weave the yarn tails through the back of your stitches, going back and forth three times to “lock” the yarn in place. This prevents the project from unraveling during use or washing. A clean finish is what separates an amateur project from a professional crochet garment.
Blocking your crochet is a secret weapon often mentioned in a Stylish Crochet Bandana – Tutorial. By pinning your finished bandana to a foam board and lightly steaming it (or wetting it and letting it dry), you can open up the stitches and perfect the triangle shape. Wet blocking is especially effective for cotton yarn, as it relaxes the fibers and gives the bandana a much more elegant drape.
Once your Stylish Crochet Bandana – Tutorial project is finished, there are many ways to style it. You can wear it traditionally over the top of your head for a 70s retro look, or fold it into a narrow band to use as a crochet headband. Some people even wear them around their necks as a stylish crochet neckerchief. The possibilities for this versatile accessory are truly endless.
To keep your Stylish Crochet Bandana – Tutorial creation looking its best, we recommend hand washing in cool water with a mild detergent. Avoid wringing the fabric; instead, roll it in a towel to remove excess moisture and lay it flat to dry. This care routine preserves the stitch definition and prevents the yarn from stretching out of shape over time.
For those looking to turn this Stylish Crochet Bandana – Tutorial into a business, consider adding a personalized leather tag or a small “Handmade” charm. These small branding details increase the perceived value of your crochet items. If you are gifting the bandana, include a small care instruction card so the recipient knows how to maintain the beauty of their new hand-crocheted gift.
Sharing your work is the best part of any Stylish Crochet Bandana – Tutorial. Take high-quality photos in natural light to showcase the stitch detail and the vibrant colors. Whether you post it on social media or add it to your crochet portfolio, your unique version of this stylish bandana is sure to inspire others in the crafting community to pick up a hook and start creating.
FAQ: Common Questions About the Stylish Crochet Bandana – Tutorial
1. What is the best yarn for a crochet bandana?
The best choice is generally a 100% cotton or a cotton-bamboo blend. These fibers are less “fuzzy” than wool and provide the necessary breathability for a head accessory. Mercerized cotton is particularly good for maintaining stitch definition.
2. How long does it take to complete this Stylish Crochet Bandana – Tutorial?
For an intermediate crocheter, this project can be finished in about 2 to 4 hours. Beginners might take a bit longer, perhaps an afternoon or two, as they get used to the increase pattern and maintaining consistent tension.
3. Is this pattern suitable for beginners?
Yes! The Stylish Crochet Bandana – Tutorial primarily uses basic crochet stitches like the chain, single crochet, and double crochet. It is an excellent “first garment” project because there is no complex shaping or sizing involved.
4. Can I make this bandana for a child?
Absolutely. To adjust the size for a child, simply work fewer rows of the triangle pattern. Once the long edge is wide enough to cover the child’s head from ear to ear, you can move on to the strap and border section.
5. How do I stop the bandana from sliding off my hair?
If you have “slippery” hair, you can use bobby pins to secure the edges. Alternatively, choosing a matte cotton yarn rather than a silky acrylic will provide more “grip” against your hair, helping the crochet bandana stay in place.
6. Do I need to block my finished bandana?
While not strictly mandatory, blocking is highly recommended in this Stylish Crochet Bandana – Tutorial. It helps the triangle lie flat, prevents the corners from curling, and gives the overall piece a much more polished, professional appearance.
Conclusion
Creating a Stylish Crochet Bandana – Tutorial is a wonderful way to expand your crochet skills while making something truly fashionable. We have covered everything from selecting the best cotton yarn and the right hook size to mastering triangle increases and adding those all-important tie straps.
This project is a testament to how simple stitches can be transformed into a boho-chic accessory that is both functional and beautiful. By following the steps outlined, you now have the knowledge to create a variety of bandanas in different colors and textures.