This Sunburst Crochet Square – Tutorial is your gateway to mastering one of the most vibrant and beloved motifs in the world of yarn crafts. The sunburst design is a modern evolution of the classic granny square, known for its dense, floral-like center that radiates outward like a summer sunrise. Whether you are aiming to create a cozy boho-style blanket, a trendy crochet tote bag, or even a decorative pillow cover, learning how to construct this specific square will significantly expand your creative repertoire.
In this comprehensive Sunburst Crochet Square – Tutorial, we are going to break down the complex-looking stitches into manageable steps that even an adventurous beginner can follow. The beauty of the sunburst pattern lies in its versatility; by simply changing your yarn colors, you can shift the mood from a bright, energetic sunflower to a moody, vintage-inspired blossom. Unlike traditional squares that can sometimes feel repetitive, the sunburst keeps you engaged with different textured stitches in almost every round.
Beyond the aesthetics, following a structured Sunburst Crochet Square – Tutorial ensures that your finished project has the structural integrity needed for long-term use. We will focus on maintaining a consistent stitch gauge and learning the “invisible join” technique to give your squares a professional, high-end finish. Grab your favorite crochet hook, select a palette of complementary yarns, and let’s dive into the rhythmic and rewarding process of creating this iconic handmade crochet motif.
1. Essential Supplies for Your Sunburst Square
The first step in any Sunburst Crochet Square – Tutorial is gathering the right materials to ensure your work looks polished and uniform. For this project, a Category 4 (Worsted Weight) cotton or acrylic yarn is highly recommended because it offers the stitch definition required to make the sunburst “petals” stand out. If you choose a yarn that is too fuzzy or dark, the intricate details of the puff and cluster stitches might get lost in the texture.
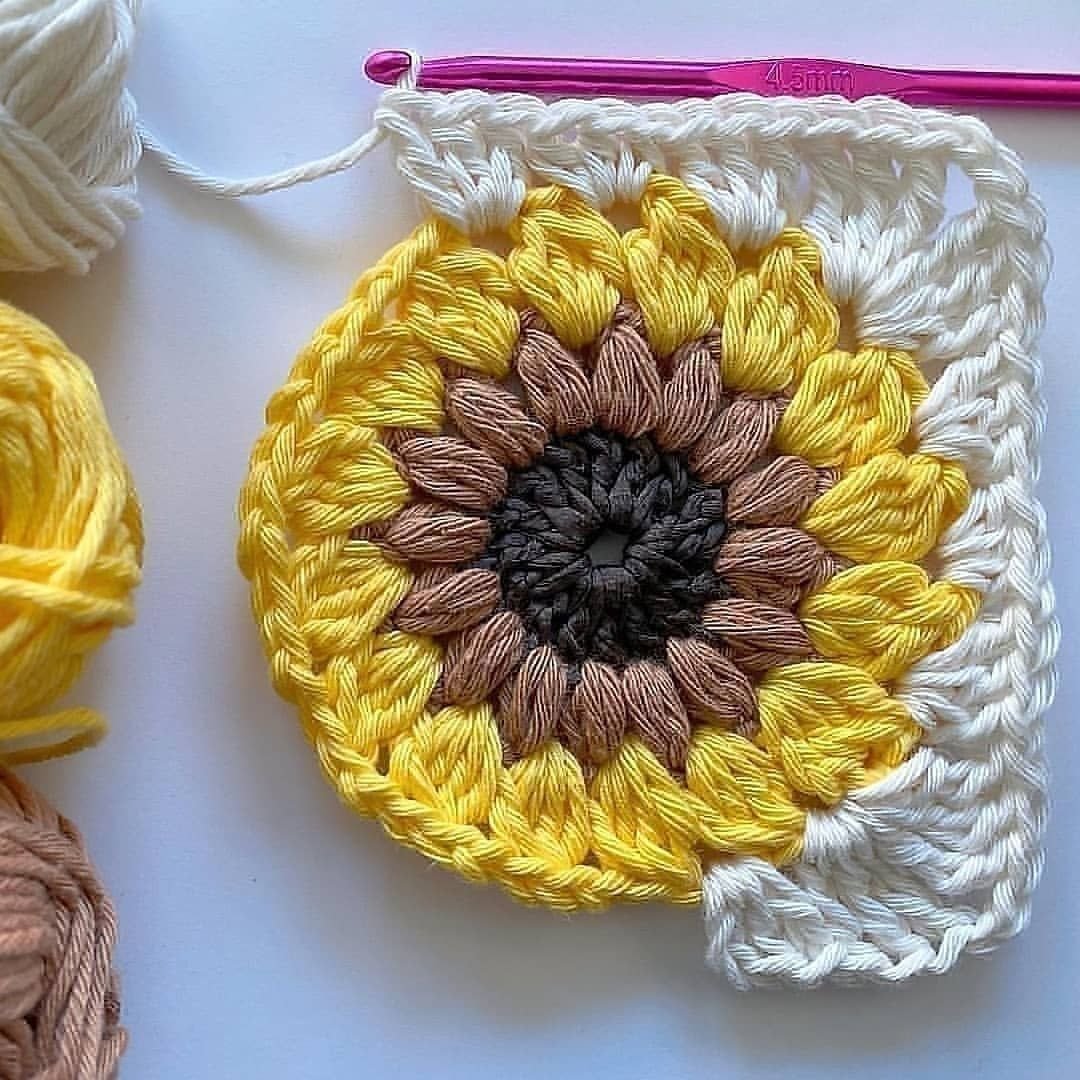
Selecting the correct crochet hook size is equally vital for a successful outcome. Most worsted weight yarns pair perfectly with a 5.0mm (H/8) hook, but if you tend to crochet very tightly, you might consider moving up to a 5.5mm hook. This adjustment prevents the center of your sunburst square from becoming too stiff or curling inward, a common issue for many beginners starting their first crochet tutorial.
To give your square that signature “sun” effect, you will need at least four different colors: one for the very center (the seeds), one for the inner rays, one for the outer petals, and a final color to “square off” the circle. Using mercerized cotton can add a slight sheen to your project, making it look particularly elegant if you are making home decor items. Always check that your yarns are of a similar weight to keep the squares perfectly symmetrical.
Beyond the yarn and hook, you will need a few basic tools to round out your kit. A sharp pair of craft scissors and a blunt-tipped yarn needle are essential for the frequent color changes required in a Sunburst Crochet Square – Tutorial. You will be weaving in several ends per square, so having a needle that glides easily through the fibers without splitting them will save you a significant amount of time and effort.
Stitch markers are another helpful addition, especially when you are learning to identify the transition points between the rounds. In the sunburst pattern, the transition from the circular center to the square border can be tricky. Marking the first stitch of each round helps you keep track of your stitch count, ensuring that each side of the square has the exact same number of double crochets for easy joining later.
Lastly, consider the surface you will be working on. Many experienced crafters recommend using a blocking board once the squares are finished. Blocking involves pinning your finished Sunburst Crochet Square to a specific dimension and lightly steaming it. This process “sets” the stitches, ensures every square in your blanket is the same size, and gives the overall project a professional, store-bought quality that is hard to achieve otherwise.
2. Starting the Core and the Puff Stitch Round
Every Sunburst Crochet Square – Tutorial begins with a solid foundation, which is typically a magic ring or a small chain circle. Into this center, you will work 16 double crochets (DC). This first round acts as the “eye” of the sun. It is important to pull your magic ring tight to ensure there is no visible hole in the center, creating a clean and modern look for your handmade crochet piece.
The second round is where the texture truly begins to take shape through the use of the puff stitch. A puff stitch is created by yarn-over, inserting the hook, and pulling up a loop multiple times in the same stitch before closing them all together. In this Sunburst Crochet Square – Tutorial, you will place one puff stitch in every DC from the previous round, separated by a single chain. This creates a soft, raised texture that mimics the center of a flower.
Mastering the puff stitch can be a bit challenging for beginners because it requires maintaining even tension across several loops on the hook. If your loops are too tight, you won’t be able to pull the yarn through at the end; if they are too loose, the puff will look messy. Practice a few “test puffs” on a scrap piece of yarn before starting your actual sunburst project to find a rhythm that works for your hand.
Once the puff round is complete, you should have a circle that looks like a small, textured gear. It is crucial at this stage of the Sunburst Crochet Square – Tutorial to count your puffs—you must have exactly 16. If you have 15 or 17, the subsequent rounds of “petals” will not align correctly, and your circle will never transition into a perfect square, leading to frustration during the assembly phase.
Round three introduces the bobble stitch or the 4-double crochet cluster, which represents the longer rays of the sun. These stitches are taller and more defined than the puffs. You will work these into the chain-1 spaces from the previous round. The combination of the short, round puffs and the taller, leaner clusters is what gives the sunburst pattern its incredible visual depth and “radiating” effect.
As you finish this third round, your circle will have grown significantly. The transition between colors here is a great opportunity to practice the standing stitch technique. Instead of joining with a slip stitch and chaining up, a standing stitch allows you to start a new color with a fresh stitch, making the seam virtually invisible. This is a “pro-tip” often highlighted in high-quality crochet tutorials to enhance the finished look of the work.
3. Transitioning from Circle to Square
The most technical part of this Sunburst Crochet Square – Tutorial is the fourth round, where we transform the circle into a square. To do this, we use a variety of stitch heights to level out the round edges. At the four “corners,” you will work a cluster of treble crochets (TR), which are the tallest stitches. Between these corners, you will use double crochets and half-double crochets to fill the gaps.
Specifically, a typical corner in a Sunburst Crochet Square consists of [3 TR, chain 2, 3 TR] all in the same space. The taller height of the trebles pushes the edge outward, creating a 90-degree angle. As you move away from the corner toward the center of the side, the stitches gradually get shorter, which compensates for the “bulge” of the circle and creates a perfectly straight horizontal line.
For many crafters, this is the “magic moment” of the Sunburst Crochet Square – Tutorial. Seeing the round flower suddenly take on a geometric shape is incredibly satisfying. However, it is the round where mistakes are most likely to happen. If you accidentally place a double crochet where a treble should be, your square will look lopsided or “wavy.” Constant checking against the pattern is key here.
Another important factor in this round is the chain spaces at the corners. These small gaps are not just decorative; they provide the “anchor points” for when you eventually join your squares together to make a larger item. Whether you use a whip stitch, a slip stitch join, or the join-as-you-go method, these corner chains are essential for keeping your rows aligned and your blanket edges straight.
If you find that your square is still looking a bit circular after this round, don’t panic. This is often due to the natural elasticity of the yarn. A final round of simple double crochet or single crochet in a solid border color can help reinforce the square shape. This border acts as a frame for the sunburst, making the central motif “pop” even more against its background.
By following the “squaring” logic of this Sunburst Crochet Square – Tutorial, you are learning a fundamental principle of crochet geometry. This skill allows you to take almost any circular motif—be it a mandala, a flower, or a doily—and turn it into a functional square that can be incorporated into larger quilt-like crochet projects. It is a versatile technique that serves as a cornerstone for advanced pattern design.
4. Finishing Touches and Creative Variations
Now that your square is constructed, the final phase of the Sunburst Crochet Square – Tutorial focuses on finishing and customization. Weaving in your ends is a task many avoid, but doing it correctly is vital. Use your yarn needle to weave the tails through the “meatier” parts of the puff stitches on the back of the work. This ensures the ends stay hidden and won’t pop out after the item is washed.
If you are planning to make a sunburst blanket, consider the color flow between squares. Some people like to keep the centers consistent (all yellow) and change only the “sky” (the border color), while others prefer a scrappy crochet look where every square is a different combination of leftover yarn. The sunburst is particularly forgiving with scrap yarn, making it an eco-friendly choice for sustainable crafters.
Another creative variation to explore after finishing this Sunburst Crochet Square – Tutorial is changing the stitch texture of the final round. Instead of a flat border, you could use a ribbed stitch or a picot edge if you are making individual coasters. For a more modern, “farmhouse” aesthetic, try using a single neutral color like cream or oatmeal for the entire square to emphasize the shadows and light of the textures.
Don’t forget the power of blocking. As mentioned earlier, blocking is the “secret sauce” of professional crocheters. Even a slightly wonky square can be transformed into a perfect geometric shape with a bit of moisture and some pins. For cotton yarn, a simple spray bottle and a flat surface will do wonders, while acrylic yarn usually requires a bit of gentle steam from an iron (just don’t touch the iron to the yarn!).
As you become more comfortable with the steps in this Sunburst Crochet Square – Tutorial, you can start playing with the size of the square. You can add more rounds of double crochet to make “giant” sunbursts, which are perfect for large floor pillows or baby mats. The mathematical logic of the increases remains the same: always add your extra stitches in the corners to maintain the square’s growth.
Finally, take a moment to admire your work. You have created a piece of handmade art that carries the warmth and radiance of a sunburst. These squares are more than just yarn; they are building blocks for memories, whether they become a gift for a new baby or a cherished heirloom blanket for your own home. The skills you’ve practiced here will serve you well in all your future crochet adventures.
FAQ – Frequently Asked Questions
1. Why is my sunburst square curling or not laying flat?
Curling usually happens because the tension in your puff stitches is too tight or you missed an increase in the corners. Try using a slightly larger hook for the center rounds and ensure you are including the chain-1 spaces between the puff and cluster stitches as directed in this Sunburst Crochet Square – Tutorial.
2. Can I use different yarn weights for the different rounds?
It is highly recommended to stay within the same yarn weight (e.g., all DK or all Worsted) for every round. Using a thicker yarn for the petals and a thinner one for the border will cause the square to warp and become distorted, making it impossible to join with other squares later.
3. How much yarn do I need for one sunburst square?
On average, a single 5-inch square uses about 25 to 35 yards of yarn across all colors. If you are making a full-sized throw blanket, you will likely need between 15 and 20 skeins of yarn (100g each), depending on how many colors you use and the size of your border.
4. What is the difference between a Sunburst Square and a Sunflower Square?
The terms are often used interchangeably, but a Sunflower Square usually uses specific colors (brown center, yellow petals), whereas a Sunburst Crochet Square can be made in any color combination. The stitch structure—puffs followed by clusters—is typically identical.
5. How do I join Sunburst Crochet Squares together?
The most popular methods are the whip stitch for a flat seam or the flat slip stitch join for a decorative, braided look. Many people also enjoy the join-as-you-go (JAYGO) method, which allows you to attach squares during the final round of crocheting, eliminating the need for sewing at the end.
6. Is this pattern suitable for beginners?
Yes, provided the beginner is familiar with basic stitches like the double crochet. The puff and cluster stitches are the only “new” elements, and once those are mastered, the rest of the Sunburst Crochet Square – Tutorial is very straightforward and repetitive in a relaxing way.
Conclusion
This Sunburst Crochet Square – Tutorial has guided you through the rhythmic journey of creating one of the most iconic motifs in contemporary crochet. We explored the importance of material selection, the intricacies of the puff and cluster rounds, and the geometric “magic” required to turn a round flower into a perfect square.
By focusing on stitch definition, color theory, and proper finishing techniques like blocking, you now have the tools to create professional-quality crochet items that radiate warmth and style.