The Sweet Dahlia Crochet Bag pattern is a wonderful way to bring the beauty of flowers into your everyday accessories.
If you’re a crochet enthusiast, this project is a great way to learn new techniques while creating a functional and stylish bag.
The dahlia flower is known for its intricate layers and vibrant colors, and this pattern captures that essence beautifully, making it a perfect project for those who love floral designs.
Crocheting a Sweet Dahlia Crochet Bag allows you to add your personal touch through color choices and design variations. Whether you’re crafting this bag as a gift or for yourself, the end result is a chic, eye-catching piece that can be used for daily outings, trips to the beach, or even as an elegant purse for special occasions. With the right materials and a bit of patience, you’ll be able to create a masterpiece that combines practicality and beauty.
In this guide, we’ll break down each step of creating the Sweet Dahlia Crochet Bag, from choosing the right materials to following the crochet instructions. Whether you’re a beginner or more experienced, the process will be easy to follow and enjoyable. So, let’s dive into the steps to create your own crochet masterpiece!
1. Materials Needed for the Sweet Dahlia Crochet Bag
Before diving into the actual crocheting, it’s important to gather the right materials for your Sweet Dahlia Crochet Bag. Having all your supplies ready ensures that you can focus solely on the crochet process and avoid interruptions. Here’s a list of essential materials you’ll need:
- Yarn: The main material for your bag is yarn. It’s best to choose a yarn that has both strength and softness. Cotton yarn works well for bags, as it’s durable, easy to clean, and holds its shape. A medium-weight (worsted weight) yarn is ideal for this project. You’ll need different colors, with a primary color for the body of the bag and accent colors for the dahlia flower.
- Crochet Hook: A 5mm (H-8) crochet hook is commonly used for this type of project, but the size can be adjusted depending on your yarn and desired stitch tension. Ensure that the hook size matches your yarn’s thickness to achieve a firm and consistent texture.
- Stitch Markers: These small tools are handy for keeping track of the beginning of each round or row, especially when working in a circular or spiral pattern. They help maintain consistency and ensure you don’t lose your place.
- Yarn Needle: This is used for weaving in the ends of your yarn and sewing together any separate parts of the bag. A blunt-tipped yarn needle is perfect for this task.
- Scissors: To cut your yarn once you’ve completed a section, scissors are necessary. Ensure your scissors are sharp enough for clean cuts.
- Lining Fabric (Optional): While optional, adding fabric to line the inside of your bag will provide extra structure and durability. You can choose a matching or contrasting fabric depending on your personal style.
With all these materials at hand, you’re ready to start crocheting your Sweet Dahlia Crochet Bag. Next, we’ll discuss how to crochet the flower that will be the focal point of your bag.
2. Crocheting the Dahlia Flower for the Bag
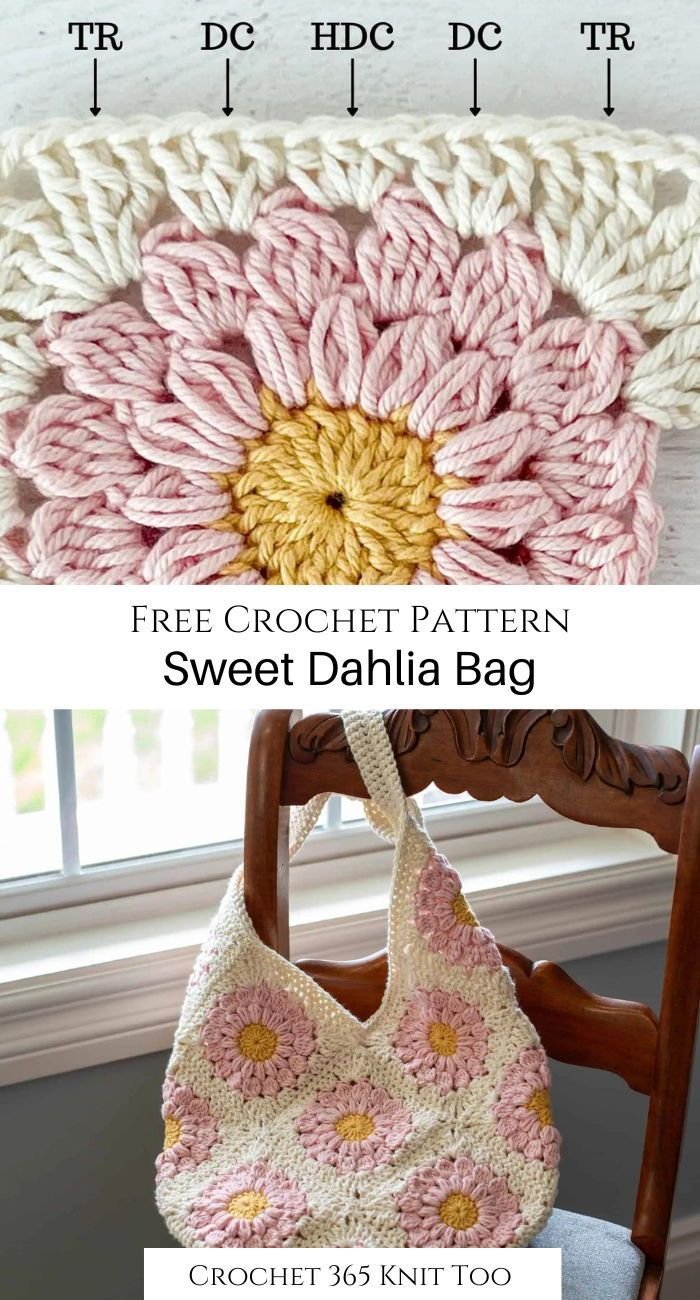
The dahlia is the centerpiece of the Sweet Dahlia Crochet Bag, and crocheting it will require patience and precision. The intricate design of the flower is what makes this bag truly special, so take your time with this step.
Start by making a magic ring, which serves as the foundation of the flower. This allows you to work in a circular pattern, ensuring that the flower has a tight, defined shape. Begin with the center of the flower, using a contrasting color (often a shade of yellow or gold) for the base.
Next, work the petals of the dahlia flower. To achieve the layered effect, you’ll crochet each petal individually, working around the magic ring. Each round of petals will involve increasing the number of stitches to make the petals fuller and more textured. For the dahlia pattern, it’s important to focus on creating smooth, evenly spaced petals, as this will give your flower a professional, polished look.
Once the initial petal layer is completed, you can add additional layers of petals for more dimension. The key to the dahlia’s beauty lies in the variation of petal sizes and layers. You can play with different stitch types, such as double crochet or treble crochet, to create depth and texture.
As you finish each layer, step back and assess your flower to make sure it looks symmetrical. Once you’re satisfied with the flower’s look, secure the last petal layer and trim the yarn. You should now have a beautiful, multi-layered dahlia flower ready to be attached to your bag.
3. Creating the Body and Base of the Bag
After completing the dahlia flower, the next step is to create the body and base of your bag. The shape and structure of the bag will depend on the style you’re going for, but most bags follow a simple rectangular or round design.
Begin by creating the base of the bag. You’ll start with a foundation chain that matches the desired width of the bag. After completing the chain, work in rows or rounds to build the base. You can use single crochet stitches for a firm, durable fabric, or half double crochet stitches for a softer, more flexible texture.
As you work on the body, continue crocheting in a circular or rectangular pattern until you reach the height that you want for your bag. For added structure and visual appeal, you can alternate between stitch types, such as double crochet or single crochet, to create different textures.
Once the body of the bag is crocheted, you’ll need to attach the Sweet Dahlia Crochet Flower to the front of the bag. Using a yarn needle, sew the flower securely onto the surface. Make sure it is centered and placed where it will be most visible.
To further enhance the body of the bag, you can add a decorative border around the edges or incorporate small embellishments such as beads, buttons, or ribbons.
4. Adding Handles and Final Touches
Now that the main body of your Sweet Dahlia Crochet Bag is complete, it’s time to add the handles and any finishing touches. The handles are essential for functionality, as they allow you to carry the bag.
There are several options for handles, depending on your preference:
- Crocheted Handles: To crochet your own handles, make long chains or rectangles of the desired length, and then attach them to the sides of the bag. Use strong stitches, such as single crochet or slip stitch, to create sturdy handles.
- Fabric or Leather Handles: For a more stylish and polished look, you can sew fabric or leather handles to the bag. These can be purchased pre-made or crafted yourself, and they add durability and sophistication to the finished product.
Once the handles are attached, you can add any final decorative touches, such as a lining inside the bag for extra structure, a zipper for closure, or a decorative button to add personality to your creation.
At this point, your Sweet Dahlia Crochet Bag is complete! All that’s left is to weave in any loose yarn ends, trim excess threads, and admire your handiwork.
FAQ: Common Questions About the Sweet Dahlia Crochet Bag Pattern
- What type of yarn should I use for the Sweet Dahlia Crochet Bag?
- It’s best to use a medium-weight yarn, such as cotton or a cotton blend. This will give the bag the right structure and durability. A worsted weight yarn is ideal.
- Can I make the dahlia flower smaller or larger?
- Yes, you can adjust the size of the flower by adding or removing petal layers or using a smaller or larger crochet hook to create different sizes.
- How can I make my bag more structured?
- You can add a fabric lining inside the bag to give it more structure. Alternatively, use stiffer yarn or add a bottom base to reinforce the shape of the bag.
- How do I attach the handles to the bag?
- You can either crochet your own handles or use pre-made fabric or leather handles. Sew them securely to the sides of the bag using a yarn needle and strong yarn.
- Can I customize the flower design?
- Absolutely! Feel free to experiment with different colors, petal shapes, and stitch types to make the flower unique to your style.
- Can I sell bags made from this pattern?
- Yes, you can sell your handmade bags, but it’s important to respect the pattern creator’s terms of use. Always check if the pattern is for personal or commercial use.
Conclusion
In this article, we’ve explored the process of creating a Sweet Dahlia Crochet Bag, from gathering materials to adding the final touches. This project is perfect for crocheters looking to expand their skills while creating a functional, stylish accessory. Whether you want to make a bag for yourself or as a gift, the Sweet Dahlia Crochet Bag pattern is versatile, customizable, and sure to impress.
We hope you enjoyed learning about this project! Please leave your feedback, questions, or suggestions for future patterns in the comments below. Happy crocheting!