When it comes to crochet, there are countless patterns to explore, each with its own unique beauty and charm.
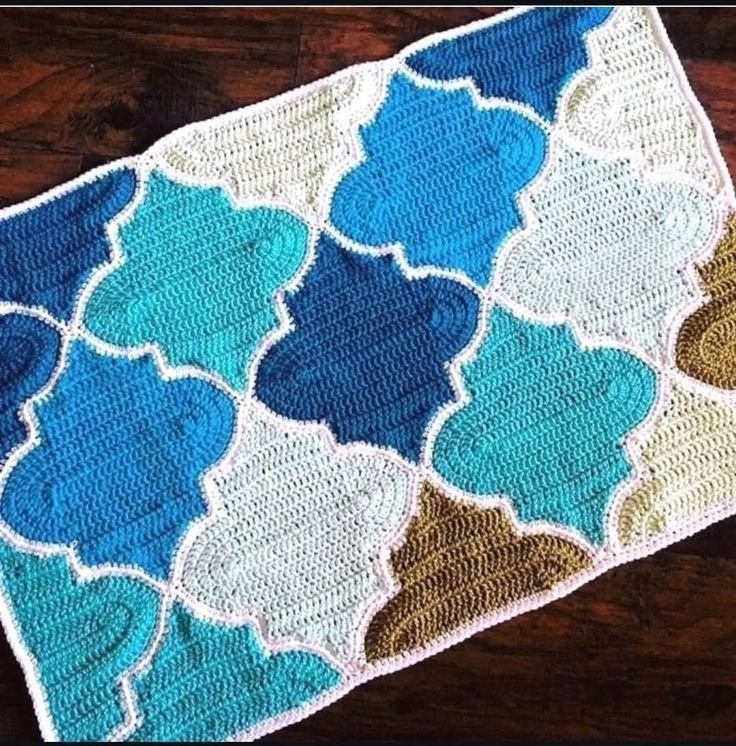
One of the most popular and stunning crochet designs is the Trellis and Chevron Blanket – crochet pattern.
This pattern combines two intricate designs – the trellis and the chevron – to create a beautiful and textured blanket that is both functional and decorative.
Whether you’re an experienced crocheter or just starting out, this pattern offers the perfect balance of challenge and creativity.
Crocheting a Trellis and Chevron Blanket is a rewarding process that allows you to create a piece of art to display in your home. The repeating zig-zag motion of the chevron and the crisscross trellis design are not only visually appealing but also provide texture and warmth to the finished project. As you work through the blanket, you’ll enjoy the rhythm and flow of the pattern, all while creating a cozy masterpiece.
In this article, we’ll guide you through the steps involved in creating your very own Trellis and Chevron Blanket. We’ll also discuss the materials you’ll need, tips for beginners, and the benefits of incorporating this design into your crochet repertoire. Let’s get started with an in-depth look at the crochet pattern and how you can easily master it.
1. Understanding the Trellis and Chevron Design
The first step in creating a Trellis and Chevron Blanket – crochet pattern is understanding the two main elements that make up the design. The chevron pattern is characterized by its V-shaped zig-zags, which repeat across the entire project. The trellis pattern, on the other hand, features a series of interwoven, crisscrossing stitches that give the blanket a unique texture.
The chevron design is made by alternating increases and decreases in the crochet stitches. This creates the classic V-shape that we see in most chevron patterns. The most common stitch used in chevron designs is the double crochet stitch, but variations exist depending on the pattern. The trellis stitch, however, often uses chain stitches combined with double crochet or treble crochet stitches to create the crisscross effect.
When combining these two patterns, the Trellis and Chevron Blanket becomes an elegant design that balances the boldness of the chevron with the intricacy of the trellis. The blanket can be made in any size, and by selecting different yarn colors or textures, you can personalize it to fit any decor style.
The key to mastering this pattern is to take it step by step. Once you understand how to form both the trellis and chevron elements, you can experiment with different stitch combinations and create a blanket that is truly one-of-a-kind.
2. Materials Needed for Your Trellis and Chevron Blanket
Before you begin your Trellis and Chevron Blanket – crochet pattern, it’s important to gather all the necessary materials. The right tools and supplies are essential to ensure that your project turns out beautifully and is enjoyable to make.
The primary materials you’ll need include yarn, a crochet hook, and scissors. For the yarn, it’s best to use a medium-weight yarn, such as worsted weight. This type of yarn provides the perfect balance of durability and softness, making it ideal for a blanket. You can choose yarn in a variety of colors to create a multicolored blanket, or you can opt for a solid color scheme for a more classic look.
The crochet hook you use will depend on the yarn you choose. For worsted weight yarn, a 5mm (H-8) crochet hook is typically recommended, but always check the yarn label for the suggested hook size. If you’re unsure, start with the recommended size and adjust as necessary.
In addition to yarn and a hook, you’ll also need a tape measure to keep track of your progress and ensure that your blanket is the right size. A yarn needle will come in handy for weaving in any loose ends once you finish the blanket.
Having all the right materials on hand will make the crocheting process smoother and more enjoyable.
3. Step-by-Step Guide to Crocheting the Trellis and Chevron Blanket
Now that you have your materials ready, let’s walk through the steps of crocheting the Trellis and Chevron Blanket – crochet pattern.
- Start with a foundation chain: Begin by making a foundation chain. The number of chains will depend on the width of the blanket you want to make. Make sure to follow the instructions in your pattern for the correct number of chains.
- Forming the chevron shape: Once you have the foundation chain, begin working in rows. The first row will create the V-shaped chevron pattern. Use double crochet stitches and alternate between increasing and decreasing to create the zig-zag effect.
- Incorporating the trellis design: After completing the chevron row, the next step is to add the trellis stitch. You’ll be using chain stitches and double or treble crochet stitches to create the crisscrossed pattern. The trellis design will work in alternating rows, creating a balanced rhythm throughout the blanket.
- Repeat the pattern: Continue alternating between chevron and trellis rows until the blanket reaches the desired length. Keep track of your stitch count and row order to ensure the pattern stays consistent.
- Finishing the blanket: Once you’ve completed the necessary rows, finish your blanket by adding a border. You can use a simple single crochet stitch for a neat and uniform border.
By following these steps and practicing patience, you will successfully create a beautiful Trellis and Chevron Blanket that can be proudly displayed in your home or given as a thoughtful gift.
4. Tips for Crocheting the Trellis and Chevron Blanket
Crocheting a Trellis and Chevron Blanket – crochet pattern can be a fun and rewarding project, but like any crochet pattern, it comes with its own set of challenges. Here are a few tips to help make the process easier and more enjoyable:
- Practice your chevron technique: If you’re new to chevron patterns, take some time to practice the increases and decreases. This will help you get the rhythm of the pattern down and make it easier to replicate in your blanket.
- Use stitch markers: Stitch markers are invaluable when working with crochet patterns, especially when you’re working with increases and decreases. They help you keep track of your stitches and avoid mistakes.
- Start with a small project: If you’re a beginner, consider starting with a smaller version of the Trellis and Chevron Blanket. This will give you a chance to practice the pattern without committing to a large project.
- Choose complementary colors: The Trellis and Chevron Blanket looks especially beautiful when made with contrasting or complementary colors. Experiment with color combinations that fit your personal style and home decor.
- Stay consistent with tension: Maintaining consistent tension is key to achieving even stitches throughout your blanket. If you find your stitches are too tight or too loose, adjust your grip on the yarn to achieve a more uniform tension.
- Take breaks and enjoy the process: Crocheting can be a time-consuming project, so remember to take breaks when needed. Enjoy the process and take pride in each stitch you complete.
FAQ: Frequently Asked Questions about the Trellis and Chevron Blanket
- What is a chevron crochet pattern? A chevron crochet pattern consists of V-shaped zig-zags created by alternating increases and decreases in stitches, usually using double crochet. This creates a striking and repetitive visual effect.
- How do I crochet a trellis stitch? The trellis stitch involves using chain stitches along with double crochet or treble crochet stitches to create a crisscrossed pattern. This stitch adds texture and visual interest to the design.
- Can I use different yarn weights for the Trellis and Chevron Blanket? Yes, you can experiment with different yarn weights. Just make sure to adjust your hook size accordingly. A heavier yarn like bulky weight will result in a thicker, cozier blanket, while lighter yarns can create a more delicate and airy feel.
- How can I make my Trellis and Chevron Blanket larger or smaller? To adjust the size of your blanket, simply add or subtract the number of chains in your foundation row. You can also modify the number of rows to increase or decrease the blanket’s length.
- What’s the best way to finish my Trellis and Chevron Blanket? You can finish your blanket with a simple single crochet border to give it a neat, polished look. You can also add a decorative edging, such as a scallop or picot, for extra flair.
- How long does it take to crochet a Trellis and Chevron Blanket? The time it takes to crochet a Trellis and Chevron Blanket depends on your skill level and the size of the blanket. On average, a small blanket can take a few days, while a large one may take a couple of weeks or more.
Conclusion
In this article, we’ve walked through the process of crocheting the Trellis and Chevron Blanket – crochet pattern, from understanding the design elements to gathering the necessary materials. By following the steps outlined, you can create a stunning blanket that will bring warmth and style to your home.
We hope this guide has inspired you to try this beautiful pattern. If you have any questions or suggestions, please feel free to leave a comment below. We would love to hear about your experiences and ideas for making the Trellis and Chevron Blanket even more unique!