This Winter Star Ornament Crochet Tutorial – Pattern is the perfect way to bring a touch of handmade elegance to your home during the coldest months of the year. There is something deeply rewarding about creating your own holiday decor, especially when it involves the intricate beauty of a crochet star. Whether you are looking to adorn your own Christmas tree or searching for a thoughtful, handcrafted gift for a loved one, this crochet pattern offers a timeless design that fits any aesthetic, from rustic farmhouse to modern chic.
As we dive into this Winter Star Ornament Crochet Tutorial – Pattern, it is important to remember that crochet is not just about the final product; it is about the mindful process of looping yarn into art. Using just a few basic stitches and some high-quality cotton or wool yarn, you can transform a simple string into a celestial masterpiece. This project is specifically designed to be accessible for beginners while remaining engaging enough for seasoned crafters who want a quick, satisfying win during the busy holiday season.
Before you begin working on this Winter Star Ornament Crochet Tutorial – Pattern, make sure you have a comfortable seat and good lighting to see your stitches clearly. This guide will walk you through every step of the process, from selecting the right hook size to blocking your finished winter ornament so it holds its shape perfectly for years to come. By following these SEO-optimized crochet instructions, you will ensure your project looks professional and polished, ready to shine brightly in any winter display.
1. Understanding the Winter Star Ornament Crochet Tutorial – Pattern Essentials
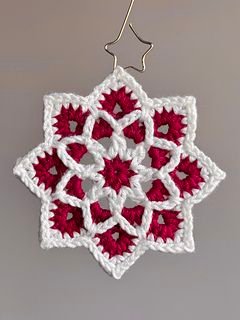
The Winter Star Ornament Crochet Tutorial – Pattern is a comprehensive guide designed to help you create a five or six-pointed star using standard crochet techniques. It focuses on building rounds from a central ring, expanding outward to create the “points” of the star. This winter pattern is versatile, meaning you can adjust the size of your ornament simply by changing your yarn weight or hook size.
To get the most out of this Winter Star Ornament Crochet Tutorial – Pattern, you should be familiar with basic terms like the magic ring, double crochet, and slip stitch. These foundational elements are what give the star its structure and open, lace-like appearance. If you are new to these terms, don’t worry; the repetitive nature of the star points makes this an excellent practice project for mastering tension.
One of the highlights of this Winter Star Ornament Crochet Tutorial – Pattern is its adaptability for different decor styles. By using a metallic thread or a sparkly white yarn, you can mimic the look of a frost-covered snowflake. Alternatively, using a deep red or forest green yarn creates a more traditional, cozy holiday vibe that pairs beautifully with wooden beads or cinnamon sticks.
When following a Winter Star Ornament Crochet Tutorial – Pattern, the choice of materials is crucial for the final result. We highly recommend using a mercerized cotton yarn because it provides excellent stitch definition and has a slight sheen that catches the light beautifully. Cotton also holds its shape much better than acrylic when it comes to flat ornaments that need to hang straight.
The “Pattern” aspect of this Winter Star Ornament Crochet Tutorial – Pattern refers to the mathematical repetition of stitches. You will notice that each point of the star follows a specific sequence of increases and decreases. Understanding this rhythm is key to ensuring your handmade ornament is symmetrical and doesn’t curl at the edges during the construction phase.
Lastly, this Winter Star Ornament Crochet Tutorial – Pattern emphasizes the importance of the finishing touches. A star isn’t truly finished until it has been properly blocked and stiffened. This ensures that the points stay sharp and the center remains flat, preventing the “floppy” look that sometimes affects crochet items. We will explore these techniques further to make your winter star truly stand out.
2. Tools and Materials for Your Crochet Star Project
To successfully complete the Winter Star Ornament Crochet Tutorial – Pattern, you will need a few specific supplies. First and foremost is a crochet hook; for a standard ornament size, a 2.5mm or 3.5mm hook is usually ideal. Matching your hook size to your yarn weight is the secret to achieving tight, neat stitches that give the star ornament its professional look.
Next, let’s talk about the yarn mentioned in this Winter Star Ornament Crochet Tutorial – Pattern. For a delicate, snowflake-like star, a size 10 crochet thread is perfect. If you prefer a chunkier, more substantial ornament, a Category 3 (DK) or Category 4 (Worsted) yarn works wonders. Always check the yarn label for recommended hook sizes, but feel free to go down a size for a firmer fabric.
You will also need a pair of sharp embroidery scissors and a yarn needle (also known as a tapestry needle). These tools are essential for weaving in your ends securely. In a Winter Star Ornament Crochet Tutorial – Pattern, hidden ends are the mark of a high-quality piece, ensuring that your ornament looks beautiful from both the front and the back.
Another key component of the Winter Star Ornament Crochet Tutorial – Pattern is the hanging loop. You can create this simply by leaving a long tail of yarn at the start or finish of your project and chaining a loop. For a more decorative touch, consider using satin ribbon, burlap twine, or even a gold ornament hook to attach your star to the tree.
Starch or a stiffening agent is a “pro-tip” included in this Winter Star Ornament Crochet Tutorial – Pattern. Since crochet fabric is naturally soft, applying a mixture of water and white glue or a commercial fabric stiffener helps the star maintain its rigid shape. This is especially important if you plan on using these as window decorations or standalone hanging pieces.
Finally, consider adding beads or sequins as suggested in many variations of the Winter Star Ornament Crochet Tutorial – Pattern. Sliding beads onto your yarn before you start crocheting allows you to “lock” them into the points of the star. This small addition adds a layer of texture and sparkle that makes your DIY winter decor look like it was bought from a high-end boutique.
3. Step-by-Step Instructions for the Star Pattern
The first phase of the Winter Star Ornament Crochet Tutorial – Pattern begins with a magic ring (or magic circle). This technique allows you to pull the center of your star tight, leaving no visible hole. Inside this ring, you will typically work a series of single crochet or half-double crochet stitches to create the foundation for the points that will follow.
Once your center is established, the Winter Star Ornament Crochet Tutorial – Pattern moves into the expansion round. This is where you create the “bases” for your points. Usually, this involves a combination of chains and skipped stitches. Precision is vital here; if you miscount your stitches in the base round, the points of your crochet star will be uneven, throwing off the entire symmetry.
Now comes the exciting part of the Winter Star Ornament Crochet Tutorial – Pattern: forming the points. Each point is worked by climbing up with taller stitches like treble crochets and then descending back down to the base. This creates the classic triangular shape. Many patterns use a picot stitch at the very tip of the point to give it a sharp, defined look.
As you work through this Winter Star Ornament Crochet Tutorial – Pattern, keep an eye on your stitch tension. If you pull too tightly, the star might pull inward like a bowl; if you are too loose, it will look limp. Consistency is the hallmark of a great crochet project, so try to maintain a steady rhythm as you move from one point to the next around the circle.
After completing all five or six points, the Winter Star Ornament Crochet Tutorial – Pattern instructs you to join the final stitch to the first with a slip stitch. This closes the circuit of the ornament. Before cutting your yarn, pull the loop through to create a knot, leaving enough of a tail to either weave in or transform into your hanging cord.
The final step in the technical part of the Winter Star Ornament Crochet Tutorial – Pattern is the “invisible join” if you are an advanced crafter. This technique hides the seam where the round ends, making the star ornament look seamless. Once the crochet work is done, you are ready to move on to the blocking phase, which truly brings the winter star pattern to life.
4. Professional Finishing and Blocking Techniques
Blocking is a “secret weapon” often mentioned in a Winter Star Ornament Crochet Tutorial – Pattern. This process involves wetting your finished crochet piece and pinning it into the desired shape on a foam mat. For a star, you want to pull each point outward and pin it securely, ensuring all angles are equal and the lines are straight.
While the star is pinned down, the Winter Star Ornament Crochet Tutorial – Pattern recommends applying your stiffening solution. If you use a spray starch, give it a heavy coating. If you use a glue-water mixture (usually a 1:1 ratio), use a paintbrush to saturate the fibers. This step is what transforms a piece of “yarn” into a durable holiday keepsake.
Allow your ornament to dry completely, which usually takes about 24 hours depending on the humidity. The Winter Star Ornament Crochet Tutorial – Pattern warns against unpinning too early; if the yarn is even slightly damp, the points may lose their sharpness. Patience is key to achieving that “store-bought” level of crispness for your crochet ornaments.
Once dry, you can add extra embellishments as per the Winter Star Ornament Crochet Tutorial – Pattern. A small wooden bead in the center or some fine glitter applied with a glue pen can add a magical touch. These details elevate the winter star from a simple craft to a piece of art that reflects your personal style and creativity.
Storage is another important aspect covered in a Winter Star Ornament Crochet Tutorial – Pattern. To keep your stars looking great for next year, store them flat between sheets of tissue paper in a sturdy box. Avoid crushing them, as the stiffened yarn can crack if bent too aggressively. Taking care of your handmade crochet items ensures they become family heirlooms.
By following this Winter Star Ornament Crochet Tutorial – Pattern, you have created more than just a decoration; you’ve mastered a skill. You can now use these stars as gift toppers, garland components, or even jewelry. The possibilities are endless once you understand the basic geometry of this beautiful winter crochet design, making it a staple in your crafting repertoire.
Frequently Asked Questions (FAQ)
What is the best yarn for this Winter Star Ornament Crochet Tutorial – Pattern?
The best yarn is generally a mercerized cotton (size 10 thread or DK weight). It offers the best stitch definition and takes fabric stiffener very well, which is essential for ornaments.
How long does it take to complete one star?
An experienced crocheter can finish one star from this Winter Star Ornament Crochet Tutorial – Pattern in about 15 to 20 minutes. Beginners might take 30 to 45 minutes as they learn the point construction.
Do I have to stiffen the ornament?
While not mandatory, it is highly recommended. Without stiffening, the points of the crochet star tend to curl or fold when hanging on a tree branch.
Can I make these stars larger?
Yes! To make a larger star using the same Winter Star Ornament Crochet Tutorial – Pattern, simply use a bulkier yarn (like chunky wool) and a larger hook (like 6.0mm).
Is this pattern suitable for absolute beginners?
Yes, as long as you know how to do a chain, single crochet, and double crochet. The Winter Star Ornament Crochet Tutorial – Pattern is a great way to learn how to work in the round.
How do I clean my crochet ornaments?
If they get dusty, a light puff of canned air or a gentle brush with a soft paintbrush is best. Avoid washing them if they have been stiffened with glue, as water will dissolve the stiffener.
Conclusion
In this Winter Star Ornament Crochet Tutorial – Pattern, we have covered everything from the essential materials and tools to the step-by-step construction and professional finishing techniques.
You’ve learned how to create a beautiful, symmetrical crochet star that can brighten up your home or serve as a heartfelt gift. By mastering the magic ring, the expansion rounds, and the blocking process, you now have the skills to produce high-quality handmade decor that lasts for years.