Zig Zag Crochet, also known as Chevron Crochet, is a popular and visually striking pattern that creates a beautiful wave-like design.
This versatile pattern can be used for blankets, scarves, bags, and more.
In this tutorial, we will guide you through the steps to create your own Zig Zag Crochet project. complete with all the yarn and stitch details you need.
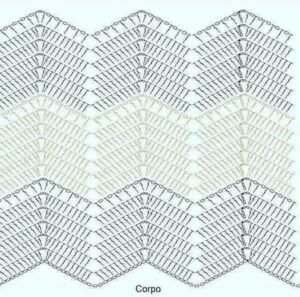
Materials and Preparation
Gathering Supplies
Before starting your Zig Zag Crochet project, you’ll need to gather the following materials:
- Yarn: Choose your favorite yarn in multiple colors to create the zig zag effect. Worsted weight yarn is a good choice for beginners.
- Crochet Hook: Use a hook size that matches the weight of your yarn. For worsted weight yarn, a 5.5mm (I-9) crochet hook is recommended.
- Other Supplies: Scissors, yarn needle for weaving in ends, and a measuring tape.
Ensure you have enough yarn in each color to complete your project. Zig Zag Crochet often uses multiple colors, so plan your color scheme ahead of time for a cohesive and visually appealing design.
Choosing Colors
Selecting the right colors for your Zig Zag Crochet project is crucial for achieving a stunning result:
- Contrasting Colors: Use contrasting colors to make the zig zag pattern stand out. Bold and vibrant colors work well.
- Color Harmony: Choose colors that harmonize well together. You can use a color wheel to help select complementary or analogous colors.
Lay out your chosen yarn colors in the order you plan to use them. This will help you visualize the final look of your project and make any adjustments before you start crocheting.
Preparing the Yarn
Before you begin, it’s important to prepare your yarn:
- Winding Yarn: If your yarn is in a hank, wind it into a ball to prevent tangling. Use a yarn winder or wind it by hand.
- Checking Gauge: Crochet a small swatch to check your gauge. This ensures your stitches are the right size and your project will turn out as expected.
Now that you have your materials ready, it’s time to start your Zig Zag Crochet project.
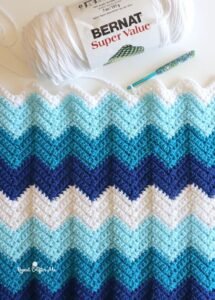
Starting the Zig Zag Pattern
Creating the Foundation Chain
The foundation chain is the starting point for your Zig Zag Crochet project:
- Chain Multiple: The Zig Zag pattern is typically worked in multiples of 12 stitches, plus an additional 3 stitches for turning. For a small sample, chain 36 + 3 = 39 stitches.
- Foundation Row: Crochet the first row by working single crochet stitches into each chain. This foundation row will set the base for your zig zag pattern.
Take your time to ensure your foundation chain is even and not too tight. A loose chain will help prevent your project from curling.
Working the Zig Zag Stitches
With the foundation chain complete, you can start working the zig zag stitches:
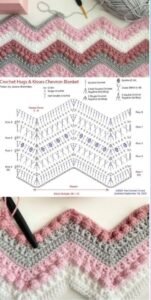
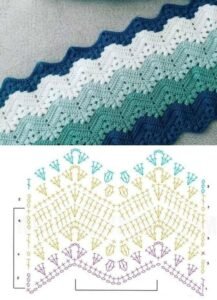
- Increasing and Decreasing: To create the zig zag effect, you’ll need to increase and decrease stitches at specific points. Follow this pattern:
- Increase: Work 3 double crochet stitches into one stitch to create a peak.
- Decrease: Work a double crochet decrease over the next three stitches to create a valley.
- Continuing the Pattern: Repeat the increase and decrease pattern across the row. At the end of the row, chain 3 and turn your work.
Continue this pattern for each row, changing colors as desired to create the zig zag effect. The peaks and valleys will form the characteristic zig zag design.
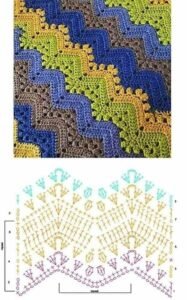
Changing Colors
Changing colors adds visual interest to your Zig Zag Crochet project:
- Color Changes: To change colors, work the last stitch of the row with the new color, completing the final yarn over with the new color.
- Securing Ends: Leave a tail of the old color and the new color to weave in later. This will secure the color change and prevent unraveling.
Plan your color changes ahead of time to ensure a smooth transition and a cohesive design.
Continuing the Zig Zag Pattern
Maintaining Consistency
Consistency is key to achieving a professional-looking Zig Zag Crochet project:
- Stitch Count: Keep track of your stitch count to ensure your zig zags are even. Count your stitches at the end of each row to avoid mistakes.
- Even Tension: Maintain even tension throughout your project. This will ensure your stitches are uniform and your zig zags are crisp.
Check your work regularly to ensure your zig zags are forming correctly. Correct any mistakes early to avoid having to unravel large sections.
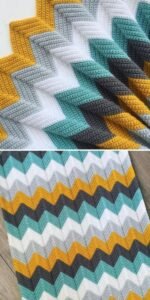
Adjusting the Size
The Zig Zag Crochet pattern is versatile and can be adjusted to any size:
- Increasing Width: To make your project wider, add more multiples of 12 to your foundation chain.
- Increasing Length: Continue crocheting more rows until your project reaches the desired length.
Measure your project periodically to ensure it is the correct size. Adjust your pattern as needed to achieve the perfect dimensions.
Weaving in Ends
Weaving in ends is an important finishing step:
- Securing Ends: Use a yarn needle to weave in the ends of each color change. This will secure the yarn and prevent unraveling.
- Hiding Ends: Weave the ends into the stitches of the same color to hide them. Trim any excess yarn.
Take your time with this step to ensure your project looks neat and professional.
Finishing Touches
Blocking the Project
Blocking helps to even out stitches and set the shape of your project:
- Wet Blocking: Soak your project in lukewarm water with a gentle soap. Gently squeeze out excess water without wringing.
- Pinning and Drying: Lay your project flat on a blocking mat or towel, pinning it to the desired shape. Allow it to dry completely.
Blocking will help your Zig Zag Crochet project lay flat and look polished.
Adding Edging
Adding an edging can give your project a finished look:
- Choosing Edging: Choose a simple single crochet or scalloped edging to complement the zig zag pattern.
- Crocheting Edging: Work the edging evenly around the entire project, ensuring smooth corners and consistent stitches.
An edging can add a touch of elegance to your project and hide any uneven edges.
Final Review
Before considering your project complete, review it carefully:
- Inspect Stitches: Check for any loose stitches or ends that need weaving in.
- Overall Appearance: Ensure the zig zag pattern is consistent and the colors are harmonious.
Take pride in your finished Zig Zag Crochet project. Share it with friends and family or gift it to someone special.
Zig Zag Crochet is a beautiful and versatile pattern that can be used for a variety of projects. By following this tutorial, you can create your own stunning Zig Zag Crochet project with confidence.7
Remember to gather your materials, prepare your yarn, and follow the steps carefully. Enjoy the process and take pride in your finished work. Happy crocheting!
