The Zigzag stitch Crochet – Pattern is one of those timeless techniques that manages to look incredibly complex while remaining surprisingly accessible for makers of all skill levels. If you have ever marveled at a classic ripple afghan or a modern textured throw, you have likely seen the Zigzag stitch Crochet – Pattern in action, creating that iconic wave-like movement across the fabric. This specific crochet technique relies on a rhythmic series of increases and decreases that force the stitches to peak and valley, resulting in a beautiful chevron effect that works perfectly for everything from baby blankets to high-fashion scarves.
Mastering the Zigzag stitch Crochet – Pattern opens up a world of creative possibilities, especially when you start playing with color theory. Because each row follows a distinct path, changing yarn colors every few rows emphasizes the geometric nature of the chevron crochet design, making it a favorite for “stash-busting” projects where you use up leftover yarn. The beauty of this crochet pattern lies in its versatility; you can work it with lightweight cotton for a summer wrap or heavy wool for a cozy winter quilt, and the structural integrity of the zigzag rows remains consistent and visually striking.
Before we dive into the technical details of the Zigzag stitch Crochet – Pattern, it is important to understand that consistency is the key to a professional finish. Many beginners find themselves frustrated when their edges don’t stay straight, but once you grasp the logic of the crochet peaks and valleys, the rhythm becomes second nature. In this guide, we will break down the fundamental steps, explore the best materials to use, and provide you with the professional tips needed to ensure your Zigzag stitch Crochet – Pattern turns out perfectly every single time you pick up your hook.
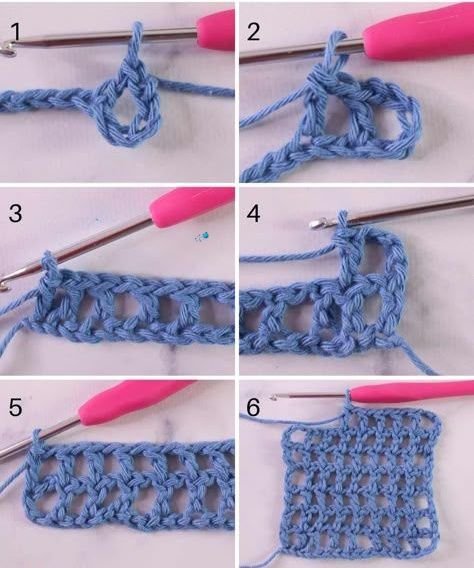
1. Understanding the Foundation of the Zigzag stitch Crochet – Pattern
To begin your journey with the Zigzag stitch Crochet – Pattern, you must first understand the concept of “multiples.” Most zigzag crochet designs require a specific number of chains to ensure the waves line up correctly across the width of your work. This foundation chain acts as the skeleton for your chevron stitches, determining how wide each “mountain” and “valley” will be as you progress through the rows.
The core mechanic of the Zigzag stitch Crochet – Pattern involves placing multiple stitches into a single chain to create a peak, and skipping chains or using decreases to create a valley. This intentional manipulation of stitch density is what forces the straight line of your foundation into a rhythmic wave pattern. Without these precise increases and decreases, the fabric would simply stay flat and rectangular rather than taking on its signature shape.
When working on a Zigzag stitch Crochet – Pattern, using a stitch marker at the peaks can be incredibly helpful for beginners. This ensures that you are always placing your increases in the exact center of the previous row’s peak, preventing the entire project from leaning to one side. It is a simple habit that significantly improves the mathematical accuracy of your handmade crochet project and reduces the need for “frogging” or ripping out stitches.
Choosing the right crochet hook size is another vital factor when starting this specific pattern. If your tension is too tight, the valleys of the Zigzag stitch Crochet – Pattern may pull inward, causing the fabric to pucker unpleasantly. Conversely, if your stitches are too loose, the peaks might lose their sharp definition, resulting in a rounded wave rather than a crisp, geometric zigzag edge.
The Zigzag stitch Crochet – Pattern is traditionally worked using basic stitches like the single crochet (sc) or double crochet (dc). The double crochet version is particularly popular because it grows quickly and provides a softer drape, making it ideal for wearable items. The single crochet version, however, creates a much denser and warmer fabric, which is excellent for durable crochet blankets or home decor items like pillows.
As you build your first few rows, you will start to see the Zigzag stitch Crochet – Pattern emerge clearly. Do not be alarmed if the first row looks a bit curled or messy; the weight of the subsequent rows will help pull the stitches into their proper alignment. Patience during these initial stages is essential for achieving a professional-looking chevron crochet finish that you can be proud of.
2. Selecting the Best Yarn and Tools for Your Crochet Project
The success of your Zigzag stitch Crochet – Pattern depends heavily on the materials you choose before you even make your first slip knot. For a classic look, many crafters opt for worsted weight yarn, as it provides excellent stitch definition, allowing the “zags” to stand out clearly. If you are aiming for a modern aesthetic, using a variegated yarn can create a stunning “scrambled” color effect within the zigzag structure.
Cotton yarn is a fantastic choice for the Zigzag stitch Crochet – Pattern if you are making kitchen accessories or summer garments. Cotton has very little “give,” which means the geometric points of your crochet peaks will remain sharp and well-defined even after multiple washes. However, for those looking for comfort and warmth, a soft acrylic or wool blend is the go-to for a cozy zigzag throw blanket.
Ergonomics play a huge role in your enjoyment of the Zigzag stitch Crochet – Pattern. Since this pattern involves repetitive movements and frequent counting, using an ergonomic crochet hook can prevent hand fatigue. A comfortable grip allows you to maintain consistent tension, which is the secret ingredient to ensuring all your crochet waves are uniform in height and width throughout the entire piece.
Color selection is perhaps the most exciting part of planning a Zigzag stitch Crochet – Pattern. High-contrast colors, like black and white or navy and gold, will emphasize the sharp angles of the chevron stitch. If you prefer a more subtle look, using a monochromatic color palette with different shades of the same hue creates a sophisticated, ombre-like transition across the zigzag rows.
Always check your yarn gauge before starting a large project with the Zigzag stitch Crochet – Pattern. Even if the pattern provides a specific count, your individual tension might differ, leading to a project that is significantly larger or smaller than intended. Creating a small gauge swatch of the zigzag pattern will help you determine if you need to adjust your hook size to achieve the desired dimensions.
Finally, ensure you have a sharp pair of yarn snips and a sturdy tapestry needle on hand. Because the Zigzag stitch Crochet – Pattern often involves frequent color changes, you will have many yarn tails to weave in at the end. Doing this properly ensures that your handmade masterpiece doesn’t unravel and that the edges of your zigzag design look clean and professional from every angle.
3. Step-by-Step Execution of the Zigzag stitch Crochet – Pattern
To execute the Zigzag stitch Crochet – Pattern, you will start by creating a foundation chain that is a multiple of your chosen “wave” width plus the necessary turning chains. For a standard double crochet zigzag, you might work into the fourth chain from the hook to begin your first peak. The rhythm usually involves several individual stitches, followed by a cluster of stitches for the peak, and then another set of individual stitches leading to a skip-chain valley.
As you move through the Zigzag stitch Crochet – Pattern, the “valleys” are created by skipping two or more stitches from the previous row. This “pulls” the fabric downward, creating the bottom angle of the zigzag. It is crucial to count your stitches between every peak and valley; missing even one stitch will cause the entire chevron row to become uneven, throwing off the symmetry of the rest of the project.
The “peaks” of the Zigzag stitch Crochet – Pattern are typically made by working three stitches into the same space or stitch. This extra volume forces the fabric to expand outward and upward, forming the top point of the zigzag. By alternating these increases and decreases perfectly, you create a balanced tension that keeps the crochet fabric lying flat while maintaining its beautiful, oscillating shape.
One professional tip for the Zigzag stitch Crochet – Pattern is to work into the back loops only (BLO) of the stitches. This technique creates a ribbed texture that adds a third dimension to your work, making the zigzag lines pop even more. The BLO method also adds extra flexibility to the fabric, which is particularly nice for crochet scarves or clothing items that need to drape gracefully over the body.
Turning your work correctly is another vital step in the Zigzag stitch Crochet – Pattern. Most patterns will have you end a row with a decrease or a specific stitch count to ensure the edge remains vertical. If your edges are looking “wavy” or leaning, double-check your turning chain count and ensure you aren’t accidentally adding or subtracting stitches at the very beginning or end of your zigzag row.
As you gain confidence with the Zigzag stitch Crochet – Pattern, you can experiment with “long” or “short” waves. By increasing the number of stitches between the peaks and valleys, you create a wider, gentler crochet ripple. Decreasing the number of stitches results in a sharp, frequent zigzag that has a very energetic and modern feel, perfect for bold home decor.
4. Advanced Variations and Finishing Your Zigzag Masterpiece
Once you have mastered the basic Zigzag stitch Crochet – Pattern, you can explore advanced variations like the Granny Zigzag or the Spike Stitch Chevron. These variations incorporate different stitch heights and placements to add even more visual interest to the classic zigzag layout. Using a treble crochet instead of a double crochet can create a very airy, lace-like version of the zigzag pattern, which is stunning for lightweight shawls.
Adding a border to your Zigzag stitch Crochet – Pattern can be a bit tricky because of the uneven top and bottom edges. Many crafters choose to fill in the valleys at the top and bottom with varying stitch heights (like using slip stitches, half-double, and double crochets) to create a straight edge before adding a final decorative border. This gives the finished project a more traditional, “framed” appearance.
Blocking is a crucial final step for any project using the Zigzag stitch Crochet – Pattern. Because the nature of the stitch involves pulling the yarn in different directions, the fabric may have a slight tendency to curl at the edges. Steam blocking or wet blocking your finished work allows the fibers to settle into their final shape, ensuring the zigzag points are sharp and the entire piece lies perfectly flat.
Don’t forget the power of texture in your Zigzag stitch Crochet – Pattern. You can incorporate puff stitches or bobbles at the peaks of your zigzags to create a tactile experience. This is especially popular for baby sensory blankets, where the combination of the visual zigzag rhythm and the physical texture of the stitches provides a wonderful developmental tool for infants.
If you are making a garment with the Zigzag stitch Crochet – Pattern, pay close attention to the seams. Joining two zigzag edges requires a “mattress stitch” or a similar invisible join to ensure the peaks and valleys line up perfectly across the seam. When done correctly, the transition between pieces is seamless, making the crochet garment look like it was created as one continuous, flowing piece of fabric.
Finally, remember that the Zigzag stitch Crochet – Pattern is a journey of creativity. There are no strict rules once you understand the math behind the waves. Feel free to mix different yarn textures, incorporate beads into the peaks, or change colors at random intervals. Your unique take on this classic crochet stitch is what will make your finished piece a true work of art that will be cherished for years to come.
FAQ – Frequently Asked Questions
1. Why is my Zigzag stitch Crochet – Pattern curling at the edges?
Curling is usually caused by tension that is too tight or a foundation chain that is too restrictive. Try using a hook one size larger for the foundation chain or practice a looser tension. Blocking the finished piece also helps significantly in flattening the zigzag fabric.
2. How do I calculate the starting chain for a specific width?
Most Zigzag stitch Crochet – Patterns work on a multiple (e.g., multiples of 12 + 3). You must determine the width of one “wave” and repeat that multiple until you reach your desired width, then add the turning chain. Always refer to your specific pattern instructions for the exact count.
3. Can I use the Zigzag stitch for a round project like a hat?
Yes! The Zigzag stitch Crochet – Pattern can be worked in the round, but it requires careful management of the joins to ensure the ripple remains continuous. You will need to join the rounds at a “valley” point to hide the seam effectively within the chevron structure.
4. What is the difference between a Chevron and a Zigzag stitch?
In the world of crochet, these terms are often used interchangeably. Both refer to the peak and valley design. However, some people refer to sharper, more angular designs as “Zigzag” and softer, more rounded waves as “Ripple” or “Chevron.”
5. How do I change colors without leaving a mess?
The best way to change colors in a Zigzag stitch Crochet – Pattern is to pull the new color through the last two loops of the final stitch of a row. This creates a clean transition. You can then carry the yarn up the side or weave in the ends as you go to keep your crochet project tidy.
6. My stitch count is off every row, what am I doing wrong?
This is the most common issue with the Zigzag stitch Crochet – Pattern. It usually happens because a stitch is missed at the “valley” (the skip-stitch area) or an extra stitch is added at the “peak.” Use stitch markers at every peak for a few rows until you can “see” the pattern clearly.
Conclusion
In this guide, we have explored the intricate and rewarding world of the Zigzag stitch Crochet – Pattern. We covered the foundational importance of multiples, the necessity of choosing the right yarn and tools, the step-by-step logic of peaks and valleys, and advanced ways to finish and customize your work.
This crochet technique is a staple for any crafter, offering a perfect blend of mathematical precision and artistic freedom. Whether you are making a vibrant chevron blanket or a subtle textured accessory, the Zigzag stitch remains a versatile and stylish choice.