
Simple Bag Without a Zipper Using Only 2 Pieces of Fabric Pattern is one of the easiest and most practical sewing projects for beginners and experienced crafters alike. With only two fabric pieces, a few straight seams, and basic sewing supplies, you can create a stylish, reusable, and durable fabric bag that is perfect for everyday use. Whether you want a lunch bag, gift bag, project bag, or eco-friendly shopping tote, this design offers incredible versatility while keeping the construction process simple.
One of the greatest advantages of this simple bag without a zipper using only 2 pieces of fabric pattern is that it requires very little fabric and very few sewing techniques. Instead of complicated closures or multiple pattern pieces, this project focuses on clean construction and functional design. The gathered top handle creates a beautiful finish while making the bag comfortable to carry. Because of its minimalist structure, it is also an excellent project for practicing accurate cutting, pressing, and stitching.
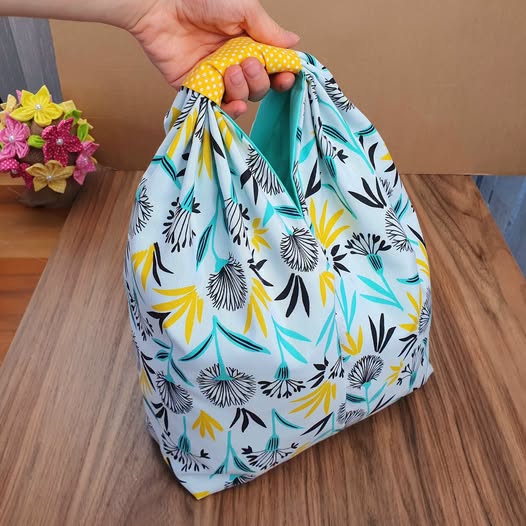
If you enjoy sewing practical accessories that are both beautiful and useful, this pattern deserves a place in your collection. The finished bag shown in the project combines a cheerful floral print with a contrasting handle, creating a fresh and modern appearance. Throughout this guide, you’ll learn every step required to recreate this project, from selecting materials to sewing, pressing, assembling, and adding professional finishing touches. By the end of this tutorial, you’ll confidently be able to customize the bag in different sizes, colors, and fabrics for any occasion.
Choosing Materials and Preparing Your Fabric
The first step for creating a beautiful Simple Bag Without a Zipper Using Only 2 Pieces of Fabric Pattern is choosing the right fabric. Medium-weight quilting cotton works exceptionally well because it is easy to sew, presses nicely, and offers enough structure for daily use. Canvas, linen blends, or lightweight home décor fabrics are also excellent alternatives if you prefer a sturdier finish.
For this project, prepare two identical rectangular fabric pieces. The exact measurements can be adjusted according to your desired bag size. A beginner-friendly example is two rectangles measuring approximately 18 x 20 inches (46 x 51 cm). This creates a medium-sized bag suitable for carrying personal belongings, groceries, or sewing supplies.
You’ll also need matching thread, sewing clips or pins, scissors or a rotary cutter, an iron, measuring tools, and your sewing machine. Since this project doesn’t require a zipper, interfacing is optional but recommended if you’d like the bag to hold its shape better.
Before cutting, wash and iron your fabric. Prewashing helps eliminate shrinkage after the finished bag is used or washed. Pressing the fabric flat also improves cutting accuracy, resulting in straighter seams and a cleaner final appearance.
Carefully cut both fabric rectangles, ensuring they are perfectly identical. Even small differences can affect the symmetry of the finished bag, especially around the gathered handle area.
Finally, mark the handle placement and seam allowances using washable fabric markers or tailor’s chalk. Taking a few extra minutes during preparation makes the sewing process smoother and produces a much more professional result.
Step-by-Step Sewing Instructions
Begin by placing both fabric pieces with the right sides facing each other. Align all edges carefully and secure them with sewing clips or pins to prevent shifting while sewing.
Using a standard ¼-inch (6 mm) or ⅜-inch (1 cm) seam allowance, sew both side seams and the bottom seam. Leave the upper edge completely open. Reinforce the beginning and end of each seam with reverse stitching to improve durability.
Once the seams are complete, trim excess thread and press all seam allowances open. Pressing is often overlooked, but it significantly improves the overall quality and appearance of the finished project.
To create the boxed bottom, fold one lower corner so the side seam aligns with the bottom seam, forming a triangle. Measure approximately 2 to 3 inches across the corner, draw a straight line, and sew along it. Repeat for the opposite corner before trimming away the excess fabric. This step allows the bag to stand upright and provides additional storage space.
Turn the bag right side out and gently push out the corners using a blunt turning tool. Avoid using sharp objects that could puncture the fabric. Press the entire bag thoroughly to create crisp edges.
Now prepare the top opening. Fold the raw edge toward the inside about ¼ inch, press, then fold again approximately 1 inch to create a clean casing. Stitch close to the folded edge, leaving enough room to gather the fabric around the handle section, just as shown in the finished project.
Creating the Gathered Handle and Finishing the Bag
The distinctive feature of this Simple Bag Without a Zipper Using Only 2 Pieces of Fabric Pattern is the gathered top handle. This design gives the bag a charming appearance while eliminating the need for complicated hardware or zipper installation.
Cut a contrasting strip of fabric for the handle. Fold it lengthwise with right sides together, sew along the long edge, turn it right side out, and press it flat. Topstitch both long edges if you want a polished professional finish.
Thread the prepared handle through the upper casing of the bag. As the fabric gathers naturally around the handle, distribute the folds evenly to create a balanced appearance on both sides.
Adjust the gathers until the bag opens and closes comfortably. The handle should remain centered while allowing enough flexibility for carrying the bag easily in one hand.
Secure the handle ends by stitching them together or sewing them firmly into place according to your preferred finish. Reinforce this stitching because the handle carries the weight of everything placed inside the bag.
Give the finished project one final press using steam. A well-pressed project always looks cleaner, more professional, and more enjoyable to use. Your reusable fabric bag is now complete and ready for everyday use.
Creative Customization Ideas and Practical Uses
One of the best aspects of this simple bag without a zipper using only 2 pieces of fabric pattern is how easily it can be personalized. By simply changing fabrics, prints, or colors, you can create bags suitable for every season, holiday, or occasion.
Floral cotton fabrics create elegant gift bags, while denim or canvas makes durable shopping bags. Holiday-themed prints are perfect for Christmas gifts, birthdays, Easter baskets, or baby showers.
You can also resize the pattern. Smaller versions become cosmetic bags, lunch bags, knitting project bags, or storage pouches. Larger versions work beautifully as grocery bags, beach bags, or reusable market totes.
Although the original project intentionally avoids zippers, you can easily add decorative labels, fabric appliqués, embroidery, quilting, or patchwork panels to personalize each bag without complicating the construction.
This project is also an excellent choice for beginners learning sewing fundamentals. It teaches measuring, cutting, pressing, seam accuracy, boxed corners, top hems, and simple handle construction while producing a useful finished item.
Because only two main fabric pieces are required, this pattern is also perfect for reducing fabric waste. It allows you to transform leftover quilting cotton into practical accessories that can be used daily or given as thoughtful handmade gifts.
Frequently Asked Questions
Is this project suitable for beginners?
Yes. This is one of the easiest sewing projects available. The construction uses straight seams, simple folds, and basic sewing techniques, making it perfect for beginners.
What is the best fabric for this bag?
Quilting cotton is the most popular choice because it is easy to sew and comes in countless beautiful prints. Canvas, linen blends, or lightweight upholstery fabrics also work well.
Can I make the bag larger?
Absolutely. Simply increase the size of both fabric rectangles equally while maintaining the same construction method.
Do I need interfacing?
No. Interfacing is optional. If you’d like a firmer bag with more structure, lightweight fusible interfacing is recommended.
Can this bag be machine washed?
Yes. If prewashed cotton fabric is used, the finished bag can usually be machine washed using a gentle cycle and then pressed after drying.
Can I use scraps of fabric?
Certainly. You can piece together fabric scraps using simple patchwork techniques before cutting the two main pattern pieces.
What can this bag be used for?
It works beautifully as a reusable shopping bag, lunch bag, gift bag, craft storage bag, knitting project bag, picnic bag, toy organizer, or everyday carry bag.
How can I make the bag more durable?
Use quality thread, reinforce the handle stitching, press every seam carefully, and optionally add interfacing or double stitching in high-stress areas.
Conclusion
The Simple Bag Without a Zipper Using Only 2 Pieces of Fabric Pattern proves that beautiful sewing projects don’t need to be complicated. Using just two fabric pieces, a few straightforward sewing techniques, and minimal supplies, you can create a reusable, attractive, and highly functional fabric bag suitable for countless everyday purposes. Throughout this guide, you learned how to choose the best materials, prepare your fabric, sew the main body, create boxed corners, construct the gathered handle, and add professional finishing details that elevate the final result.
This versatile pattern is easy to customize in different sizes, colors, and prints, making it an excellent project for beginners, experienced sewists, handmade gift makers, and anyone looking for a practical sewing project with beautiful results.