
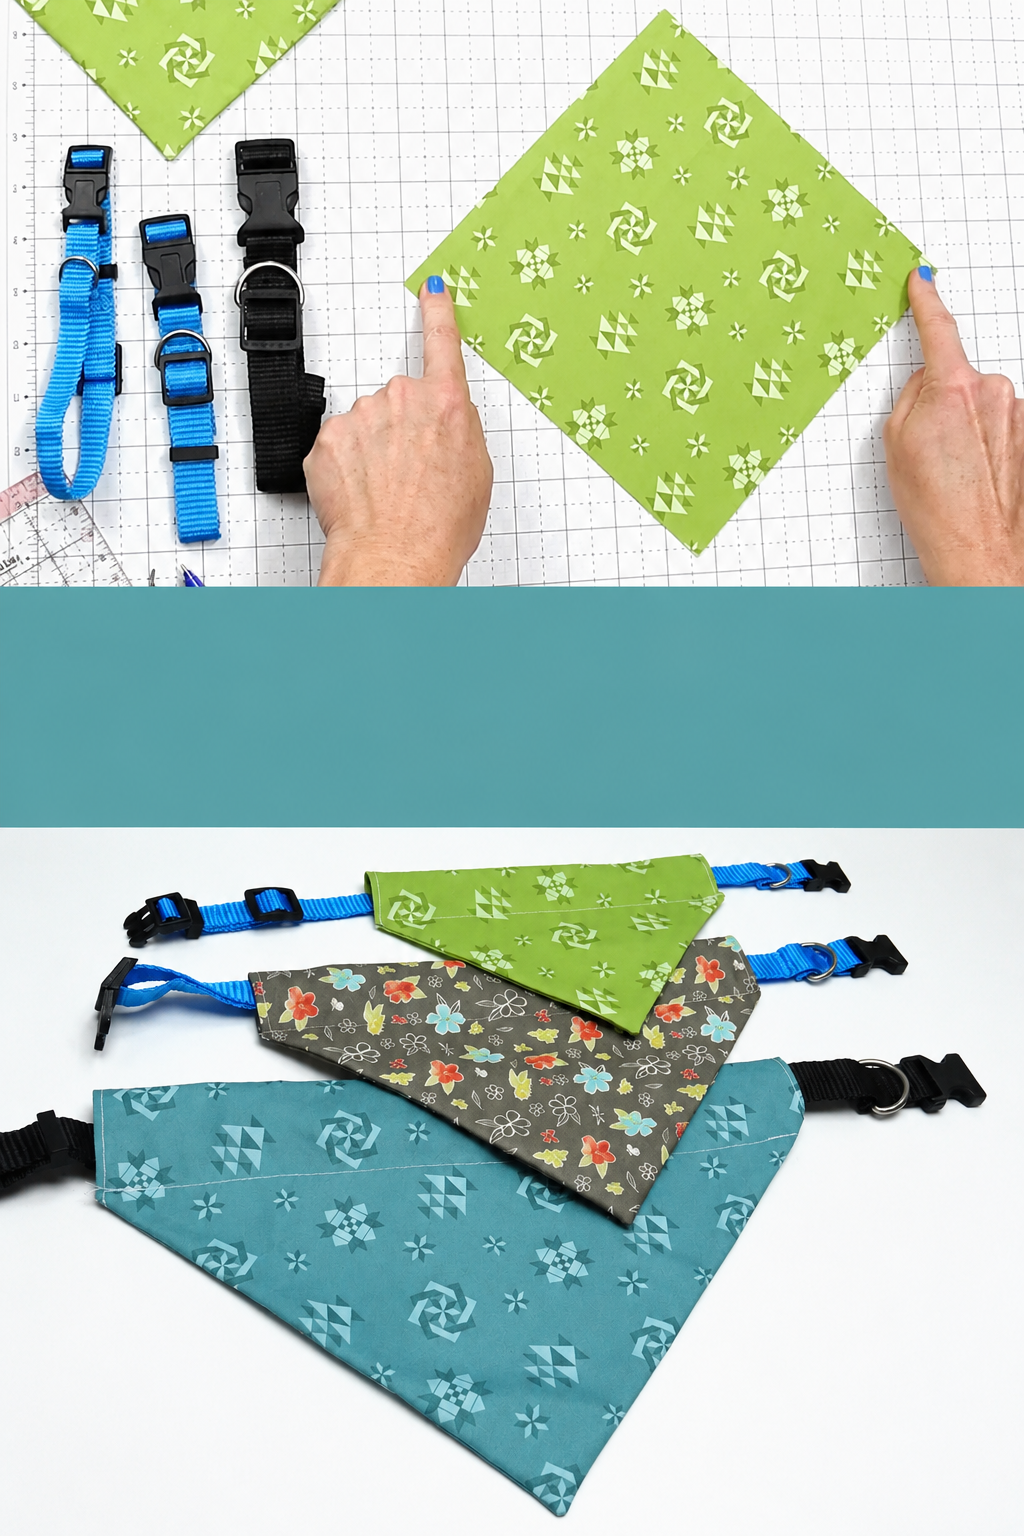
Dog Bandanas That Fit Over the Collar Pattern is a practical sewing project that combines comfort, simplicity, and an adorable handmade look for dogs of many sizes. Unlike traditional tie-on bandanas, this design features a fabric casing along the top edge that allows the dog’s regular collar to slide directly through the bandana. This means there are no additional strings around the dog’s neck and no complicated fastening system to manage. Inspired by the project shown in the photo, the finished accessory has a clean triangular shape, neat topstitching, and enough structure to remain attractive while being comfortable for everyday wear.
One of the greatest advantages of making dog bandanas that fit over the collar is how customizable the project can be. Cotton quilting fabric is an excellent choice because it is lightweight, easy to sew, available in countless prints, and simple to wash. You can make seasonal bandanas, floral designs, colorful geometric versions, holiday accessories, or personalized bandanas that coordinate with the dog’s collar. Because only a relatively small amount of fabric is required, this is also a useful project for turning leftover quilting cotton into something functional instead of allowing scraps to accumulate in your sewing room.
The construction itself is beginner-friendly, but careful measuring makes an important difference in the final result. The collar opening needs to be wide enough for both the collar webbing and its hardware to pass through comfortably. The triangular portion should also be proportional to the dog’s neck rather than being excessively long or bulky. In this Dog Bandanas That Fit Over the Collar Pattern, we will cover fabric selection, measuring, cutting, sewing, creating the collar channel, topstitching, and finishing so you can recreate the polished appearance of the bandanas shown in the reference image.
Materials, Measurements, and Preparing the Dog Bandana Pattern
Start your Dog Bandanas That Fit Over the Collar Pattern with a good-quality woven cotton fabric. Quilting cotton works particularly well because it holds a crease, feeds easily through a sewing machine, and is comfortable against a dog’s coat. Prewashing and drying the fabric before cutting is recommended because cotton can shrink slightly during its first wash. Press the fabric afterward so the measurements remain accurate.
For the basic sewing supplies, prepare fabric, coordinating polyester thread, fabric scissors or a rotary cutter, a cutting mat, ruler, fabric marking tool, pins or sewing clips, an iron, ironing board, and sewing machine. A point-turning tool can also be helpful when creating the lower tip of the triangle. Choose thread that blends with the fabric if you want subtle stitching or contrasting thread when decorative topstitching is part of your design.
The most important measurement is the width of the dog’s existing collar. Measure the webbing at its widest point, but remember that the buckle or adjustment hardware may also need to travel through the finished casing. For a collar approximately 1 inch (2.5 cm) wide, a finished channel around 1½ to 2 inches (3.8 to 5 cm) tall usually provides comfortable clearance. Always test the actual collar because hardware dimensions vary considerably.
For a small dog, you might begin with a fabric square approximately 8 x 8 inches (20 x 20 cm). A medium version can start around 10 x 10 inches (25 x 25 cm), while a larger dog may need approximately 12 x 12 inches (30 x 30 cm) or more. These measurements are starting points rather than rigid sizing rules. The dog’s neck circumference, body proportions, collar width, and preferred bandana coverage should determine the final dimensions.
To create the characteristic triangular shape, you can begin with a square or rectangular pattern piece and establish a center point along the lower edge. Draw diagonal lines from the upper sides toward that center point. The finished piece should resemble a wide triangle with enough additional fabric across the top to form the over-the-collar casing. Keeping the pattern symmetrical will help the bandana hang straight when worn.
Before cutting your favorite fabric, consider making a simple test version from inexpensive cotton. Slide the dog’s collar through the casing and check the proportions without placing anything restrictive around the dog’s neck. The bandana should lie naturally against the chest without interfering with walking, eating, or normal movement. Once the test size looks correct, save that template so additional over the collar dog bandanas can be produced quickly.
Step-by-Step Sewing Instructions for the Main Bandana
Begin by placing the fabric on a flat cutting surface and positioning your pattern carefully. If the print has a directional design, decide which direction should face upward on the finished bandana before cutting. This small detail matters with fabrics featuring animals, words, trees, flowers, or other motifs that clearly have a top and bottom. Cut accurately around the pattern so both sides of the triangle remain balanced.
Depending on your preferred construction method, the bandana can be made from a single piece with finished edges or from two fabric layers sewn together. A double-layer version produces a particularly polished appearance and gives the Dog Bandanas That Fit Over the Collar Pattern additional body. For this method, cut two matching pieces. You can use identical fabric for both sides or select coordinating fabrics to create a reversible accessory.
Place the two fabric pieces with their right sides facing each other. Align all edges carefully and secure them using pins or sewing clips. Sew around the triangular body using approximately a ¼-inch (6 mm) seam allowance, leaving an opening where needed for turning. Sew slowly near the lower point because an accurate seam here produces a sharper and more professional-looking tip once the piece is turned.
Before turning the fabric right side out, trim excess bulk around the corners without cutting through the stitching. At the bottom tip, carefully trim the seam allowance so the point can turn cleanly. Turn the bandana right side out through the opening. Use a point-turning tool or another blunt object gently to shape the corners. Avoid pushing aggressively because this can puncture the cotton or weaken the seam.
Pressing is one of the simplest ways to transform a homemade sewing project into something that looks professionally finished. Roll the seams gently between your fingers so they sit exactly at the edge, then press the entire triangular section flat. Fold the raw edges of the turning opening inward so they align with the surrounding seam. Pressing everything before topstitching will make the next step significantly easier.
Topstitch approximately ⅛ inch (3 mm) from the finished edges of the triangular section. This closes the turning opening while reinforcing the shape of the fabric dog bandana. Use a medium stitch length and guide the fabric slowly around corners. The visible stitching seen around the reference project’s edges provides both decoration and reinforcement, so maintaining an even distance from the edge creates a cleaner final appearance.
Creating the Over-the-Collar Channel and Professional Finish
The feature that defines this Dog Bandanas That Fit Over the Collar Pattern is the channel across the upper section. Instead of attaching ties, snaps, or elastic, you will create a fabric tunnel through which the dog’s normal collar can pass. Before sewing this channel permanently, place the collar against the fabric and confirm that your planned opening is sufficiently generous for the collar and its hardware.
Fold the upper section toward the back of the bandana to create the casing. The exact depth depends on the collar. If your collar is approximately 1 inch (2.5 cm) wide, a finished channel close to 1½ inches (3.8 cm) may work well, but bulkier buckles may require additional space. Press the fold firmly so the top edge remains straight and consistent across the entire width.
Pin or clip the folded section securely. Sew a straight line across the lower edge of the fold, forming the collar channel. Backstitch at both ends because these areas receive repeated stress whenever the collar is inserted or removed. Keep this seam straight because it will be clearly visible on the front of the bandana and contributes significantly to the professional appearance of the project.
Now test the channel using the actual collar. Feed one end of the collar through one side opening and continue until it emerges from the opposite side. The fabric should move smoothly without requiring excessive pulling. If the buckle cannot pass through, the casing is too narrow. Correcting the problem at this stage is much easier than discovering it after making several bandanas from the same template.
Once the collar is inserted, center the triangle along the length of the collar. The point should hang downward and the upper edge should remain relatively flat. If the bandana twists, inspect whether the casing was sewn evenly. If the triangle appears too long for the dog, shorten the pattern before making another version. These small adjustments allow you to create a genuinely customized over the collar bandana pattern.
Give the completed bandana a final press while taking care around synthetic collar components. Trim loose threads and inspect every seam. There should be no exposed pins, sharp objects, loose decorations, or threads that could become caught. Since the accessory is intended for an animal, simple construction is usually best. Always supervise pets when introducing a new wearable accessory and remove it if it interferes with comfortable movement.
Customization, Fabric Choices, Sizing, and Sewing Tips
Once you have created a reliable Dog Bandanas That Fit Over the Collar Pattern, making additional versions becomes surprisingly quick. You can trace the original template onto sturdy paper and label it with the dog’s size and compatible collar width. Keeping separate small, medium, and large templates is especially useful when sewing bandanas for multiple dogs or making handmade gifts.
Fabric choice can completely change the personality of this simple pattern. Floral cotton creates a cheerful everyday accessory, geometric designs provide a modern appearance, and seasonal prints are wonderful for special occasions. The green, gray floral, and blue fabrics visible in the reference image demonstrate how the exact same construction can produce dramatically different finished styles simply by changing the print.
You can also make a reversible dog collar bandana by choosing two coordinating fabrics. One side might feature a bright print while the reverse uses a subtle pattern. This essentially creates two looks from one accessory. When making reversible bandanas, select fabrics of similar weight so one side does not pull or distort the other after washing.
Accurate cutting is particularly important when producing several bandanas at once. A rotary cutter, acrylic quilting ruler, and cutting mat can help maintain straight edges and consistent dimensions. Stack fabrics only if you are confident that the layers will not shift. Otherwise, cutting each piece individually provides better precision and helps ensure the triangular points remain symmetrical.
Washability should also influence your material choices. Dogs naturally expose accessories to fur, dirt, moisture, and outdoor surfaces, so washable cotton is a practical option. Before laundering, remove the bandana from the collar. Follow the fabric manufacturer’s care recommendations and reshape the bandana while pressing if necessary. Regular cleaning keeps the handmade dog bandana looking fresh and comfortable.
Most importantly, prioritize fit rather than relying exclusively on labels such as small, medium, or large. Two dogs of similar weight can have very different neck proportions. Measure the actual collar and compare the bandana dimensions against the dog’s body. The accessory should decorate the collar without covering an excessive portion of the chest or restricting natural movement.
Frequently Asked Questions About Dog Bandanas That Fit Over the Collar Pattern
What is an over-the-collar dog bandana?
An over-the-collar dog bandana has a sewn fabric channel across its upper edge. The dog’s existing collar slides through this channel, allowing the triangular fabric portion to hang from the collar without requiring separate ties around the neck.
What fabric is best for a Dog Bandanas That Fit Over the Collar Pattern?
Quilting cotton is one of the easiest choices because it is lightweight, widely available, washable, and simple to sew. Medium-light woven cotton also works well. Avoid extremely heavy or stiff material that could make the bandana uncomfortable.
How do I determine the correct size?
Measure the dog’s collar and consider the dog’s neck and chest proportions. The width of the bandana should provide attractive coverage without overwhelming the dog, while the casing must accommodate the collar and its hardware comfortably.
How wide should the collar opening be?
The channel should be slightly larger than the collar’s widest section that needs to pass through it. Do not measure only the webbing if the buckle must also slide through the opening. Make a test casing when working with particularly large hardware.
Can this pattern be made reversible?
Yes. Cut two identical pieces from coordinating cotton fabrics and sew them with right sides together. After turning, pressing, and topstitching, either side can become the visible front depending on how you position the bandana.
Do I need a special sewing machine?
No. A standard domestic sewing machine with a straight stitch is generally sufficient. Cotton fabric is beginner-friendly, and this project does not require specialized equipment.
What seam allowance should I use?
A ¼-inch (approximately 6 mm) seam allowance works well for many versions of this project. The most important thing is to remain consistent around the entire piece so the finished shape stays symmetrical.
Can I make the bandana without a lining?
Yes. A single-layer bandana can be made by neatly hemming the raw edges before constructing the casing. However, a double-layer version often provides cleaner edges and additional structure, making it an attractive option for beginners who want a polished result.
Why does my bandana twist after I put it on the collar?
A twisted bandana can result from an uneven collar casing, inaccurate cutting, or fabric that stretched during sewing. Pressing carefully and maintaining consistent measurements on both sides usually helps prevent this problem.
Can I use fabric scraps for this project?
Absolutely. This Dog Bandanas That Fit Over the Collar Pattern is a useful scrap-friendly sewing project. As long as the remaining fabric is large enough for your pattern piece, small quantities of quilting cotton can be transformed into attractive dog accessories.
Should the bandana be removed for washing?
Yes. Removing it from the collar makes cleaning easier and protects collar hardware. Wash according to the fabric’s care instructions and press the bandana afterward if necessary to restore its crisp triangular shape.
Is this a beginner-friendly sewing pattern?
Yes. The project primarily involves measuring, cutting, straight seams, turning, pressing, and topstitching. Beginners can use it to practice basic sewing skills while creating a practical finished item.
How can I make several different sizes?
Create a master template for each size and write the compatible collar width directly on the paper pattern. You can then trace those templates whenever you need another bandana. Testing each size before producing multiples is a good way to maintain consistent results.
Can decorative elements be added?
Fabric appliqué or embroidery may be incorporated when securely constructed, but simple designs are often preferable for pet accessories. Avoid loose beads, buttons, dangling decorations, or other small components that could detach or become a hazard.
Conclusion
Creating a Dog Bandanas That Fit Over the Collar Pattern is an enjoyable way to combine practical sewing techniques with creative fabric choices. Starting with accurate measurements, you learned how to select and prepare cotton fabric, cut the triangular shape, sew the main body, trim and turn the seams, press the project carefully, add clean topstitching, and construct the essential collar channel.The biggest advantage of this design is its simplicity. Instead of tying another accessory around the dog’s neck, the finished dog bandana that fits over the collar works directly with the dog’s regular collar. Once you have adjusted the template for the correct collar width and body proportions, the same basic pattern can be repeated using countless colors, prints, and seasonal fabrics.
This project is also an excellent opportunity to practice accurate cutting, consistent seam allowances, careful pressing, and straight topstitching. Those basic skills are useful throughout sewing and quilting, while the small scale of the project makes it approachable for someone who is still gaining confidence at the sewing machine.If you make your own version of this Dog Bandanas That Fit Over the Collar Pattern, leave your sincere opinion about the project and share your suggestions. Tell us which fabric combination you would choose, what size worked best for your dog, and what changes you would make to personalize your next handmade bandana.