Welcome to your ultimate guide on creating a Double Fabric Bag- Tutorial, where we will explore everything you need to craft a stunning, durable, and highly functional accessory. Making your own double fabric bag is one of the most rewarding sewing projects you can undertake, whether you are a seasoned crafter or just starting out on your creative journey. This comprehensive guide is designed to walk you through every single step, ensuring you achieve a professional finish that looks like it came straight from a boutique.
Sewing a double fabric bag—often referred to as a fully lined tote—is a fantastic way to express your personal style while creating something incredibly useful. By using two layers of fabric, you not only hide all the raw edges inside the lining but also create a heavy-duty tote that can handle daily wear and tear. Throughout this Double Fabric Bag- Tutorial, you will learn how to select the right materials, cut your pieces accurately, assemble the structure, and add beautiful finishing touches that elevate your handmade creation.
The beauty of learning this technique lies in its incredible versatility and adaptability to different styles and needs. Once you master the basic steps of this reversible tote bag tutorial, you can easily customize the size, add internal pockets, or experiment with different handle lengths. We will dive deep into the best practices for handling various textile combinations, ensuring your final product is both beautiful and resilient. Let us gather our materials and dive straight into the wonderful world of high-quality, sustainable DIY fashion.
1. Choosing the Best Materials for Your Double Fabric Bag
Selecting the right textiles is the foundational step for a successful Double Fabric Bag- Tutorial experience. For the exterior, you want a sturdy material like cotton canvas, denim, or heavy linen that provides structure and durability. The lining, or the inner fabric, can be a lighter 100% cotton fabric, which allows you to introduce fun colors, intricate patterns, and a contrasting aesthetic when someone peeks inside.
Combining different weights of fabric requires a bit of planning to ensure the bag holds its shape perfectly over time. If your chosen exterior fabric is a bit too soft or lightweight, you can easily reinforce it using a high-quality fusible interfacing. Applying iron-on interfacing to the wrong side of the fabric pieces adds wonderful body and crispness without making the sewing process overly complicated.
Don’t forget to think about the functionality and daily use of your finished project when picking your colors and patterns. Darker colors or busy prints are fantastic for the bottom of the bag, as they naturally hide dirt and everyday stains much better than solid pastels. Mixing a bold, solid exterior with a whimsical, patterned lining creates a delightful visual surprise every time you open the bag.
The choice of handles is another critical element that affects both the overall look and the daily comfort of your tote. You can create custom fabric straps using matching remnants from your exterior material, or opt for pre-made cotton webbing straps for a modern, utilitarian look. Leather or faux-leather straps can also be attached after sewing to give your DIY project a luxury, high-end retail finish.
Before you cut into your beautiful new materials, it is highly recommended to pre-wash and iron all of your cotton fabrics. Pre-washing removes any manufacturing chemicals and prevents the fabrics from shrinking unevenly the first time you wash your finished handmade fabric bag. Ironing ensures that your measurements are incredibly precise, which is the secret key to achieving perfectly straight seams.
Lastly, assemble your essential sewing tools so everything is within arm’s reach before you begin the assembly. You will need a reliable sewing machine fitted with a sharp heavy-duty needle, high-quality polyester thread, a rotary cutter, a cutting mat, and plenty of sewing clips or pins. Having the right tools prepared saves time and ensures a smooth, highly enjoyable crafting session from start to finish.
2. Step-by-Step Cutting Guide and Layout Preparation
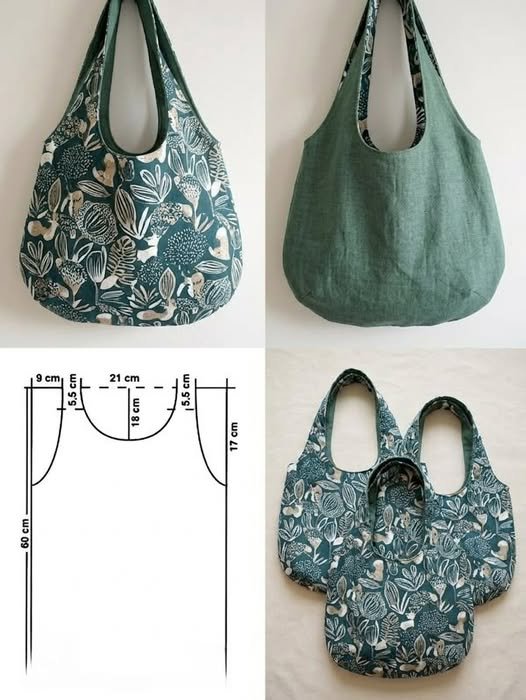
Accurate cutting is absolutely essential for ensuring that all the pieces of your Double Fabric Bag- Tutorial align flawlessly during assembly. To start, you will need to cut two identical rectangles from your exterior fabric and two identical rectangles from your lining fabric. A standard, highly versatile size for a daily tote is 15 inches wide by 17 inches tall, but you can adjust these dimensions to fit your specific needs.
If you decide to use fusible interfacing to give your bag extra structure, cut two pieces matching the dimensions of your exterior fabric. Lay the interfacing adhesive-side down onto the wrong side of your exterior fabric rectangles, and press firmly with a hot iron according to the manufacturer’s instructions. This quick step makes a massive difference in how professional and upright your finished tote will look.
Next, we need to prepare the straps for your custom double fabric bag if you are making them from scratch. Cut two long strips of fabric measuring 4 inches wide by approximately 28 inches long, which is an ideal length for a comfortable shoulder bag. If you prefer a shorter hand-held tote, you can easily reduce the length of these strap strips to 16 or 18 inches.
To construct the fabric straps, fold each strip in half lengthwise with the wrong sides together and press a sharp crease down the center. Open the strip back up, fold the two outer raw edges inward so they meet precisely at that center crease, and press again. Fold the entire strap in half one more time along the original crease, trapping the raw edges securely inside, and pin the layers together.
Topstitch along both long edges of the straps, keeping your stitches about 1/8 inch away from the edge for a clean, professional appearance. This dual line of topstitching not only looks beautiful but also adds significant structural strength to the handles, preventing them from stretching out under heavy loads. Set your completed straps aside safely while we prepare to assemble the main body of the bag.
Before moving to the sewing machine, take a moment to mark the placement of your straps on the right side of the exterior fabric. Measure in 4 inches from each side along the top edge of both exterior pieces, and place a small chalk mark or pin. Align the outer edges of your straps with these marks, making absolutely sure the straps are not twisted, and baste them in place.
3. Assembling the Exterior and Lining Pieces Flawlessly
Now we enter the core assembly stage of our Double Fabric Bag- Tutorial, where the structural shape truly begins to come to life. Place your two exterior fabric pieces right sides together, aligning all three outer edges perfectly, and secure them with sewing clips. Sew down both long sides and across the bottom edge using a standard 1/2-inch seam allowance, leaving the top edge completely open.
To give your bag a modern, professional flat bottom that stands up easily, we will create boxed corners at the base. Pinch the bottom corner of the bag so that the bottom seam aligns perfectly with the side seam, creating a sharp triangle shape. Measure across the triangle where it is 3 inches wide, draw a straight line with chalk, sew directly along that line, and trim away the excess fabric tip.
Repeat this exact boxing process on the other bottom corner of the exterior bag to ensure perfect symmetry and balance. Once both corners are securely boxed, turn the entire exterior bag right side out, carefully pushing the corners out with your fingers. Use your iron to press the side and bottom seams flat, creating a beautiful, crisp silhouette for your outer shell.
Next, we will assemble the lining pieces using a very similar method, but with one critical modification for turning the bag later. Place the two lining pieces right sides together and sew down the sides, but leave a 4-inch to 5-inch opening unsewn in the middle of the bottom edge. This open gap is absolutely essential, as it acts as the magic window through which we will pull the entire bag right side out.
Box the corners of your lining fabric exactly the same way you did for the exterior, matching the 3-inch width precisely. Do not turn the lining right side out; leave it with the wrong side of the fabric facing outward for the next step. Keeping the lining wrong-side out allows us to nest the two separate bags together perfectly for the final top seam assembly.
Take a moment to inspect your stitching on both pieces to make sure there are no dropped stitches or puckers along the seams. A strong foundational seam ensures your heavy-duty tote can carry heavy items like books, laptops, or groceries without any risk of tearing. With both the outer shell and the lining fully prepped, we are officially ready to join them together into one seamless piece.
4. Joining the Layers and Adding the Final Topstitch
This is the most exciting phase of the Double Fabric Bag- Tutorial, where the magic of the fully lined design happens. Take your right-side-out exterior bag and carefully slide it completely inside the wrong-side-out lining bag, making sure the right sides of both fabrics are touching. Align the side seams of both the exterior and lining perfectly, pinning or clipping them together around the entire top circular edge.
Ensure that the fabric straps are tucked down neatly between the two layers so they do not accidentally get caught in the top seam. Sew completely around the top raw edge of the nested bags using your machine’s free arm and a consistent 1/2-inch seam allowance. Take your time during this step, sewing slowly over the areas where the straps are attached to ensure maximum stitch accuracy.
Once the top edge is fully sewn, locate the open gap that you left in the bottom seam of the lining fabric. Reach your hand inside the gap, gently grab the exterior fabric, and carefully pull the entire bag through the opening. This process, often called “birthing the bag,” reveals a perfectly clean, enclosed structure with all raw edges neatly hidden inside the lining.
Tuck the raw edges of the lining opening inward so they align with the rest of the bottom seam, and press flat with an iron. You can close this opening by topstitching very close to the edge with your machine, or use a hand-sewn blind stitch for an invisible finish. Once the opening is closed, push the entire lining down inside the exterior shell of your beautiful new tote.
Use your iron to press the top edge of the bag thoroughly, rolling the seam slightly toward the inside so the lining doesn’t peek out. Pin the crisp top edge in place to prepare for the final, most crucial round of functional topstitching. A beautiful topstitch provides a high-end retail look and keeps the lining from shifting around when you use the bag.
Topstitch all the way around the top edge of your tote, about 1/4 inch down from the folded edge, using a slightly longer stitch length. For extra strength and durability, you can add a second line of topstitching about 1/2 inch below the first one. Your stunning, durable, and professional double fabric bag is now completely finished and ready to be used with pride or gifted to a loved one!
Frequently Asked Questions
What are the best fabric combinations for a double fabric bag?
The most successful combinations utilize a sturdy woven fabric for the exterior and a lighter, smoother fabric for the lining. Excellent exterior choices include canvas, denim, duck cloth, and heavy upholstery linen because they provide structural integrity. For the interior lining, quilter’s cotton, poplin, or linen blends work beautifully because they add minimal bulk while offering endless color and pattern options.
Do I really need to use fusible interfacing for this project?
While it is not strictly mandatory, using a high-quality fusible interfacing is highly recommended if you want a bag that holds its shape when empty. If you are using lightweight fabrics like standard cotton for both the outside and inside, interfacing is essential to prevent a floppy, unstructured look. It adds a wonderful crispness, increases the overall durability of the seams, and helps the bag stand upright.
Can I add interior pockets to this specific bag design?
Absolutely! Adding internal pockets is a fantastic way to upgrade your tote and keep small items like keys, phones, and lip balms organized. You should sew your custom pockets onto the right side of one or both lining fabric pieces before you assemble the lining bag. This ensures that all the pocket attachment seams are completely hidden inside the completed bag structure.
How do I properly wash and care for my handmade tote?
Care instructions depend heavily on the specific fabrics you chose, but most cotton-based bags can be easily machine washed. Wash your tote on a gentle cycle with cold water to preserve the vibrant colors and prevent any unexpected fabric shrinkage. Avoid tumble drying on high heat; instead, reshape the bag while damp and hang it to air dry, followed by a quick press with a hot iron.
What size needle should I use on my sewing machine?
Because you will be sewing through multiple layers of heavy fabric and thick straps, a standard universal needle might bend or break. It is best to use a specialized Denim/Jeans needle (size 90/14 or 100/16) or a heavy-duty Universal needle. These needles feature a sharper point and a reinforced shaft designed to pierce dense layers easily without skipping stitches.
Is this sewing project suitable for absolute beginners?
Yes, this project is one of the absolute best patterns for intermediate beginners who want to transition from basic projects to structured items. It introduces fundamental techniques like boxing corners, creating custom straps, working with linings, and executing precise topstitching. Because the cuts are basic geometric rectangles, it is highly forgiving and builds tremendous confidence for future sewing endeavors.
Conclusion
In this comprehensive Double Fabric Bag- Tutorial, we have covered every essential step required to design, cut, and assemble a gorgeous, professional-quality tote bag from scratch. From selecting complementary textiles and applying structural interfacing to boxing corners and executing flawless topstitching, you now possess the core skills to create unlimited variations of this classic accessory.
This project beautifully demonstrates how thoughtful planning and proper techniques can transform simple pieces of fabric into a durable, stylish, and highly functional item for everyday use.