
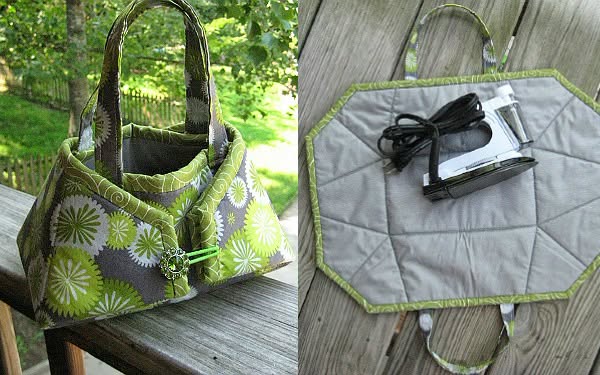
Fabric Iron Storage Bag Pattern is a practical sewing project that combines safe organization, portability, and an attractive handmade finish in one clever design. Inspired by the project shown in the photo, this type of bag opens completely flat to create a padded surface for temporarily placing an iron and then folds upward into a convenient carrying or storage bag. It is especially useful in a sewing room, quilting area, craft class, or retreat where keeping tools organized can make the entire creative process more comfortable. The generous fabric panels also provide a wonderful opportunity to feature a favorite print while practicing useful sewing techniques such as quilting, binding, topstitching, and handle construction.
One of the most interesting features of this Fabric iron storage Bag Pattern is its convertible construction. Instead of sewing a traditional rectangular tote, you begin with a large layered fabric shape that can lie flat when opened. The center area is padded, while strategically positioned sides fold upward around the iron. Handles are attached near opposite edges so that, once the sides are brought together, the project becomes a compact bag. A closure at the front helps keep everything together. This construction makes the pattern appealing even for sewists who already own several ordinary storage bags because it offers a different approach to organizing an everyday sewing tool.
Before starting, remember that a handmade fabric iron bag should primarily be treated as a storage and transportation accessory. A household iron should be switched off, unplugged, and allowed to cool according to its manufacturer’s instructions before being enclosed inside fabric. Ordinary cotton fabric, batting, thread, elastic, and decorative materials should never be assumed to be heatproof. If you want to incorporate a specialty heat-resistant layer, select a material specifically manufactured and labeled for that purpose and follow its directions carefully. With that sensible precaution in mind, this project can become a beautiful addition to your sewing space and a satisfying weekend sewing project.
Materials, Measurements, and Planning the Fabric Iron Storage Bag
For a medium-sized Fabric iron storage Bag Pattern, begin with approximately 1 yard (0.9 m) of quilting cotton for the exterior and about 1 yard (0.9 m) for the lining. You will also need batting or another suitable stabilizing layer, coordinating sewing thread, binding fabric, fabric for the handles, and your preferred closure. A small button with an elastic loop, fabric loop, or simple tie closure can reproduce the decorative appearance seen in the inspiration photo.
A useful starting size for the main body is approximately 22 x 22 inches (56 x 56 cm). This is intentionally generous because the finished piece must accommodate the iron while leaving enough material around it to fold upward. Since irons vary considerably in size, measure your cooled iron from front to back, across its widest point, and from the base to the top of the handle before cutting anything.
Cut one main piece from the exterior cotton and another matching piece from the lining. Cut the batting slightly larger than these pieces if you prefer to quilt first and trim afterward. A square can be used as the starting shape, but trimming the corners creates the attractive multi-sided appearance visible in the photo. Cutting approximately 4–5 inches (10–13 cm) diagonally from each corner is a practical starting point.
Create a paper template before cutting your favorite fabric. Draw the full-sized square, mark the center, and place the cooled iron over the paper. Draw a generous imaginary boundary around the iron, then experiment with folding the surrounding paper upward. This simple test helps determine whether your particular iron requires a larger or smaller sewing pattern and reduces the chance of wasting fabric.
For the handles, cut two strips approximately 4 x 18 inches (10 x 46 cm). Fold each strip lengthwise with right sides together, stitch along the long edge, turn right side out, press, and topstitch. Alternatively, fold the raw long edges toward the center and then fold the entire strip in half. This second method creates a sturdy four-layer fabric handle without requiring you to turn a narrow tube.
The key terms in this project are easy to understand. Fabric iron storage Bag Pattern refers to the overall template and construction instructions used to create the convertible carrier. A fabric iron bag is the finished storage piece, while quilting describes the stitching that secures the outer fabric, padding, and lining together. Binding is the narrow fabric strip covering the raw outer edge, giving the project a clean and professional finish.
Creating and Quilting the Main Padded Body
Begin construction by pressing all cotton fabric before cutting. Place the exterior fabric with its wrong side against the batting, then position the lining on the opposite side so the batting is sandwiched between the two fabrics. Smooth the layers carefully from the center toward the outside. Temporary fabric clips, safety pins, or another sewing-appropriate basting method can help prevent shifting during quilting.
The inspiration project uses simple diagonal quilting, which is an excellent choice for beginners. Using a removable fabric marker and ruler, draw diagonal guidelines across the main panel approximately 3–4 inches (7.5–10 cm) apart. Sew along each guideline with a regular straight stitch. Turn the piece and repeat in the opposite direction if you want a diamond-style quilted surface.
Work gradually while quilting the iron storage bag. Start near the center and move toward the outer edges whenever practical. Avoid pulling or stretching the fabric as it travels beneath the presser foot because this can distort the shape. After quilting, place the paper template back over the panel and trim all layers evenly. At this point, the multi-sided silhouette should become much more obvious.
Next, test the folding arrangement before attaching any permanent hardware. Place the completely cool iron approximately in the center of the lining side. Bring two opposite portions of the panel upward and then experiment with the remaining sides. The goal is to create a soft bag shape with sufficient room around the iron rather than forcing the fabric tightly against it.
Once you are happy with the proportions, mark the positions for both handles. They should sit on opposite sides of the Fabric iron storage Bag Pattern so they meet naturally when the panel is folded. Pin or clip the handles temporarily and lift the empty project. If it hangs unevenly, reposition the handles before sewing. Small adjustments at this stage can dramatically improve the finished appearance.
Stitch the handle ends securely to the quilted body, keeping their attachment areas away from the final binding seam. A reinforced rectangle or box-shaped stitching pattern provides additional stability. Make certain the handles are not twisted before stitching the second end. Because an iron has significant weight, sturdy construction is more important than decorative stitching in these attachment areas.
Before moving forward, inspect the entire quilted panel. Check that the layers remain smooth, the edges match, and all handle ends are firmly secured. Trim loose threads and correct any puckered areas that can easily be repaired. Careful preparation produces a handmade iron storage bag that looks much cleaner after the binding and closure are added.
Binding, Handles, and the Convertible Bag Construction
Binding provides the polished border visible around the open mat in the photo. Cut fabric strips approximately 2½ inches (6.4 cm) wide and join enough strips to travel around the entire perimeter. Press the continuous strip in half lengthwise with wrong sides together. This creates a traditional double-fold quilt-style binding that is durable enough for a frequently handled sewing accessory.
Starting along a relatively straight section, align the raw edges of the folded binding with the raw edge of the quilted panel. Sew slowly around the perimeter. The angled corners require a little patience; stop with the needle down when necessary, reposition the binding, and continue while keeping the edge smooth. Avoid stretching the strip excessively, as this can make the finished mat curl.
Fold the binding around to the opposite side, covering the first stitching line and all raw fabric layers. Secure it with clips and finish by machine or hand. Machine topstitching is faster and particularly practical for a working fabric storage bag, while hand stitching can create a more traditional quilted appearance. Either method is appropriate as long as the binding remains secure.
Now test the handles again. Fold the sides toward the center and bring both handles together. The structure should naturally transform from a flat padded panel into a bag-like shape. If the sides remain too open, small fabric tabs or additional closures can be added at strategic points. The exact placement depends on the dimensions and shape of your particular iron.
To recreate the decorative front shown in the inspiration project, make a small elastic or fabric loop on one folding edge and sew a sturdy button on the corresponding section. When the sides are folded together, stretch the loop around the button. Another option is to make narrow fabric ties. Whatever closure you select, position it so that it organizes the fabric without placing unnecessary pressure on the iron.
Perform a final fit test only with the iron completely switched off, unplugged, and cool. Place it in the center, fold the sections upward, fasten the closure, and bring the handles together. Check that the iron does not push excessively against the seams. If everything closes comfortably, the basic Fabric iron storage Bag Pattern construction is complete.
Finishing Details, Customization, and Useful Sewing Tips
A final row of topstitching can make a significant difference to the finished project. Stitch approximately ⅛ inch (3 mm) from selected edges of the handles or binding where appropriate. This provides definition and helps prevent fabric layers from shifting during regular use. Choose a thread that coordinates with the print for a subtle look or contrasting thread when you want the quilting itself to become a decorative feature.
Cotton quilting fabric works particularly well because it is easy to cut, press, quilt, and bind. Medium-scale floral, geometric, or traditional quilting prints can produce a result similar to the green patterned bag shown in the photo. The lining can be neutral or contrasting. Coordinating the binding with one color from the exterior print is an easy way to create a professional-looking sewing storage bag.
You can also modify the dimensions. For a compact travel iron, try reducing the starting panel after creating a paper prototype. For a larger household iron, increase the main panel dimensions. Always preserve enough surrounding fabric for the sides to overlap appropriately. It is better to make a prototype slightly too generous than to discover after quilting that the carrier cannot close.
One common mistake is choosing dimensions based entirely on another person’s finished bag. The dimensions given here are a useful starting point rather than a universal size because iron designs differ. Another common mistake is attaching the handles permanently before testing how the sides fold. Pinning everything temporarily and performing an empty test assembly can prevent both problems.
Another important consideration is the padding. Standard quilt batting gives the project structure and the soft appearance seen in the photograph, but it does not automatically make the bag suitable for enclosing a hot appliance. Heat-resistant fabric and ordinary batting are different products. If heat protection is an intended feature, use materials specifically rated for that application and follow their manufacturer’s temperature and layering instructions.
Finally, personalize your Fabric iron storage Bag Pattern with details that make sense for your sewing routine. You might add a small exterior pocket for a cool detachable accessory, embroider a name on the exterior before assembling the layers, use patchwork for the outer panel, or make matching accessories from leftover fabric. Functional handmade projects are particularly rewarding when their dimensions, colors, and features are adapted to the person who will actually use them.
Frequently Asked Questions About the Fabric Iron Storage Bag Pattern
What is a Fabric iron storage Bag Pattern?
It is a sewing pattern designed to create a fabric carrier for storing or transporting an iron. This particular style is convertible: the main padded body opens into a large flat panel and folds upward to form the storage bag.
What size should I make the main fabric panel?
A starting size of approximately 22 x 22 inches (56 x 56 cm) works for experimenting with many medium-sized irons. However, you should measure your own iron and make a paper prototype before cutting fabric because dimensions vary significantly between models.
Can beginners make this project?
Yes. A confident beginner who can sew straight seams, quilt simple lines, make handles, and apply binding should be able to complete it. The angled perimeter may require slightly more patience than a basic rectangular sewing project.
How much fabric will I need?
Approximately 1 yard (0.9 m) each of exterior and lining fabric provides comfortable working room for a medium project, although the exact amount depends on the desired size, fabric width, handle length, binding method, and whether directional prints are being used.
What type of fabric works best?
Quality quilting cotton is an excellent option for the exterior and lining because it is stable and easy to sew. Avoid assuming that ordinary decorative fabric provides thermal protection simply because the finished project contains multiple layers.
Can I put a hot iron directly inside the bag?
Do not assume an ordinary handmade fabric bag is safe for a hot iron. Switch off and unplug the appliance and allow it to cool according to the iron manufacturer’s instructions before enclosing it. If your project requires thermal protection, use appropriately rated specialty materials according to their instructions.
Why does the project need batting?
Batting gives the fabric iron bag softness, body, and structure. Quilting the batting between the exterior and lining also creates the padded appearance visible in the finished project.
Can I use insulated material instead of regular batting?
You may incorporate specialty materials that are specifically manufactured for the intended application, but their construction requirements vary. Follow the product manufacturer’s directions rather than assuming all insulated materials offer the same temperature resistance.
How do I keep the bag from opening during transportation?
A button-and-loop closure, fabric ties, or another suitable sewn closure can hold the folded sections together. The handles should also be positioned so the sides naturally pull upward when the bag is carried.
Can I wash the finished iron storage bag?
That depends on every material used in the project. Prewash washable cotton if desired and check the care instructions for batting, insulated layers, closures, and decorative elements before laundering the completed bag.
Can I make the pattern larger?
Absolutely. Measure the iron and enlarge the main template while maintaining generous folding sections around the center. Creating a paper prototype first is the easiest way to determine whether the new dimensions work.
What seam allowance should I use?
A ¼-inch (6 mm) seam allowance works well for many quilting operations. Handle construction may use approximately ¼–⅜ inch (6–10 mm), depending on your preferred method. Consistency is more important than choosing an unusually large seam allowance.
How can I make the bag look more professional?
Accurate cutting, even quilting lines, carefully applied binding, reinforced handles, consistent topstitching, and neatly trimmed threads will significantly improve the result. Press the fabric during each stage rather than waiting until the entire project is finished.
Can scraps be used for this pattern?
Yes. A patchwork exterior is a wonderful variation. Join scraps into a panel slightly larger than your template, press the seams, and then treat the completed patchwork panel exactly as you would a single piece of exterior fabric.
What other colors would work for this project?
Almost any coordinated quilting palette can be attractive. Green and gray create a calm appearance similar to the inspiration photo, while navy and cream, red and white, floral pastels, black and gray, or colorful scrap fabrics can completely transform the personality of the same Fabric iron storage Bag Pattern.
The Fabric iron storage Bag Pattern is an enjoyable way to combine quilting and practical sewing in one useful project. Starting with exterior fabric, lining, and padding, you can create a generously sized multi-sided panel, quilt the layers together, construct reinforced handles, finish the perimeter with binding, and add a simple closure that allows the flat panel to transform into a convenient storage bag. Measuring your own iron and testing the dimensions with a paper prototype are two of the most important steps because they allow the finished project to fit comfortably rather than relying on a one-size-fits-all measurement.
This project also offers plenty of room for creativity. Different fabrics, quilting designs, bindings, closures, patchwork panels, and decorative details can turn the same basic construction into something completely personal. Most importantly, remember to treat an ordinary cotton version as a storage project and allow the iron to cool before enclosing it unless appropriately rated specialty materials have been incorporated according to their instructions. If you make your own Fabric iron storage Bag Pattern, leave your sincere opinion about the project and share your suggestions for colors, measurements, closures, or creative variations you would like to try next.