Easter Basket Handle Tutorial for Button Boats – Pattern projects have become increasingly popular among crafters who enjoy adding a handmade touch to their spring and Easter celebrations. In this article, the keyword is included naturally from the very first line to ensure strong SEO optimization while maintaining a welcoming, humanized tone. Creating an Easter Basket Handle Tutorial for Button Boats – Pattern allows you to personalize your Easter baskets with unique, decorative handles that are both functional and visually charming. Whether you are preparing for an Easter egg hunt, decorating your home, or crafting gifts, this tutorial brings creativity and practicality together.
The idea behind Button Boats—small, adorable fabric or craft-based containers—and their customizable basket handles is that they can transform simple Easter baskets into delightful, personalized pieces. The handle itself becomes a design focal point, and with the right pattern, it can be sturdy, decorative, and perfectly matched to your Easter theme. Crafters of all skill levels appreciate how accessible and enjoyable this project is.
Before we begin, it’s important to recognize how versatile this craft can be. The Easter Basket Handle Tutorial for Button Boats – Pattern can be adapted for modern, rustic, minimalist, or colorful designs. With just a few materials, you can elevate the look of your Easter baskets and create something durable enough to last year after year. This guide will walk you through everything you need, from materials and instructions to creative ideas and practical tips.
1. Materials Needed for the Easter Basket Handle Tutorial for Button Boats – Pattern
To start your Easter Basket Handle Tutorial for Button Boats – Pattern, gather the right materials. Most crafters prefer sturdy fabrics such as cotton, canvas, or felt for the handle. These materials offer structure and durability, ensuring your basket handle stays firm even when carrying eggs or small gifts.
You will also need interfacing or batting. Interfacing adds strength and keeps the handle from folding or twisting, while batting provides a slightly softer, padded feel. Choose according to the look and functionality you want to achieve.
A sewing machine simplifies the assembly process, but hand-sewing is also suitable. Many crafters who enjoy slow stitching find this step relaxing and rewarding. Whether you choose machine or hand-sewing, a strong thread is essential to maintain the integrity of the handle.
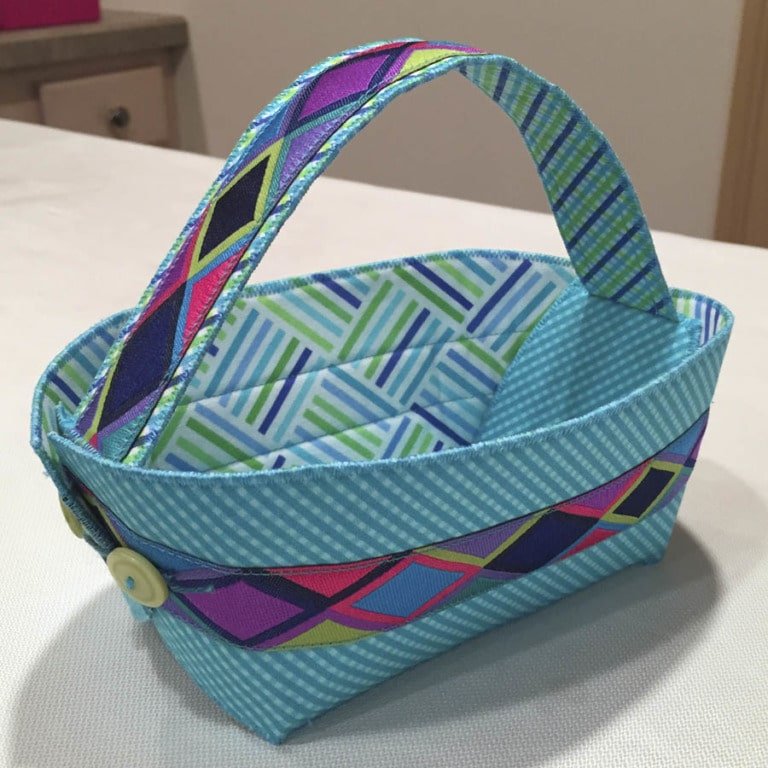
For embellishments, gather supplies such as buttons, ribbons, lace, or embroidery thread. These decorations enhance the Button Boats theme by tying in matching accents and adding charm to the finished handle.
You will need a measuring tape or ruler to ensure consistent length and width measurements. Handle sizes may vary depending on the basket design, so accurate measurements help achieve a perfect fit.
Lastly, prepare basic tools such as scissors, pins, fabric clips, and an iron. Pressing the handle at each stage ensures smooth edges and a clean, professional finish.
2. Step-by-Step Instructions for the Easter Basket Handle Tutorial for Button Boats – Pattern
Begin by measuring the width of your basket. A good handle length typically spans from one side of the basket to the other with enough height for comfortable carrying. Add a few extra inches to allow for secure attachment points. These measurements form the foundation of your Easter Basket Handle Tutorial for Button Boats – Pattern.
Next, cut your fabric according to the measurements. If you want a thicker handle, cut two identical fabric strips and a strip of interfacing or batting. Layer the pieces together, making sure everything aligns neatly. The interfacing should sit between the fabric layers if you want added firmness.
Fold the fabric strips lengthwise with right sides facing each other, then sew along the edge, leaving the ends open. This step creates a clean, tube-like structure for your handle. Turn the fabric right side out and press it flat with an iron to maintain a crisp shape.
Insert the interfacing or batting if you have not already sewn it inside. This stuffing reinforces the structure without making the handle too rigid. Smooth out any wrinkles by gently adjusting the internal layer before pressing again.
Add top-stitching along both sides of the handle. Top-stitching not only strengthens the handle but also gives it a decorative, finished look. Many crafters incorporate contrasting thread colors that complement their Button Boats design.
Finally, attach the handle to the basket using strong stitches, fabric glue, or sewn loops depending on the basket’s structure. Secure attachment ensures your Easter Basket Handle Tutorial for Button Boats – Pattern stays durable and reliable during use.
3. Decorating and Customizing Your Easter Basket Handle Tutorial for Button Boats – Pattern
One of the most enjoyable parts of crafting an Easter Basket Handle Tutorial for Button Boats – Pattern is the opportunity to decorate and personalize your creation. Start by adding buttons that reflect the Button Boats theme. You can sew them along the sides of the handle or cluster them at the base for a fun touch.
Ribbon accents can be woven around the handle for a playful, colorful effect. Soft pastel ribbons are ideal for Easter, but bold colors also make the handle stand out beautifully. You can tie small bows along the length or attach one elegant bow in the center.
Embroidery is another charming option. Simple floral motifs, initials, or Easter-themed designs like chicks or eggs can give your handle a handcrafted and meaningful appearance. Hand-stitched details often become the highlight of the Easter Basket Handle Tutorial for Button Boats – Pattern.
Fabric paint is great for adding patterns, names, or decorative borders. If crafting for children, consider writing their names on the handle to make each basket unique and personal.
You can also add lace or crochet trim to soften the look and give the piece a delicate feel. This is especially beautiful for vintage-inspired or rustic Easter themes.
Finally, try coordinating the handle with the design of your Button Boat or basket lining. Matching fabrics, colors, or embellishments create a cohesive and professional-looking finished piece.
4. Tips for Using, Maintaining, and Storing Your Easter Basket Handle Tutorial for Button Boats – Pattern
Once your Easter Basket Handle Tutorial for Button Boats – Pattern is complete, think about how to use it effectively. For Easter egg hunts, make sure the handle is securely attached so it can support the weight of collected eggs or treats. A reinforced handle ensures safety and comfort.
If you are gifting the basket, consider adding tissue paper, chocolates, or small trinkets inside. The decorative handle will enhance the presentation and make the basket feel extra special. Handmade touches often become memorable keepsakes.
To maintain your handle’s shape, avoid exposing it to excessive moisture. If you used fabric glue or embellishments, moisture could weaken the adhesive or cause fraying. Store the basket in a dry, cool place.
If the fabric becomes wrinkled during storage, lightly steam or press the handle before using it again. A quick iron refresh will restore its structure and make it look brand new.
For long-term use, check the handle occasionally for loose stitches or buttons. Repairing small issues promptly prevents wear and tear from spreading and keeps your Easter Basket Handle Tutorial for Button Boats – Pattern looking fresh.
When storing, avoid placing heavy items on top of the handle. This helps maintain its shape and extends the life of your handmade Easter accessory.
FAQ – Easter Basket Handle Tutorial for Button Boats – Pattern
1. Is the Easter Basket Handle Tutorial for Button Boats beginner-friendly?
Yes, the process is simple and suitable for beginners with basic sewing skills.
2. What fabric works best for the handle?
Cotton, felt, or canvas provide strength and durability.
3. Do I need interfacing?
Interfacing is recommended for added firmness, but you can skip it for a softer handle.
4. Can I decorate the handle?
Absolutely—buttons, ribbons, embroidery, lace, and fabric paint are all great options.
5. What length should the handle be?
Most handles range between 12–18 inches depending on the basket size.
6. Can I attach the handle without sewing?
Yes, strong fabric glue or pre-made loops can be used, though sewing provides the best hold.
7. Can children help with this craft?
Yes, with adult supervision—especially for cutting and sewing steps.
8. How do I clean the handle?
Spot cleaning is recommended to protect embellishments.
9. Can I reuse the basket each year?
Yes, a well-made handle can last for many Easter seasons.
10. Can I make multiple matching handles?
Yes, using the same pattern makes it easy to create coordinated sets.
Conclusion
This complete guide has shown you how to create a beautiful and functional Easter Basket Handle Tutorial for Button Boats – Pattern, from materials and step-by-step instructions to decorating ideas and maintenance tips.
This project is fun, creative, and perfect for elevating your Easter celebrations with handmade charm. I hope this tutorial inspires you to craft your own decorated basket handles.