The 3D Cube Block Quilt – Pattern is one of the most visually captivating and rewarding quilting designs you can create. Known for its optical illusion effect, this pattern makes flat fabric appear to leap off the quilt in a three-dimensional cube form. It’s the perfect blend of geometry, precision, and creativity—bringing both modern style and traditional quilting techniques together into one striking result.
What sets the 3D Cube Block Quilt – Pattern apart is its clever use of color value and contrast. By strategically placing light, medium, and dark fabrics, quilters create the illusion of depth and shadow, giving the appearance that the cubes are popping out or sinking into the quilt. While it may look complex at first glance, this block is very approachable with the right techniques and guidance.
In this article, you’ll learn everything you need to know to start and finish a 3D Cube Block Quilt – Pattern with confidence. From materials and cutting techniques to layout tips and creative variations, we’ll walk you through each stage. We’ll also include answers to frequently asked questions and a helpful conclusion to summarize what you’ve learned.
1. What is the 3D Cube Block Quilt – Pattern?
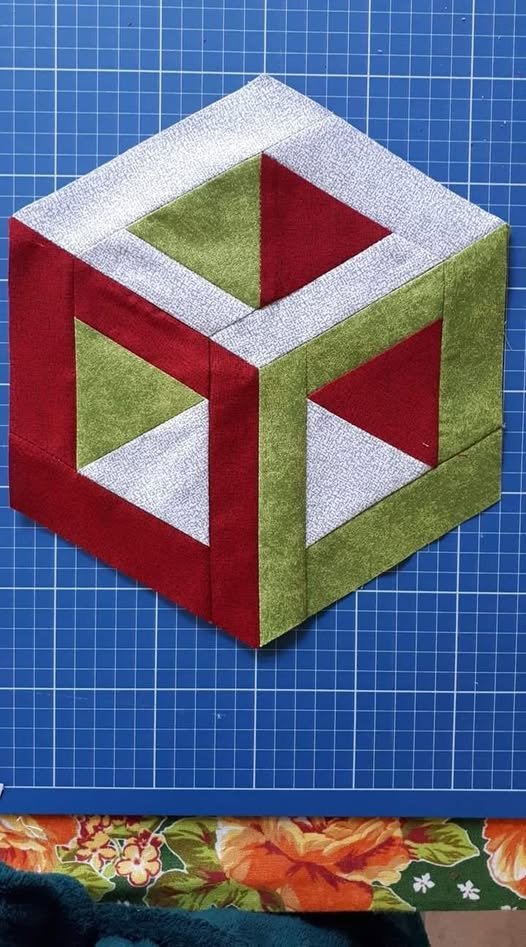
The 3D Cube Block Quilt – Pattern is a traditional yet eye-catching design that creates an illusion of cubes popping out from a flat surface. This pattern is often called the “Tumbling Blocks” quilt in vintage patterns, but it’s also widely known today for its 3D visual appeal using hexagon-based blocks.
Each cube is formed from three diamond-shaped fabric pieces—light, medium, and dark—arranged in a way that tricks the eye into seeing a dimensional cube. When multiple blocks are stitched together, they create a field of interlocking 3D shapes that appear to rise and fall from the surface of the quilt.
Despite its optical illusion, the pattern is fundamentally built on straight-line piecing. There are no curves involved, and with the help of accurate cutting tools, even beginner quilters can achieve stunning results. The key lies in fabric selection and precise alignment of pieces.
The 3D Cube Block Quilt – Pattern can be used in a variety of quilt sizes and projects. From baby quilts and lap throws to large bedspreads or even wall hangings, the cube design scales beautifully without losing its visual impact.
Many quilters enjoy the mathematical and logical nature of this pattern. It appeals to those who like puzzles and structured layouts but also allows room for color play and creative expression through fabric choices.
Whether you want a modern black-and-white cube layout or a colorful rainbow block effect, this quilt pattern adapts easily to any palette or style. It’s both a challenge and a masterpiece—and definitely a conversation starter once completed.
2. Materials and Tools Needed
To begin your 3D Cube Block Quilt – Pattern, it’s important to have the right materials and tools prepared. Accuracy is everything in this quilt, so investing in proper cutting supplies and quality fabric will make a significant difference in your final results.
Start with quilting cotton in three values: light, medium, and dark. These three tones will be used repeatedly in each cube to create the 3D effect. Solid fabrics work best when learning, as patterns can distract from the depth illusion, but experienced quilters may enjoy experimenting with prints or textures.
You’ll also need a diamond quilting ruler or a 60-degree triangle ruler, which are essential for cutting precise diamond shapes. If you don’t have these, a protractor and standard rotary cutter can also do the job with some extra measuring effort.
Choose high-quality thread in a neutral or matching tone for piecing. A fine thread helps reduce bulk at seams and blends into your fabric, giving your quilt a more polished look. Consider using a ¼” quilting foot on your sewing machine to keep your seam allowances consistent.
Your batting should be thin to medium loft. A thicker batting may distort the crisp look of the 3D cubes. Use a backing fabric that complements your front fabrics, especially if you plan to do visible quilting patterns that add dimension from the back.
Don’t forget essential tools like pins or fabric clips, a rotary cutter, self-healing mat, iron, and pressing surface. Pressing is crucial in this pattern—every seam should be neatly flattened to keep your cube shapes sharp and aligned.
Before starting, it’s a good idea to create a test block. This helps you understand how the pieces come together and allows you to practice matching points before committing to a full quilt layout.
3. How to Assemble the 3D Cube Block Quilt
Creating the 3D Cube Block Quilt – Pattern starts with cutting and arranging diamond shapes. Each cube requires three diamonds, each from a different fabric value—light, medium, and dark—to mimic light hitting different sides of a cube.
Begin by cutting all diamonds using your 60-degree ruler. Make sure the angles are accurate and the edges are clean. Even small errors can throw off the alignment when multiple blocks are joined together, so take your time.
Next, arrange the diamonds in a Y-shape, with the dark diamond on the left (shadow), the medium diamond on the right (side), and the light diamond on top (top of the cube). This layout is crucial for creating the illusion of a 3D cube.
Sew the three diamonds together in rows of three. It’s important to not stretch the bias edges while sewing, as diamonds have two sides cut on the bias and can easily become distorted. Pin at the intersections carefully to keep points sharp.
Once you have several cubes assembled, begin sewing them together. Match the edges of each Y-shaped cube carefully, ensuring that the cube shapes continue to align in the correct direction. Press your seams consistently to one side or open, depending on how the pattern lays best.
Depending on your chosen layout, you might sew the cubes into rows and then join the rows together, or you can work in columns. Some layouts require setting triangles or partial cubes to fill in the edges and create a straight border for binding.
After assembling the quilt top, layer with batting and backing, baste, and quilt as desired. Straight-line quilting or echoing the cube shapes can enhance the 3D effect. Finish by attaching the binding and giving your quilt a final press.
4. Creative Variations and Design Ideas
The 3D Cube Block Quilt – Pattern offers countless creative possibilities once you understand the basics. You can modify color schemes, layout styles, and even add unique embellishments to make your quilt truly one-of-a-kind.
Try a monochromatic cube layout, where all cubes are made from different shades of a single color, like various blues or grays. This creates a sleek, modern aesthetic that still retains the dimensional cube illusion.
For a bold look, consider using rainbow fabrics and a black or dark background. This contrast makes the cube shapes pop even more, giving the quilt a dramatic, graphic appearance perfect for wall art or contemporary décor.
If you want a softer or more playful approach, use pastel colors or low-volume prints. This works well for baby quilts or gifts where a gentler look is desired without sacrificing the geometric interest.
Some quilters like to incorporate fussy cutting—cutting fabric so a specific image appears inside the cube. This technique can add novelty or storytelling elements to your quilt, especially if using fabric with characters or motifs.
You can also adapt the 3D Cube Block Quilt – Pattern for smaller projects like table runners, pillows, or tote bags. These are excellent ways to practice the design and make use of leftover blocks or scraps.
Advanced quilters might experiment with asymmetrical layouts, curved elements, or mixing cube blocks with other block styles. While the pattern itself is structured, it provides a great foundation for creative exploration.
FAQ – Frequently Asked Questions
Q1: Is the 3D Cube Block Quilt – Pattern suitable for beginners?
Yes, it can be. While the visual effect looks complex, the sewing involves basic straight seams and accurate cutting. Beginners can practice with a small number of blocks before committing to a full quilt.
Q2: What is the best way to choose fabrics for this pattern?
Use three fabric values: light, medium, and dark. This contrast is what creates the 3D effect. Solids work best for beginners, but prints can also be used creatively once you’re comfortable with the block.
Q3: How do I prevent the fabric from stretching during sewing?
Handle the diamond shapes carefully, as two edges are cut on the bias. Use plenty of pins, sew slowly, and avoid pulling the fabric. Press gently without dragging the iron.
Q4: Can I use pre-cuts for this pattern?
Pre-cuts like fat quarters work well for this quilt. Just make sure the size is large enough to cut full diamonds with your template or ruler.
Q5: How should I quilt the finished 3D cube quilt?
Straight-line quilting that echoes the shapes of the cubes works beautifully. Stitching in the ditch or outlining each cube enhances the 3D illusion even more.
Q6: Can I mix the cube block with other quilt blocks?
Absolutely! The cube blocks pair well with solids, stars, or geometric patterns. Use them as a focal point or border to add visual depth to your quilt design.
Conclusion
The **3D Cube Block
Quilt – Pattern** is an extraordinary blend of visual illusion, precise technique, and artistic creativity. With the right fabric choices and careful assembly, you can create a quilt that amazes viewers and brings endless satisfaction to the maker. Whether you’re crafting a cozy throw, a stunning wall piece, or a thoughtful gift, this pattern delivers style and substance in equal measure.
We hope this guide has inspired you to try the 3D Cube Block Quilt – Pattern for your next quilting project. If you’ve made one before or plan to start soon, please leave your honest opinion and suggestions below. We’d love to hear your experiences and see how you bring this incredible pattern to life.