The Air Castle Quilt Block – Pattern is a classic patchwork design beloved by quilters for generations. It combines tradition and elegance, featuring a dynamic arrangement of triangles and squares that resemble floating shapes or drifting castle towers in the sky. Perfect for beginners yet engaging for experienced quilters, this block provides both beauty and versatility in your quilting projects.
The pattern’s simple geometry allows for creative interpretation, especially when using contrasting or coordinated fabrics. While the block may look complex at first glance, it’s built from basic shapes like half-square triangles (HSTs) and squares. This makes the Air Castle Quilt Block – Pattern approachable and satisfying to sew.
In this article, we’ll explore the history of the pattern, guide you through the tools and techniques you’ll need, and share ideas for incorporating it into full quilts and other fabric projects. Whether you’re quilting for pleasure, gifts, or even as part of a business, mastering the Air Castle Quilt Block – Pattern will add depth and charm to your repertoire.
1. The Legacy and Appeal of the Air Castle Quilt Block
The Air Castle Quilt Block has its roots in traditional American quilting, with historical records of similar designs appearing in early 20th-century quilts. Its name evokes imagery of dreamlike towers or floating fortresses—hence the “Air Castle” moniker.
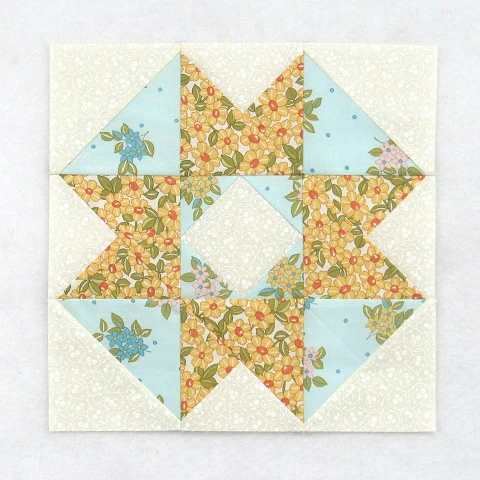
This block stands out because of its symmetry and motion. The arrangement of triangles and squares forms a star-like pattern, creating the illusion of rotation or expansion, which makes it visually striking in both single blocks and full quilt layouts.
The standard layout includes a combination of a large square in the center, surrounded by half-square triangles and corner squares. When repeated, the blocks create a sense of movement across the quilt surface, much like stars twinkling in a sky or castles suspended in clouds.
Traditionally, the Air Castle Quilt Block – Pattern was used in scrap quilts, where various fabric remnants were pieced together, giving it a unique and colorful look. Today, quilters use coordinated fabrics to bring a modern twist to this timeless design.
Another reason this block remains popular is its scalability. It can be made in different sizes—from small 6-inch blocks to large 12-inch or 15-inch ones—depending on your project needs. This flexibility allows you to create quilts, table runners, wall hangings, or even pillows.
Despite its historical significance, the Air Castle block continues to inspire creativity today. With endless color combinations and fabric styles available, each block becomes a one-of-a-kind piece of art that adds warmth and personality to your work.
2. Tools and Materials Needed for Success
To successfully make the Air Castle Quilt Block – Pattern, you don’t need a studio full of specialized equipment. In fact, most quilters already have the tools needed to bring this beautiful block to life.
First, you’ll need basic cutting tools: a rotary cutter, cutting mat, and quilting ruler. These ensure precise measurements and clean edges, especially when cutting your half-square triangles and squares. Accuracy is key to making the points align well.
Choose high-quality quilting cotton in at least two contrasting fabrics—one for the background and one for the focus shapes. If you’re feeling adventurous, use three or more fabrics to create additional layers of depth and complexity.
A sewing machine with a quarter-inch foot is extremely helpful, as most quilt blocks, including the Air Castle Quilt Block, are assembled using a ¼” seam allowance. If you’re sewing by hand, a fine needle and consistent stitch length will work just as well.
Other tools include an iron and ironing board or pressing mat. Pressing your seams flat (either open or to one side) helps your block lay smooth and makes assembly easier down the line. Always press, don’t iron—pressing sets the seams without distorting the fabric.
To mark lines for half-square triangles, use a water-soluble fabric marker or chalk pencil. These allow you to draw a diagonal guideline before stitching. This step is especially helpful for beginners working on triangle units.
Lastly, it’s a good idea to have a design wall or work surface where you can lay out your cut pieces before sewing. Seeing the layout visually helps catch errors before stitching and allows for creative experimentation with fabric placement.
3. Step-by-Step Construction of the Air Castle Quilt Block
Once you’ve gathered your materials, it’s time to start building your Air Castle Quilt Block. Though variations exist, we’ll focus on the traditional construction method using half-square triangles (HSTs), squares, and careful piecing.
Begin by cutting your fabric into the required shapes. For a 12-inch finished block, you’ll need four HSTs (usually made from two squares of contrasting fabric), one center square, and four smaller squares for the corners. Templates or downloadable patterns can help ensure sizing.
To create your HSTs, draw a diagonal line on the back of one of your squares, pair it with a contrasting square, and sew ¼” from both sides of the line. Cut along the line and press the resulting triangles open. Trim them to the correct size if necessary.
Arrange the pieces on your work surface in a 3×3 grid: place the center square in the middle, HSTs on each side pointing toward the center, and solid squares in each corner. This layout forms the iconic spinning star look of the Air Castle.
Sew the rows together horizontally—top, middle, and bottom—then press the seams. Finally, sew the three rows together to complete the block. You should now have a finished Air Castle Quilt Block with clean corners and a balanced, symmetrical look.
Check your measurements after assembling the block. It should match your intended block size (e.g., 12½ inches before seam allowances). If it’s off, adjust your cutting or seam allowance next time, as small errors can add up.
Repeat this process to make additional blocks. With consistent sewing and pressing, you’ll find that creating multiple blocks becomes faster and easier as you go.
4. Creative Ways to Use the Air Castle Block in Projects
The Air Castle Quilt Block – Pattern is incredibly versatile and can be used in countless quilting and sewing projects. Its star-like appearance and geometric balance make it perfect for both traditional and contemporary pieces.
One of the most popular ways to use the Air Castle block is in full-sized quilts. Whether you create a monochromatic look or a colorful patchwork, repeating the block in rows adds stunning visual movement across the entire quilt.
Try alternating light and dark fabrics between blocks to create a secondary pattern. When placed side-by-side, the HSTs form additional stars or diamonds, adding depth to the design. This is a favorite technique among modern quilters.
You can also use a single block as the centerpiece for a wall hanging. Add a border and some quilting, and you have an elegant decoration for your home. It’s a fast and satisfying way to showcase your skills.
Table runners are another great application. Sew three or four Air Castle blocks in a row, add a backing and some simple quilting, and you’ll have a handmade piece that elevates any dining table, especially during holidays.
Don’t overlook small projects. A single block can be turned into a quilted pillow cover, tote bag panel, or potholder. These make thoughtful gifts and are excellent for practicing new fabric combinations.
Finally, consider entering your finished quilt or block into a local quilt show or online community challenge. The Air Castle block is admired for its craftsmanship, and your interpretation could inspire others and receive well-deserved recognition.
FAQ – Air Castle Quilt Block – Pattern
Q1: What is the difficulty level of the Air Castle Quilt Block?
The block is beginner-friendly but still interesting enough for advanced quilters. It mainly involves basic shapes and techniques like half-square triangles and standard piecing.
Q2: What size is most common for this block?
A 12-inch finished block is common, but you can easily scale the pattern up or down depending on your project. Use quilting math or templates to adjust sizes accordingly.
Q3: Can I make this block using scrap fabrics?
Yes! The Air Castle block is perfect for using up scraps. Just be sure there is enough contrast between your fabrics to maintain the block’s visual structure.
Q4: How do I avoid bulky seams in the center?
Press seams open or alternate pressing directions in each row. Using a stiletto tool or seam roller also helps reduce bulk during final assembly.
Q5: What quilting designs work well with this block?
Straight-line quilting or echoing the shapes with free-motion quilting both work beautifully. You can also emphasize the spinning effect with curved motifs.
Q6: Is this block suitable for hand quilting?
Absolutely. The shapes are not overly complex, making them ideal for hand piecing and quilting. Just use a fine needle and consistent stitches.
Conclusion
The Air Castle Quilt Block – Pattern is a timeless and flexible design that offers visual interest, creative possibilities, and a satisfying sewing experience. Whether you’re stitching one block for a small project or assembling an entire quilt, this pattern is sure to add charm and elegance to your work.
We hope this guide has helped you understand the history, construction, tools, and potential of the Air Castle Quilt Block – Pattern. Have you tried it yet? Share your sincere opinion and let us know what colors or layouts you chose! We’d also love to hear your suggestions and see your unique versions of this beautifulblock. Happy quilting!