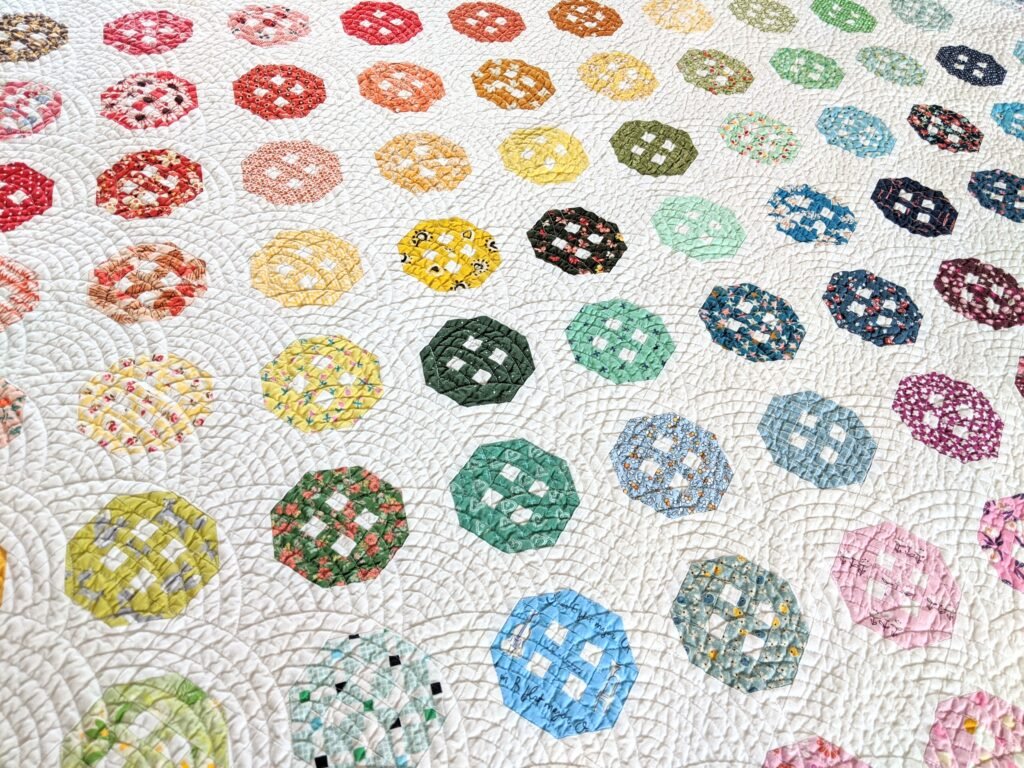
The All the Buttons Quilt is a captivating and unique quilt design that incorporates the charm and whimsy of buttons into a traditional craft.
Quilting has long been a beloved pastime for its ability to combine artistry with practicality, and the addition of buttons elevates this tradition by introducing texture, creativity, and personality.
Whether you are a quilting enthusiast or a beginner exploring new ideas, crafting an All the Buttons Quilt is a delightful way to experiment and produce something truly special.
Incorporating buttons into quilting brings endless possibilities for customization. From colorful plastic buttons to vintage wooden or metal designs, each choice adds a unique flair. Beyond aesthetics, the tactile element of buttons invites interaction and provides a three-dimensional quality that makes your quilt stand out. Plus, it’s a fantastic way to repurpose old buttons and create a sustainable, eco-friendly craft.
This article will guide you through the essentials of making an All the Buttons Quilt, including materials, techniques, and creative inspirations. Let’s explore how to bring this delightful idea to life and make a quilt that’s as fun as it is functional.
1. Getting Started with All the Buttons Quilt
Before diving into the creative process, it’s important to prepare your materials and plan your design. Starting with a clear vision and the right tools will ensure a smooth quilting journey.
- Choosing Your Fabric
The foundation of any quilt is the fabric. Select high-quality cotton for durability and ease of use. Solid colors work well for showcasing buttons, while patterns can add an extra layer of complexity and charm. - Selecting Buttons
Gather a variety of buttons in different shapes, sizes, and colors. Consider using themed buttons for a specific look, like floral or geometric designs, or go for an eclectic mix for a playful vibe. - Designing Your Layout
Sketch a design to determine where the buttons will be placed. Symmetrical patterns provide a clean, organized look, while random arrangements offer a whimsical, artistic feel. - Preparing Tools and Materials
In addition to fabric and buttons, you’ll need a sewing machine, needle, thread, scissors, a rotary cutter, and batting for the quilt. A fabric marker and ruler will help with precise measurements. - Learning Basic Quilting Techniques
If you’re new to quilting, familiarize yourself with basic techniques such as piecing, layering, and binding. These are the building blocks for creating a successful quilt. - Planning Your Time
Quilting is a time-intensive craft, especially with the added step of attaching buttons. Set realistic goals and enjoy the process without rushing.
2. Techniques for Incorporating Buttons into Your Quilt
Adding buttons to your quilt requires careful planning and execution to ensure durability and aesthetic appeal. Here are some tips to help you master this process.
- Sewing Buttons Securely
Use strong thread to attach buttons, ensuring they are firmly secured. For quilts that will see frequent use, double-threading is recommended for extra durability. - Spacing Buttons Evenly
Consistent spacing enhances the quilt’s overall appearance. Use a ruler and fabric marker to map out button placements before sewing. - Creating Button Clusters
Group buttons together to form clusters or shapes, like flowers or stars. This technique adds visual interest and makes the quilt more dynamic. - Mixing Materials
Experiment with combining buttons of different textures, such as glossy, matte, or metallic finishes. Mixing materials adds depth and contrast. - Incorporating Functional Buttons
Consider using functional buttons that can open or close certain parts of the quilt. For example, you can create hidden pockets or foldable sections. - Avoiding Overcrowding
While buttons are beautiful, less is sometimes more. Leave enough space between buttons to ensure the quilt remains comfortable and visually balanced.
3. Creative Ideas for All the Buttons Quilt Designs
The beauty of an All the Buttons Quilt lies in its endless design possibilities. Let your imagination guide you as you create a quilt that reflects your personality.
- Themed Quilts
Choose a theme, such as nature, holidays, or geometric patterns, and select buttons and fabrics that align with it. For instance, use flower-shaped buttons for a garden-themed quilt. - Monogram or Initial Quilts
Spell out initials or words using buttons as your “letters.” This personalized touch is perfect for gifts or keepsakes. - Rainbow Quilt
Arrange buttons in a gradient or rainbow pattern for a colorful, eye-catching design. Pair with neutral fabric to make the colors pop. - Vintage Style
Repurpose old buttons from thrift stores or family collections for a vintage-inspired quilt. Pair with muted fabrics for a classic look. - Interactive Quilts
Create quilts with movable buttons or flaps that reveal hidden designs. These are especially fun for children’s quilts. - Minimalist Designs
For a modern aesthetic, use buttons sparingly on a plain background. This approach highlights the buttons as focal points.
4. Caring for Your All the Buttons Quilt
Proper care ensures that your quilt stays beautiful and functional for years to come. Here’s how to maintain it effectively.
- Washing Guidelines
Wash the quilt gently by hand or use a delicate cycle on your washing machine. Avoid harsh detergents that can weaken the fabric or damage buttons. - Drying Recommendations
Air-dry the quilt flat to prevent buttons from loosening or breaking. Avoid using a dryer, as the heat can damage some button materials. - Inspecting for Loose Buttons
Regularly check for loose buttons and reattach them promptly to avoid losing any during use or washing. - Storing Properly
Store the quilt in a cool, dry place. Avoid direct sunlight, which can fade fabrics and buttons over time. - Repairing Wear and Tear
Over time, quilts may develop minor issues such as frayed fabric or missing buttons. Keep spare buttons on hand and repair as needed. - Displaying with Care
If you plan to display your quilt, use a quilt hanger or lay it flat on a protected surface to avoid stretching or wear.
FAQ About All the Buttons Quilt
Q: Can I use any type of button for an All the Buttons Quilt?
A: Most buttons work well, but avoid fragile or sharp-edged buttons that could damage the fabric or become uncomfortable.
Q: How do I attach buttons to a quilt securely?
A: Use a strong thread and double-knot the stitches. Sewing through the quilt’s batting adds extra security.
Q: Are button quilts practical for everyday use?
A: Yes, but they require gentle handling. Consider using fewer buttons for functional quilts and more for decorative ones.
Q: Can I machine-wash an All the Buttons Quilt?
A: Use a delicate cycle and place the quilt in a laundry bag for added protection. Hand washing is preferable for intricate designs.
Q: How long does it take to make an All the Buttons Quilt?
A: The time varies based on the size and complexity of the design. Expect several weeks for a large quilt with many buttons.
Q: Where can I find unique buttons for my quilt?
A: Look in craft stores, thrift shops, or online marketplaces for a wide variety of buttons. Vintage buttons add a special touch.
Conclusion
Crafting an All the Buttons Quilt is a wonderful way to combine creativity, functionality, and sustainability. From selecting fabrics and buttons to designing intricate layouts, every step offers a chance to express yourself and create something meaningful. Whether you’re making a decorative piece or a functional quilt, the possibilities are endless.
Have you tried making an All the Buttons Quilt? Share your experiences, feedback, and ideas in the comments below! We’d love to see your creations and hear your thoughts.