Designing an American-style Quilted Placemat – Pattern is one of the most rewarding projects for any sewing enthusiast looking to combine utility with classic home aesthetics. These handmade pieces do more than just protect your dining table; they serve as a canvas for creativity, allowing you to experiment with colors, textures, and geometric shapes. By following a structured American-style Quilted Placemat – Pattern, you can transform simple fabric scraps into a professional-grade set that rivals high-end boutique decor.
The beauty of the American-style Quilted Placemat – Pattern lies in its versatility and the timeless “Americana” feel it brings to a kitchen. Traditionally characterized by bold blocks, intricate topstitching, and durable batting, these placemats are designed to withstand daily use while maintaining their visual appeal. Whether you prefer a rustic farmhouse look or a sleek modern finish, mastering the foundational techniques of this American-style Quilted Placemat – Pattern will elevate your tabletop presentation significantly.
In this comprehensive guide, we will explore every essential step to creating your own high-quality American-style Quilted Placemat – Pattern. From selecting the right cotton fabrics and quilt batting to mastering the binding techniques that ensure a crisp edge, we have curated the best SEO-friendly tips to help your project succeed. Understanding the mechanics of a well-constructed American-style Quilted Placemat – Pattern is the first step toward building a collection of functional art that your family will cherish for years to come.
1 Understanding the American-style Quilted Placemat – Pattern Essentials
To begin your journey with an American-style Quilted Placemat – Pattern, you must first understand the structural components that define this specific craft. A standard American placemat typically measures around 13 by 19 inches, providing ample space for a full dinner setting including cutlery and glassware. The quilt sandwich is the heart of the project, consisting of a decorative top layer, a middle layer of insulating batting, and a sturdy backing fabric.
Selecting high-quality 100% cotton fabric is crucial for this American-style Quilted Placemat – Pattern because cotton is heat-resistant and washes exceptionally well. Since these items will inevitably face spills and crumbs, using a pre-washed fabric prevents future shrinkage and keeps your quilted design flat and symmetrical. Many crafters choose fat quarters for the top layer to ensure a cohesive yet varied color palette across a set of four or six mats.
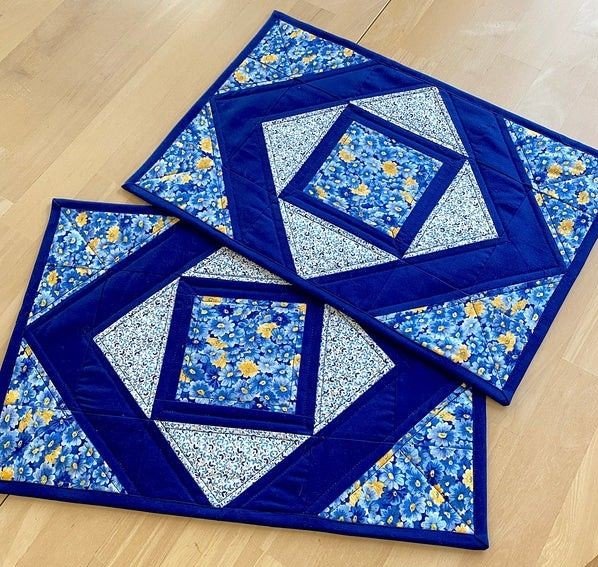
The “Pattern” aspect of the American-style Quilted Placemat – Pattern refers to the mathematical arrangement of fabric pieces to create a visual motif. Common choices include the Log Cabin, Flying Geese, or simple Strip Piecing methods which are hallmark styles in American quilting history. By following a precise cutting list, you ensure that each component fits perfectly, reducing the need for aggressive trimming later in the process.
Another vital element is the seam allowance, which is almost universally 1/4 inch in the world of quilting. Maintaining a consistent seam is what separates a beginner project from a professional-looking American-style Quilted Placemat – Pattern. Using a specific quilting foot on your sewing machine can help you stay on track, ensuring that your points align and your edges remain perfectly straight.
We must also consider the role of thread choice in your American-style Quilted Placemat – Pattern. A 50-weight cotton thread is usually preferred because it is strong enough to hold the layers together without adding unnecessary bulk to the seams. Choosing a thread color that either blends with the fabric or provides a high-contrast decorative stitch can completely change the final aesthetic of your dining set.
Finally, the American-style Quilted Placemat – Pattern requires a thoughtful approach to the internal padding. Low-loft cotton batting is the gold standard here, as it provides enough heat protection for your table without making the placemat so puffy that wine glasses become unstable. Once you have these essentials gathered, you are ready to move into the preparation and cutting phase of your DIY project.
2 Material Preparation and Precision Cutting Techniques
Preparation is the secret ingredient to a flawless American-style Quilted Placemat – Pattern. Before making your first cut, it is highly recommended to starch your fabrics; this adds a bit of stiffness that makes rotary cutting much more accurate. Using a self-healing cutting mat and a sharp rotary cutter will allow you to produce clean, crisp edges that are vital for the geometric accuracy of the American-style Quilted Placemat – Pattern.
When executing the American-style Quilted Placemat – Pattern, always “measure twice and cut once” to avoid wasting your precious textiles. For a standard rectangular mat, you will need to cut your backing and batting at least one inch larger than your finished top. This “overage” accounts for the quilting shrinkage that occurs when the three layers are stitched together, preventing the backing from becoming too small.
Organizing your cut pieces into “kits” for each placemat helps maintain consistency throughout the American-style Quilted Placemat – Pattern. If you are using a patchwork design, label your strips or squares according to the pattern’s diagram. This level of organization is especially helpful if you are working on a large set, as it ensures that the color distribution remains balanced across every single piece.
The American-style Quilted Placemat – Pattern often involves repetitive shapes, so consider using acrylic quilting templates to speed up the process. These clear rulers allow you to see the fabric grain through the tool, ensuring that your motifs are cut “on grain” to prevent warping. Precision at this stage is what allows the quilt blocks to lay perfectly flat once they are joined together.
Don’t forget the binding strips, which are a critical part of the American-style Quilted Placemat – Pattern. For a standard finish, cut strips 2.5 inches wide, which will be folded in half to create a durable, double-fold binding. You can cut these on the cross-grain for straight edges or on the bias if you decided to give your placemats rounded corners for a softer look.
Lastly, give all your cut pieces a final press with a steam iron. Heat sets the fibers and ensures that there are no hidden folds or wrinkles that could distort the American-style Quilted Placemat – Pattern during the assembly phase. Now that your pieces are perfectly prepped, you can move on to the sewing machine to bring your quilted masterpiece to life.
3 Step-by-Step Assembly and Quilting the Layers
Assembling the American-style Quilted Placemat – Pattern begins with the piecing of the top layer. Align your fabric segments right sides together and sew using that critical quarter-inch seam. After each row is completed, press the seams to one side—usually toward the darker fabric—to prevent “shadowing” where the seam allowance shows through the lighter colors of your quilted top.
Once the top is finished, it is time to create the quilt sandwich. Lay your backing fabric face down, place the batting on top, and finally center your pieced top face up. To keep these layers from shifting during the American-style Quilted Placemat – Pattern process, use curved safety pins or a temporary spray adhesive. Proper “basting” is essential for a smooth finish without unsightly puckers on the back.
Now comes the actual quilting, which is where the American-style Quilted Placemat – Pattern truly gains its character. For a classic look, try straight-line quilting or a “stitch in the ditch” technique where you sew directly into the seams. If you want more texture, a cross-hatch grid spaced 1 inch apart provides a traditional American aesthetic that feels both sturdy and sophisticated.
Using a walking foot is highly recommended when quilting your American-style Quilted Placemat – Pattern. This attachment feeds the top and bottom layers through the machine at the same rate, preventing the “shoving” effect that often leads to wrinkles. Slow and steady wins the race here; maintaining a consistent speed will ensure your quilt stitches are uniform in length and tension.
Feel free to get creative with your quilting motifs. Some modern interpretations of the American-style Quilted Placemat – Pattern use free-motion designs like pebbles or swirls to add movement to the fabric. However, if you are a beginner, sticking to geometric lines that follow the patchwork seams is the safest way to ensure a high-quality, professional result on your first try.
After the quilting is complete, “square up” your placemats. This involves using your large square ruler to trim away the excess batting and backing, ensuring every corner is a perfect 90-degree angle. This step is the final preparation before the binding, and it is what gives the American-style Quilted Placemat – Pattern its clean, store-bought silhouette while maintaining its handmade soul.
4 Finishing Touches and Binding Your Placemats
The final stage of the American-style Quilted Placemat – Pattern is the binding, which seals the raw edges and adds a decorative frame to your work. Start by sewing your binding strips together into one long continuous piece using diagonal seams to reduce bulk. Fold the strip in half lengthwise and press it well; this “French-fold” binding is the most durable choice for items that require frequent laundering.
Attach the binding to the front of the American-style Quilted Placemat – Pattern by aligning the raw edges of the strip with the raw edge of the mat. Use a mitered corner technique to ensure the corners look sharp and professional. When you reach the point where the ends meet, tuck one end into the other for a seamless finish that hides the start and stop points of your sewing journey.
Once the binding is sewn to the front, flip it over to the back of the American-style Quilted Placemat – Pattern. You can choose to finish this by hand using a blind stitch for an invisible look, or use your machine to “topstitch” the binding in place for extra speed and durability. Machine binding is often preferred for placemats because it stands up better to the heavy-duty cycle of a washing machine.
After the binding is secure, give the entire project a “hero press” with a hot iron. This sets the stitches into the fabric and gives the American-style Quilted Placemat – Pattern a flat, crisp appearance. You might also consider adding a personalized label to the back, noting the date and the creator, which turns a simple kitchen accessory into a potential family heirloom.
Caring for your completed American-style Quilted Placemat – Pattern is simple but important. Wash them in cold water on a gentle cycle and tumble dry on low heat. Because you used high-quality quilting cotton, the mats will actually become softer and develop a beautiful “crinkle” over time, which is a hallmark of authentic American quilting that many collectors adore.
By following this American-style Quilted Placemat – Pattern, you have created more than just a place to put a plate; you have practiced precision, color theory, and textile engineering. These skills can now be applied to larger projects like full-sized quilts or decorative wall hangings. Your dining room is now refreshed with a touch of handmade elegance that reflects your unique style and dedication to the craft of sewing.
FAQ – Frequently Asked Questions
1. What is the best size for an American-style Quilted Placemat – Pattern?
The standard size for most dining tables is 13″ x 19″ or 12″ x 18″. This provides enough room for a dinner plate, a napkin, and silverware without overlapping with the person sitting next to you.
2. Can I use polyester batting for this project?
While you can use polyester, cotton or a cotton-blend batting is better for an American-style Quilted Placemat – Pattern. Cotton is flatter, more heat-resistant, and won’t “beard” (fibers poking through) as much as some cheap polyesters.
3. How many fat quarters do I need for a set of four placemats?
Usually, 4 to 6 fat quarters are enough to create a varied patchwork top for four mats, depending on the complexity of your American-style Quilted Placemat – Pattern. You will still need additional yardage for the backing and binding.
4. Do I need to pre-wash my fabric?
Yes, pre-washing is highly recommended. Cotton can shrink up to 5%, and red or dark blue fabrics might bleed. Pre-washing ensures your American-style Quilted Placemat – Pattern stays perfect after its first real wash.
5. Is a walking foot absolutely necessary?
It is not mandatory, but it is highly recommended. A walking foot ensures that the multiple layers of your American-style Quilted Placemat – Pattern move together, preventing shifting and puckering during the quilting process.
6. How do I make my corners perfectly square?
Use a large acrylic quilting square. After quilting but before binding, align the ruler’s grid with your interior seams and trim the edges. This is the most important step for a professional American-style Quilted Placemat – Pattern finish.
Conclusion
In this guide, we have covered the entire journey of creating a high-quality American-style Quilted Placemat – Pattern, from the initial selection of 100% cotton fabrics to the intricate details of mitered corner binding.
We learned that the secret to a great placemat lies in precision cutting, the use of proper tools like the walking foot, and the art of creating a balanced “quilt sandwich.” By mastering these SEO-friendly techniques, you have gained the skills to create a durable, beautiful, and functional set of table linens that bring a touch of traditional American craftsmanship into the modern home.