The Baby Bunny Ball – Pattern is one of the most charming and delightful projects any crochet enthusiast or knitter can embark on when looking to create a gift for a newborn or a toddler. This specific design merges the simplicity of a round, easy-to-grasp ball with the adorable features of a woodland rabbit, resulting in a toy that is both functional and incredibly cute. By using a Baby Bunny Ball – Pattern, crafters can produce a high-quality, handmade nursery item that encourages tactile development and sensory play, making it a favorite for baby showers and first birthdays alike.
Working with a Baby Bunny Ball – Pattern allows for immense creativity while maintaining a structure that is accessible even to those who are still perfecting their stitching techniques. The beauty of the “ball” shape is that it serves as a sturdy base, ensuring the toy rolls gently across the floor, which helps babies practice their crawling and reaching skills. Throughout this guide, we will delve into the specifics of how the Baby Bunny Ball – Pattern is constructed, focusing on the two main elements: the Baby Bunny Ball, which is the physical plush toy, and the Pattern, which provides the mathematical instructions and stitch counts needed to achieve the perfect spherical shape.
Whether you are making this for your own child or as a heartfelt gift for a friend, following a professional Baby Bunny Ball – Pattern ensures that the final product is safe, durable, and aesthetically pleasing. We will explore the best materials to use, the technical steps involved in shaping the bunny’s ears and tail, and how to assemble the pieces for a professional finish. By the end of this article, you will see why the Baby Bunny Ball – Pattern has become a staple in the DIY toy community, offering a perfect blend of whimsy and practical design that stands the test of time.
1. Choosing Safe and Soft Materials for Your Baby Bunny Ball
The first step in executing a successful Baby Bunny Ball – Pattern is selecting the right yarn and stuffing, as safety is the highest priority for baby toys. It is highly recommended to use organic cotton yarn or a high-quality bamboo blend because these fibers are hypoallergenic and gentle on a baby’s sensitive skin. Since babies often explore toys with their mouths, choosing a yarn that is free from harmful chemicals and doesn’t shed fibers is an essential part of the Baby Bunny Ball – Pattern preparation process.
In addition to the outer fabric, the internal structure of your Baby Bunny Ball depends on the type of stuffing you choose. Most crafters following a Baby Bunny Ball – Pattern opt for premium polyester fiberfill because it is washable and retains its shape well over time. To add an extra sensory element, some people include a small internal rattle box inside the stuffing. This turns your Baby Bunny Ball into a musical discovery toy, though you must ensure the rattle is securely encased so it cannot be reached by the child.
Colors play a significant role in the visual appeal of your Baby Bunny Ball – Pattern. While classic whites and soft grays are traditional for bunnies, don’t be afraid to experiment with pastel mints, dusty roses, or even vibrant primary colors to stimulate a baby’s developing vision. When choosing colors for your Baby Bunny Ball, ensure that the dyes are colorfast, meaning they won’t bleed or fade when the toy inevitably needs to be tossed in the washing machine after a day of play.
The tools you use are just as important as the materials when following a Baby Bunny Ball – Pattern. For crochet versions, a smaller-than-usual hook (such as a 2.5mm or 3.0mm) is often suggested to create a tight tension. This “amigurumi style” of stitching ensures that the stuffing doesn’t peek through the holes and, more importantly, prevents small fingers from pulling the filling out. A high-quality Baby Bunny Ball – Pattern will always specify the gauge to help you achieve this dense, safe fabric.
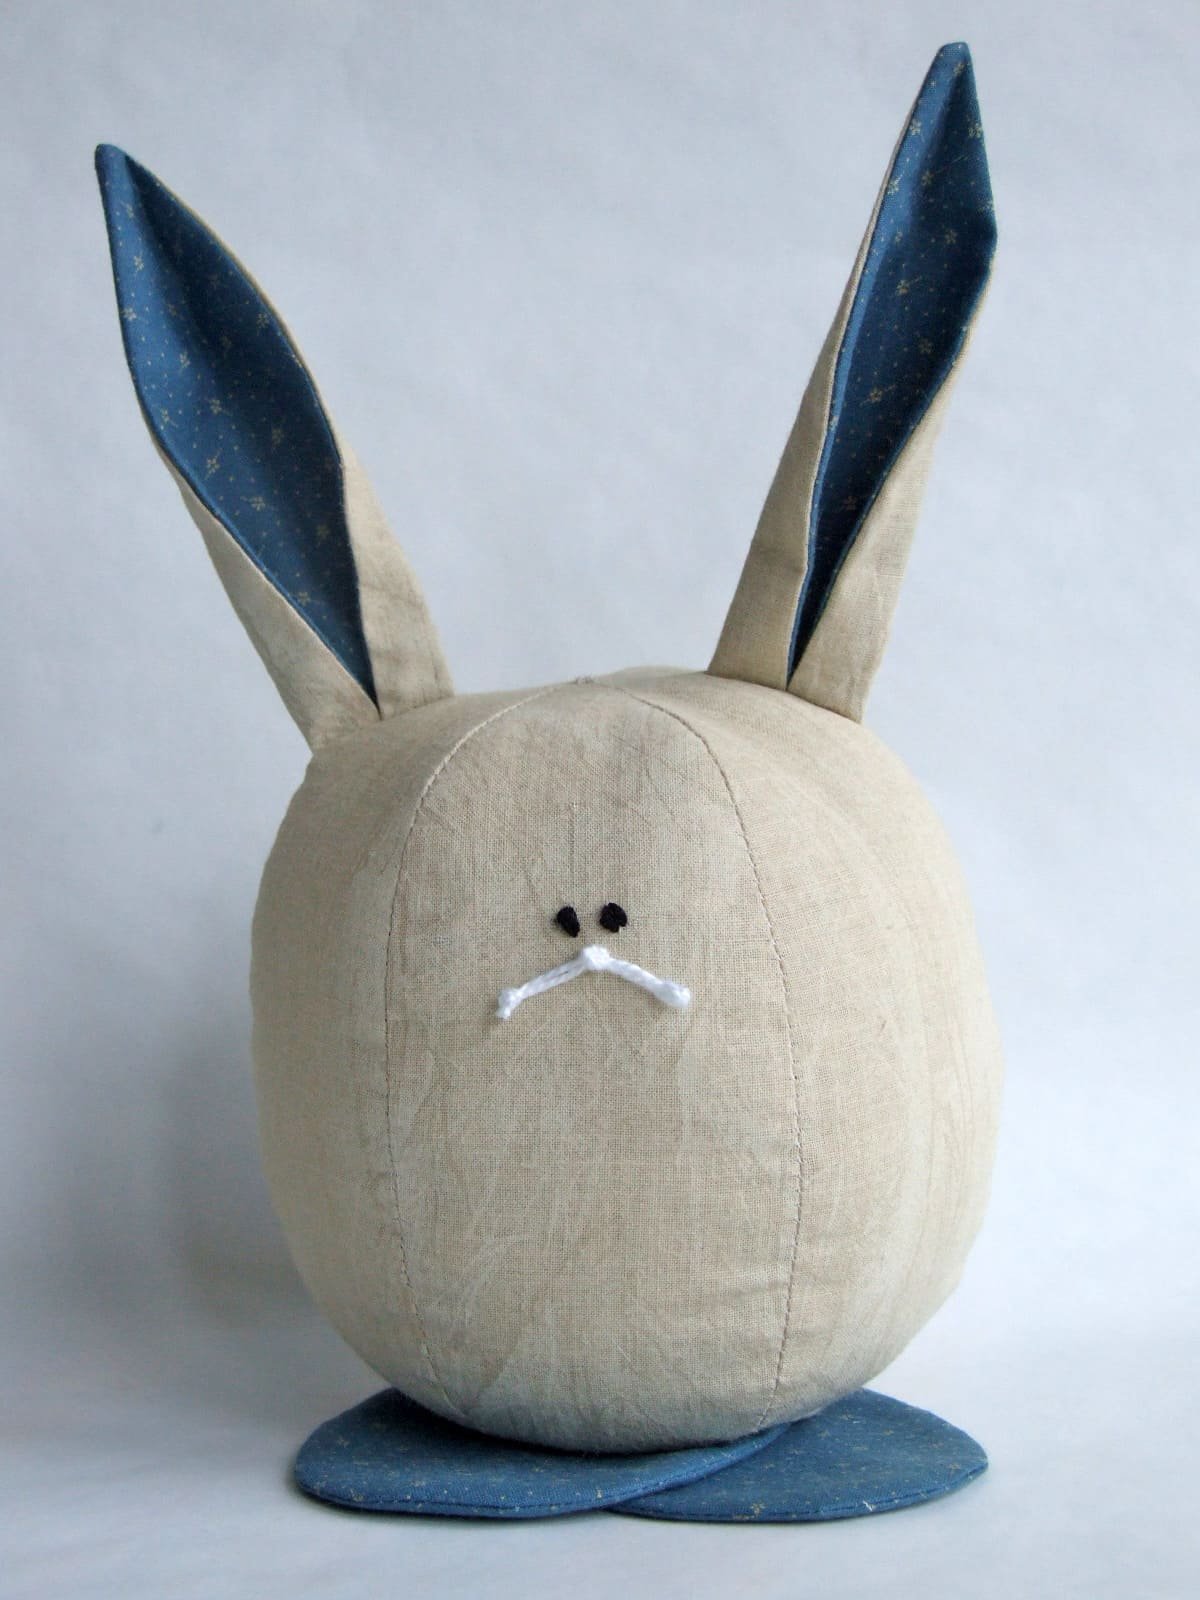
Safety eyes are a common feature in many toy designs, but when following a Baby Bunny Ball – Pattern for a very young infant, embroidered eyes are the much safer choice. Small plastic parts can pose a choking hazard if they become loose. By using a simple satin stitch with black or dark brown embroidery floss, you can give your Baby Bunny Ball a sweet, sleepy expression that is 100% safe for all ages, maintaining the integrity of the Pattern while prioritizing security.
Lastly, consider the “washability” factor of your chosen notions. A Baby Bunny Ball will likely become a “lovey” that travels everywhere, from the car seat to the park. Therefore, choosing materials that are marked as machine washable and dryable ensures that the toy remains hygienic. Following the Baby Bunny Ball – Pattern with durable materials means the toy can be passed down to siblings, becoming a cherished family heirloom that survives the rigors of childhood.
2. Understanding the Spherical Construction of the Pattern
The core of the Baby Bunny Ball – Pattern is the geometric construction of a perfect sphere. In crochet, this is achieved through a series of consistent increases and decreases. You begin at the top with a magic ring, which allows for a seamless start without a hole in the middle. As you follow the Baby Bunny Ball – Pattern, you will gradually add stitches in each round to expand the circle into a dome, which eventually forms the body of the Baby Bunny Ball.
Precision in counting is vital when working through the middle section of the Baby Bunny Ball – Pattern. These “even rounds” are what give the bunny its height and roundness. If you skip a stitch or add an extra one, your Baby Bunny Ball might end up looking more like an egg or a disc. Many experienced makers use a stitch marker at the beginning of every round to keep their place in the Pattern, ensuring the symmetry of the sphere is maintained from start to finish.
The decrease phase of the Baby Bunny Ball – Pattern is where the shape begins to close. Using an invisible decrease technique is highly recommended here. Unlike a standard decrease, the invisible version is almost undetectable in the finished fabric, leaving your Baby Bunny Ball smooth and professional. This technical detail is a hallmark of a well-executed Baby Bunny Ball – Pattern, as it prevents the “ridges” that can sometimes appear at the bottom of a spherical toy.
Once the body is nearly closed, the Pattern will instruct you to add the stuffing. It is important to stuff the Baby Bunny Ball firmly but not so much that the stitches stretch apart. A perfectly stuffed Baby Bunny Ball should bounce back when squeezed but still feel soft enough for a baby to cuddle. The Baby Bunny Ball – Pattern usually provides guidance on when to insert the rattle or chime if you are choosing to include those sensory features.
The ears are the next major component of the Baby Bunny Ball – Pattern. Usually, these are worked as long, flat ovals or pointed tubes. The Pattern will specify whether you want “loppy” ears that hang down or “perky” ears that stand up. To make the ears stand up on a Baby Bunny Ball without using wire (which is unsafe for babies), the Pattern might suggest a tighter stitch or a specific way of folding the base of the ear before sewing it to the head.
Finally, the tail of the Baby Bunny Ball adds the perfect finishing touch and provides a different texture for the baby to hold onto. Most Baby Bunny Ball – Pattern designs suggest a small pom-pom made of the same yarn or a tiny crocheted sphere. This small detail at the back of the Baby Bunny Ball completes the 360-degree visual appeal of the toy, making it look adorable from every angle as it rolls across the nursery floor.
3. Customizing Your Baby Bunny Ball with Unique Details
One of the joys of using a Baby Bunny Ball – Pattern is the ability to customize the toy to match a specific nursery theme. You can add tiny embroidered flowers near the ears or give the bunny a little bowtie. These personal touches turn a standard Baby Bunny Ball into a unique creation. When modifying a Pattern, just remember to keep all additions soft and securely fastened so they don’t interfere with the toy’s safety for small children.
Texture is another area where you can get creative with your Baby Bunny Ball – Pattern. While the body might be smooth cotton, you could use a fuzzy chenille yarn for the ears or the tail. This “multi-texture” approach is highly beneficial for a baby’s sensory development. Mixing different yarns within the same Baby Bunny Ball project makes the Pattern more engaging to work on and results in a more sophisticated finished product.
You can also adapt the size of your Baby Bunny Ball – Pattern by simply changing your yarn weight and hook size. If you use a bulky velvet yarn, you will end up with a large, huggable Baby Bunny Ball that acts as a floor pillow. If you use a fine lace-weight yarn, you can create a miniature version that works as a keychain or a stroller toy. The mathematical proportions of the Pattern remain the same, regardless of the scale.
For a more modern look, try using a minimalist color palette for your Baby Bunny Ball – Pattern. High-contrast colors like black, white, and red are scientifically proven to be the most visible to newborns. A Baby Bunny Ball designed with these stark contrasts can be a great visual stimulation tool. Even a simple Pattern can look very high-end and contemporary when you choose sophisticated, muted tones like terracotta, sage, or mustard.
Adding a “heart” inside your Baby Bunny Ball is a sweet tradition many makers follow. Before closing the Baby Bunny Ball – Pattern, you can tuck a small crocheted heart or a piece of felt with a handwritten note inside the stuffing. While the baby won’t see it, it adds a layer of sentimental value to the Baby Bunny Ball, making it a “secretly” special gift that carries a lot of meaning for the parents.
Don’t forget that the Baby Bunny Ball – Pattern can be adjusted to create other animals too! By changing the ear shape and tail, the same spherical Pattern used for the Baby Bunny Ball can become a cat, a bear, or even a chick. This versatility makes the Baby Bunny Ball – Pattern a valuable template to have in your library, as it serves as a foundation for an entire collection of “Ball Animals” for a nursery.
4. Tips for Assembling and Finishing Your Crochet Toy
The assembly stage of the Baby Bunny Ball – Pattern is where the magic really happens, but it requires patience to get the features symmetrical. Using pins to hold the ears and tail in place before sewing is a crucial step. It allows you to look at the Baby Bunny Ball from the front and sides to ensure nothing is crooked. A well-aligned Baby Bunny Ball looks much more professional and “store-quality” than one where the ears are unevenly placed.
When sewing the pieces together, use a long yarn needle and the “whip stitch” or “ladder stitch.” The Baby Bunny Ball – Pattern usually recommends using the yarn tails left over from the ears and tail for sewing. This ensures the color matches perfectly and the connection is strong. When attaching parts to the Baby Bunny Ball, go through both the piece and the body stitches several times to ensure it can withstand a baby’s curious tugging.
Hiding your yarn ends is the final technical hurdle in the Baby Bunny Ball – Pattern. Instead of just cutting the thread, “weave” it through the middle of the Baby Bunny Ball and out the other side several times before snipping. This creates friction inside the stuffing that prevents the tail from ever unravelling. A finished Baby Bunny Ball should have no visible knots or loose threads, giving it a clean and polished appearance.
If you find that your Baby Bunny Ball is slightly lopsided after stuffing, you can “massage” it into shape. Because the Pattern creates a flexible fabric, you can often roll the Baby Bunny Ball between your hands like a ball of dough to distribute the stuffing more evenly. This simple trick can fix minor irregularities and ensure your Baby Bunny Ball – Pattern results in a perfectly round and bouncy friend.
For those who plan to sell their creations, adding a personalized fabric label to the bottom of the Baby Bunny Ball is a great touch. You can sew it on near the tail. This identifies you as the maker and adds to the “boutique” feel of the item. Even though you followed a Baby Bunny Ball – Pattern, your unique handiwork deserves to be recognized, and it adds a professional finish that customers love.
Lastly, always perform a “stress test” on your finished Baby Bunny Ball. Give the ears and tail a firm (but not destructive) pull to make sure they are securely attached. Once your Baby Bunny Ball – Pattern is complete and tested, give it a quick steam or a gentle wash to settle the stitches. Your Baby Bunny Ball is now ready to be loved, played with, and cherished by its new little owner!
Frequently Asked Questions (FAQ)
Is the Baby Bunny Ball – Pattern suitable for absolute beginners?
Yes! The Baby Bunny Ball – Pattern is an excellent project for beginners because it focuses on the basic sphere shape. If you know how to do a single crochet, an increase, and a decrease, you have all the skills needed to complete the Baby Bunny Ball. It is a great way to learn amigurumi basics.
How long does it take to complete one Baby Bunny Ball?
Depending on your speed and experience, a Baby Bunny Ball – Pattern can usually be finished in 2 to 4 hours. The body of the Baby Bunny Ball is the fastest part, while the ears and the assembly of the facial features usually take a bit more focused time.
Can I use safety eyes on a Baby Bunny Ball?
While many patterns use safety eyes, they are generally not recommended for toys intended for children under three years old. For a Baby Bunny Ball, embroidery is the safest and most durable option. If you do use safety eyes, ensure they are the highest quality and installed correctly.
What is the best way to clean a Baby Bunny Ball?
If you used cotton or acrylic yarn and polyester stuffing as suggested in the Baby Bunny Ball – Pattern, you can hand wash the toy in cool water with a mild detergent. Air drying is best to help the Baby Bunny Ball maintain its perfectly round shape.
Why does my Baby Bunny Ball have holes where the stuffing shows?
This usually happens if your crochet hook is too large for your yarn. To fix this in your next Baby Bunny Ball – Pattern attempt, try using a hook that is 0.5mm or 1mm smaller than what the yarn label recommends. This will create a tighter, denser fabric.
Can I make a Baby Bunny Ball using knitting needles instead of a crochet hook?
Absolutely! While this article focuses on the crochet version, there are many Baby Bunny Ball – Pattern variations designed specifically for knitters. The construction is similar, usually involving knitting a flat piece that is then seamed into a ball or using double-pointed needles to knit in the round.
Conclusion
The Baby Bunny Ball – Pattern is more than just a craft project; it is a gateway to creating a meaningful, safe, and beautiful toy that can provide hours of joy to a child.
Throughout this article, we have explored the importance of selecting high-quality, baby-safe materials, the technical steps of spherical construction, and the various ways you can customize and finish your project to make it truly your own. By following a structured Baby Bunny Ball – Pattern, you ensure that your finished Baby Bunny Ball is durable enough for play and soft enough for snuggles.